
Cami has written a wonderful tutorial for an 8″x8″ gift card holder recently shown at a SU regional seminar. Go and check it out! Her samples are gorgeous and fun…like all her work!
May 312007
The birds Lori send me were just too adorable to lay down. I made another card with it.
A lot of times I start out designing by picking the image. Next I look for a layout. I went back to the Sketch This blog and picked their newest design #14.

Once I have the image and the layout, I think about what paper or background I want to use. I take my image and lay it on top of paper, that I think would work, to see how it looks.
I had cut this gorgeous My Mind’s Eye paper up about four weeks ago for a sketch I never finished. I thought it was a good time to use it. I sanded the edges of my patterned paper with my sanding block. Next I used my new favorite stamp from All in A Row to add the faux stitching.
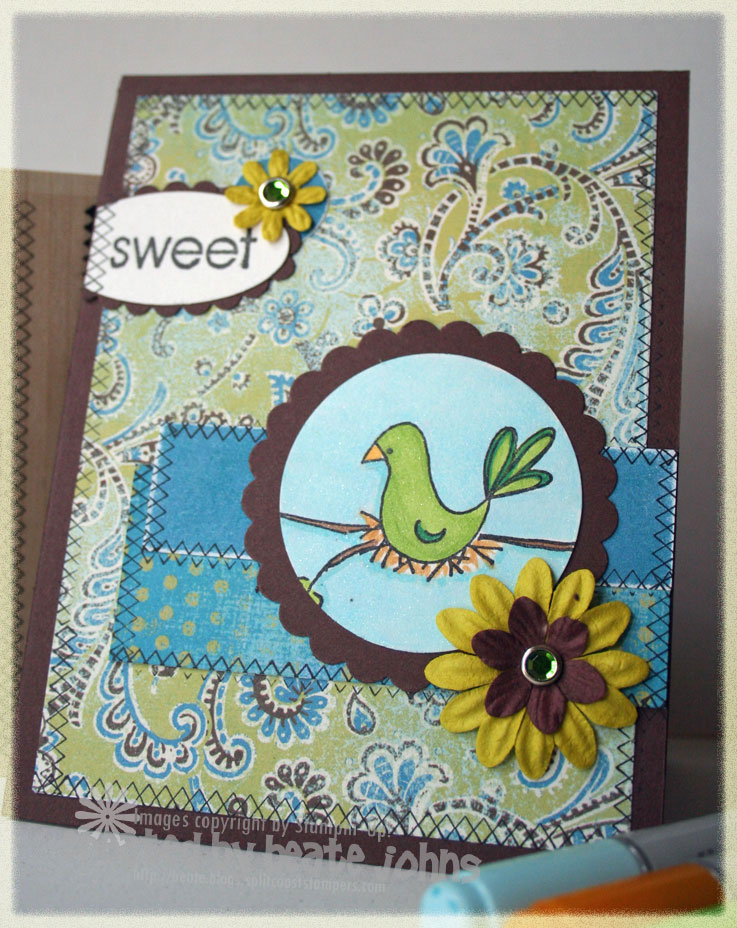
For the main image, I pulled out Copic Marker that I think would work good with the paper and colored the bird. I used YG03 Yellowish Green and GG09 Blue green for the bird, E77 Maroon for the tree branch, YE12 Yellow Ochre for the nest, Y17 Golden Yellow for the beak and B00 Frost Blue for the sky. I added shadow lines with B02 Robin’s Egg Blue. Remember, I am still a beginner with those markers. I color in my image once, and then once again to even out the ink. Next I add another layer, where I want some shading.
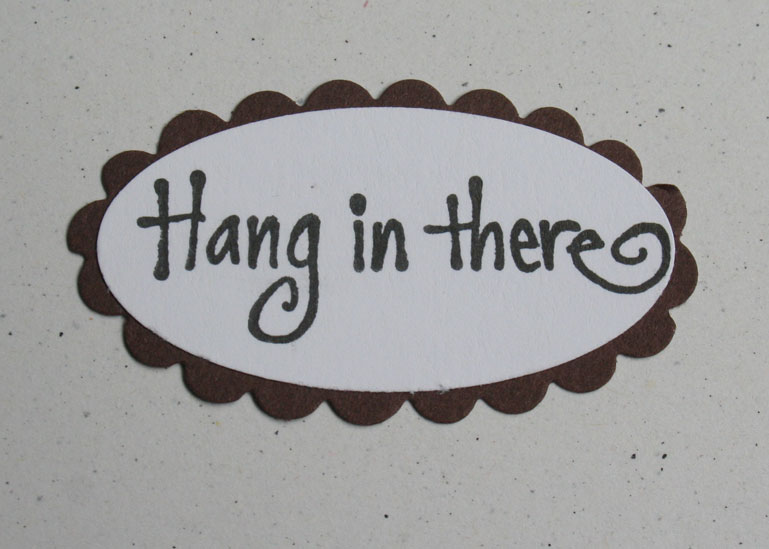
I stamped the word Sweet from Sweet Shapes on Shimmery white cardstock, punched it out with the large oval punch from Stampin’ Up!, layered it on Chocolate Chip cardstock and cut around it with decorative scissors. Then I cut off the right side, added Faux Stitching and taped it on my card.
To add some bling and make it look more finished, I added Prima Flowers from the Moda Collection with green jewel brads. The package didn’t contain a small flower in just the right color. So I took a bigger one and punched the smaller flower out with the Spring Flower punch.
I bought the Jewel brads in a scrapbook store in San Antonio. I am not sure who made it.
Fun idea for Alcohol based Markers:
- Color your brads with it. (I did make one brad chocolate chip, but then decided to use another bling brad instead.)
- Color your prima’s with it. (Did that too, but it turned out too green for my purpose.)
- Color your ribbon with it. Check out StampOwl’s tutorial! The ribbon won’t leak color afterwards, like when you use classic ink. You won’t seal the ribbon afterwards like when you use chalk!
May 312007
I used Random Org to pick the winner of the raffle. I let it pick a number from 1-335 and it chose #273. I counted backwards and the winner is:
Carol Says: I love your blog and check it everyday! You are a great inspriation! I’d like to see some altered projects…maybe coasters… Thanks!
Thank you all for giving me some great ideas!
I will definitely continue with the sketch challenges. I love participating in those myself.
May 312007
Lori send Sharon, Angel, Jenn and me some gorgeous Whipper Snapper birds. Those were created by our fellow SCS member and former DD girl Anna Wight. She also send PURPLE designer paper. Those of you who don’t know me very well might not know that I strongly dislike purple and never use it. EVER!!!! But here I go. The challenge was definitely challenging.
I looked through my saved card layouts and found this wonderful sketch from the Sketch This blog. If you haven’t been there, hop on over. They have some great sketches. I decided to use their sketch challenge #8.
To tone the purple down I started with a white card base. Next I looked through my big stash of patterned paper stash to find a scrap that would work with the main paper. I decided on this strip from Daisy D’s. I had previously used some of the paper for Bee cards. I have my patterned paper scraps in a manila file folder. I think I have to follow Amy’s lead and start putting them next to my table in a plastic box. The folder is getting a bit too full and I am sure that way I would use more scraps then.
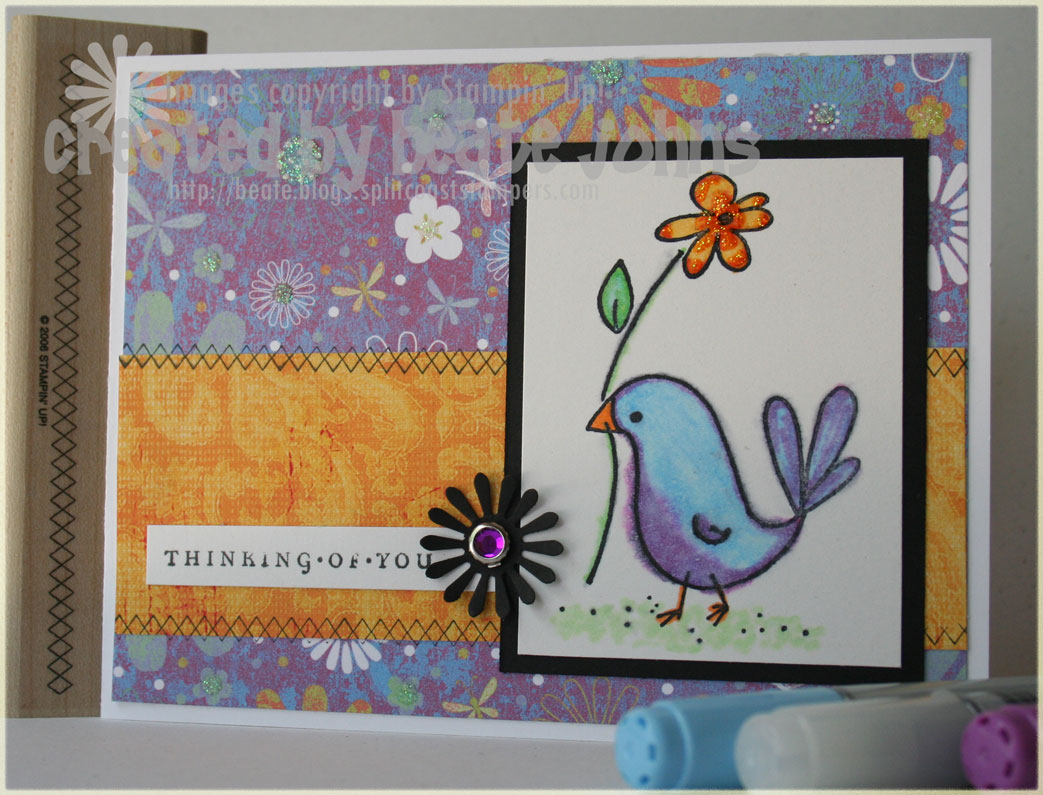
My new favorite thing is to use the Argyle Stamp from All in A Row for Faux Stitching. I just love the way it looks. I added my Faux Stitching in black to tie in the black from the stamped image.
I am still playing around with my new Copic Markers trying to find out what works best. I colored the little bird first with BG00 Frost Blue and then added (the dreaded) purple with (I think) V17 Amethyst. Then I used the Colorless Blender over the colors. Well, I found out that it doesn’t work too well on shimmery white paper. It made the colors fade out a bit and not really run together, but out of my lines. I still liked it. It looked a bit watercolored to me. So I left it in.
I have talked since then to Kim from My Favorite Things. She said the blending pen works best with either Waussaw Exact Matte coded paper or Georgia Pacific cardstock. I will have to run to Walmart and pick some of that up.
I punched out a flower out of black cardstock with the Spring Flower punch and added a PURPLE jewel brad into it’s center. The saying is from Take Three.
The paper Lori send had glitter on it. To incoorporate it in my image, I added some orange peel Stickles on the flower.
Thanks Lori for the gorgeous images and a (cough, cough) fun challenge. No more purple please! LOL
May 312007
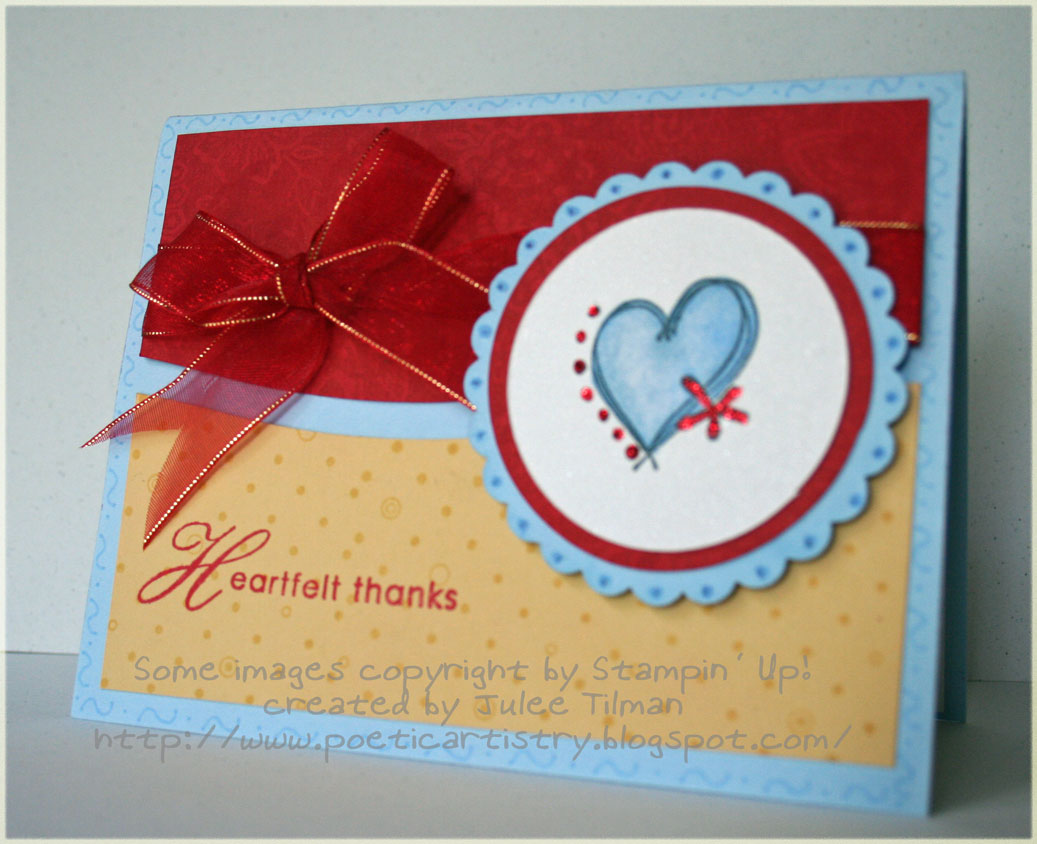
Julee Tilman send me this beautiful card. My photograph doesn’t give it justice. Check out her bow. I am so bow impaired. Julee’s is absolutely perfect!
You can read more about it on her blog Poetic Artistry. I love Julee’s work. She is an amazing artist. Thank you so much Julee!!!
Fun game of Secret Squares
Amuse
Comments Off on Fun game of Secret Squares
May 302007
Head on over to A Muse Palooza. They have a fun game of secret squares going on!
Hollywood Squares – A Muse Style! We’ve chosen one of our Crew to hold a secret prize. Who do you think has the prize? If you guess the correct A Muse Crew member, you move on to the next round of the game. For round two, we’ll mix things up, add a new prize, and you’ll get to guess again. We’ll keep going until we have one winner who will then receive all the prizes revealed in each round of the game!!
You must be registered at www.amuseapalooza.com to play. To enter, leave a comment on this post with your guess (one entry per person) before this round of the game ends at midnight Pacific time Monday June 4th. Then check back on Tuesday to see if you move on to round two!
May 302007
Today’s tutorial on Splitcoast is for a technique you probably all know already. But since we didn’t have it yet in the splitcoast resource section, I decided to write a tutorial on Poppin’ Pastels.

I started by stamping the flower heads from You Make Me Happy with VersaMark on my whisper white cardstock circle. I used sponge dauber to apply Pixie Pink and So Saffron Chalks over them. Then I stamped the stamps and flower centers with VersaMark and added Chocolate Chip Chalk in the flower center and Certainly Celery on the stems.
To show off the VersaMarker for the tutorial, I used it on the rest of the cardstock circle and added Bashful Blue Chalk all around it.
Last I outlined the flower heads and the cardstock circle itself with doodles I made with the chocolate chip marker.
The rest of the card is easy and fast. I wanted to keep the main focus on the Chalked flowers. The card base is Certainly Celery cardstock. I stamped the top half with the background stamp from You Make me Happy In Certainly Celery classic ink. I added Au Chocolat Designer paper on the bottom half. The bottom corners are punched with the ticket corner punch. I love to do that. I think it justs adds a nice touch to the simple layout.
The ribbon is Stampin’ Up!’s Rose grosgrain.
The saying is from You Make me Happy as well. It’s stamped on Whisper white in Chocolate chip. I punched it out with large oval punch and cut around it with scallop decorative scissors.
May 302007
Rita Ryer send me this gorgeous card to congratulate me on my 200,000 blog hits. I think that I might use this layout for a sketch challenge one day. I love it.
I love everything about this card. It’s wonderful different layout, the paper piercing, the use of Mini Mates and the big Hi five in the center. Thank you so much Rita. You spoil me! Big cyber hug!


