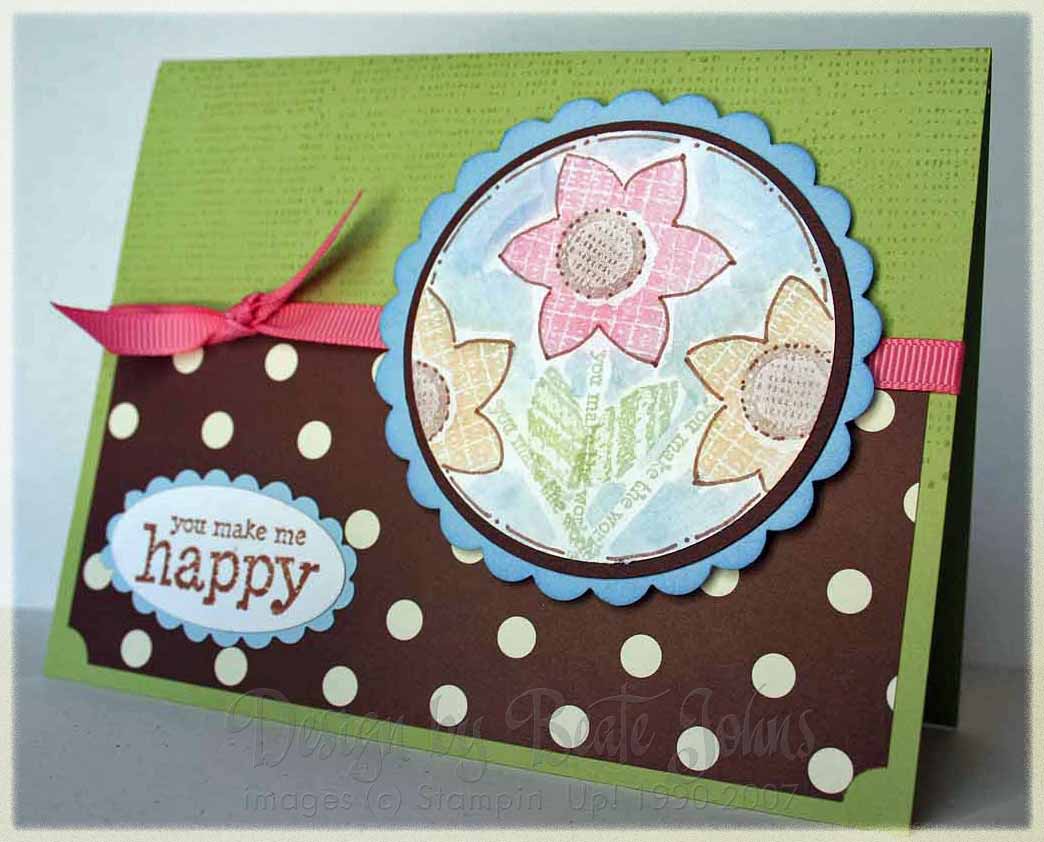
Today’s tutorial on Splitcoast is for a technique you probably all know already. But since we didn’t have it yet in the splitcoast resource section, I decided to write a tutorial on Poppin’ Pastels.
I started by stamping the flower heads from You Make Me Happy with VersaMark on my whisper white cardstock circle. I used sponge dauber to apply Pixie Pink and So Saffron Chalks over them. Then I stamped the stamps and flower centers with VersaMark and added Chocolate Chip Chalk in the flower center and Certainly Celery on the stems.
To show off the VersaMarker for the tutorial, I used it on the rest of the cardstock circle and added Bashful Blue Chalk all around it.
Last I outlined the flower heads and the cardstock circle itself with doodles I made with the chocolate chip marker.
The rest of the card is easy and fast. I wanted to keep the main focus on the Chalked flowers. The card base is Certainly Celery cardstock. I stamped the top half with the background stamp from You Make me Happy In Certainly Celery classic ink. I added Au Chocolat Designer paper on the bottom half. The bottom corners are punched with the ticket corner punch. I love to do that. I think it justs adds a nice touch to the simple layout.
The ribbon is Stampin’ Up!’s Rose grosgrain.
The saying is from You Make me Happy as well. It’s stamped on Whisper white in Chocolate chip. I punched it out with large oval punch and cut around it with scallop decorative scissors.
14 Responses to “Back to the basics”
Sorry, the comment form is closed at this time.


This is just adorable Beate! I LOVE the colors you used! So sweet!
What a fun card! I love the colors.
Your chalked flowers are beautiful, as is your card! Love it!
Beautiful card! I love the soft look of the chalking!!!
Great card for the Poppin’ Pastel technique, B — you really revived this technique for me!
Thanks so much for sharing this – you’re card looks lovely! My son and I just used this technique to make birthday invites for his 4th birthday. I stamped the dinosaur stamp (his choice, of course!) with versamark, then let him do the “popping” – he LOVED it and was so proud of himself and his “magic pictures”! Such a great technique for making really smashing cards like yours and easy enough to do with the kiddos, too! (sorry, no picture of the cards… though I would have loved to post on my blog. I went to take a picture, and he got all wierd and said they were “just for me and my friends” – what a hoot! but I’m respecting his wishes… though it pains me as proud mom to do it!) sorry for such a long comment, guess I was prompted to share here since I couldn’t on the blog! 🙂
aw man… just realized the link to my blog was totally wrong… in case you care, it’s correct now!
I really like the popping pastels, but for some reason don’t use them very much. I certainly need to get busy!
Haven’t used this technique in a while and anxious to give it a try. Thanks for reminding us of all the wonderful ways to add color to our projects.
die Anleitung ist klasse…. man kann auch einfachen Haarlack zum fixieren nehmen….
Such a pretty card Beate, love the brown paper with the green. Loved your toot too 🙂
Beautiful card. I love the chalks, but I rarely use them. I think I will have to bust them out this weekend. Thanks for the inspiration!
Thanks for the tutorial….what is the best way to “color” with the pastels doing this technique…should you dab or lightly rub? I always seem to make a mess!! I guess I should play with it more! 🙂
Love this card. It is so beautiful. Thanks for the tutorial over at SCS.