
Do you own a Bind It All (BIA) and you haven’t used it yet? Are you thinking about purchasing a BIA and you aren’t sure if you would like it?
I enjoy making these little Address books. They aren’t hard and don’t cost much once you have the BIA.
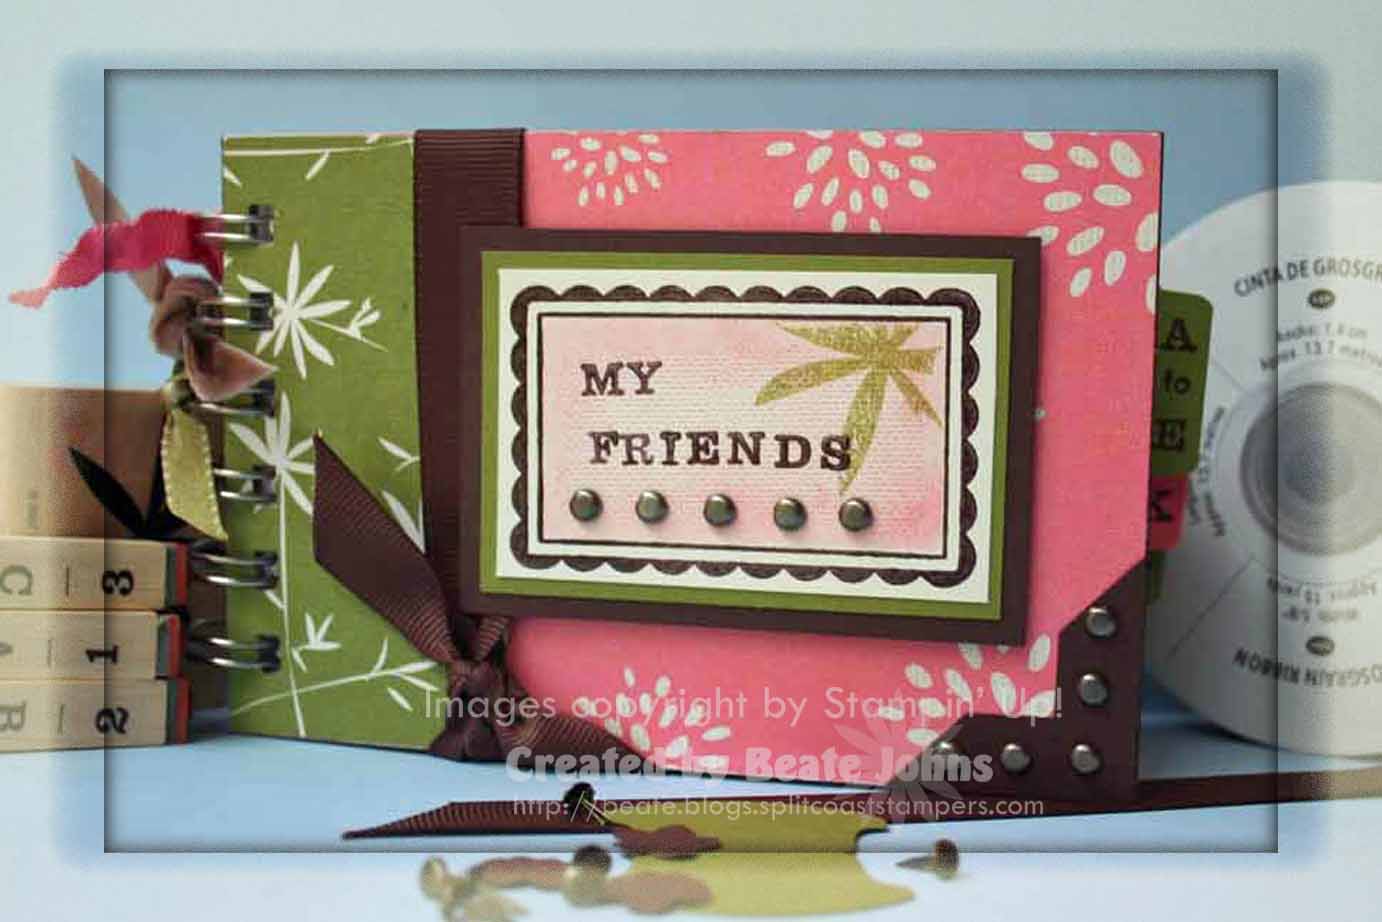
I really like how this book turned out. Here is the receipe:
Stamps: Linen, Simple Serif Alpha, Label Classic, Flowers & Flourish
Ink: Cameo Coral, Old Olive and Chocolate Chip Classic ink, Chocolate Chip Craft ink
Paper: Cameo Coral, Very Vanilla, Old Olive and Chocolate Chip cardstock, Linen Prints Designer Paper
Acc.: BIA, 7/8″ silver wire, 5/8″ chocolate grosgrain ribbon, Ribbon Originals Beach front, Theatre and Fairytale, Clear Embossing powder, photo corner punch, vintage brads, SS and EE brads, Three for you Punch
If you are interested to see just how easy these booklets are, click on more and check out my quick tutorial.
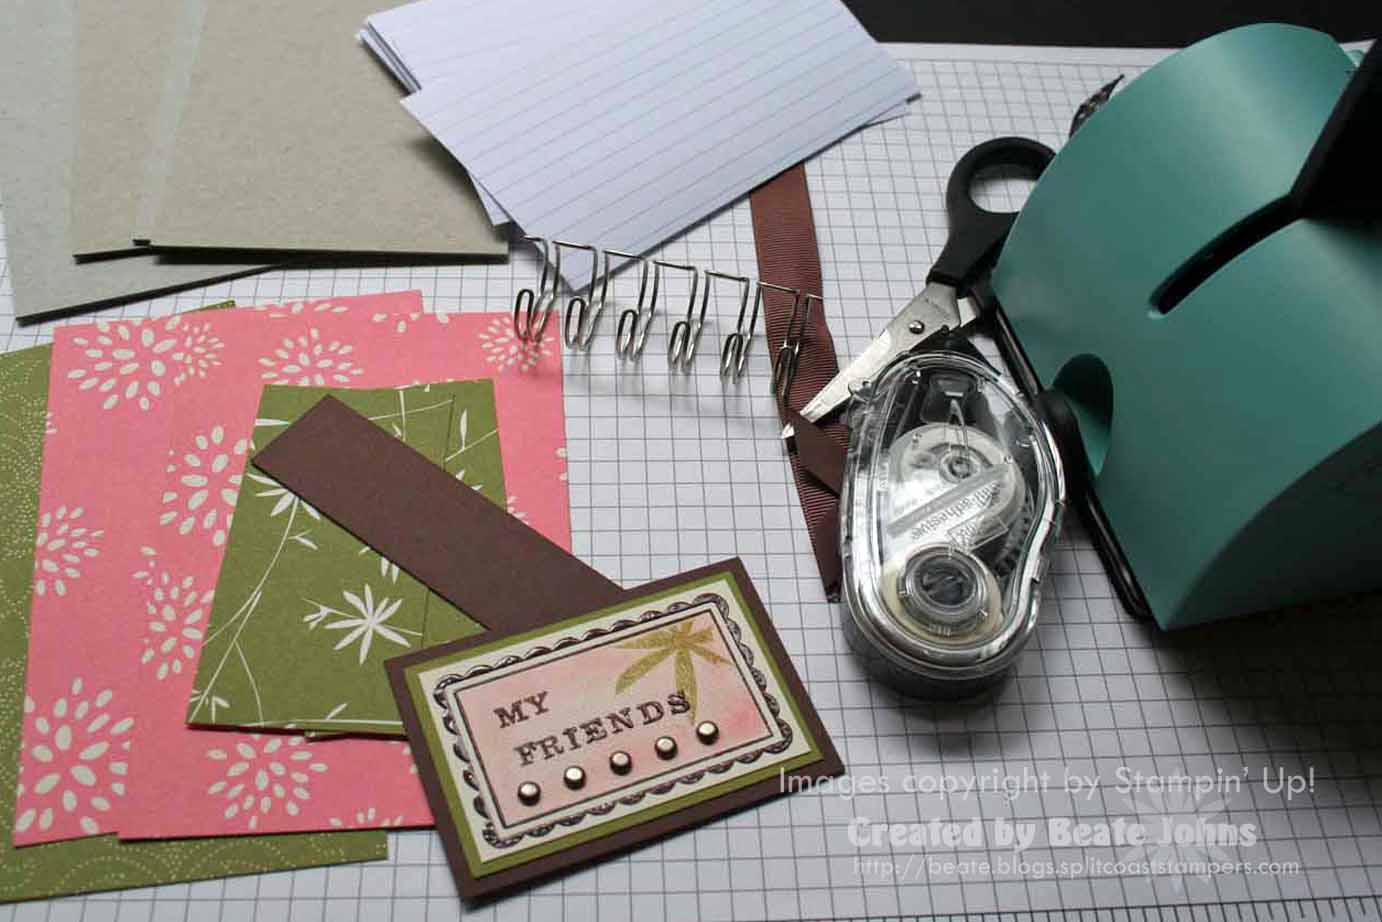
Supplies:
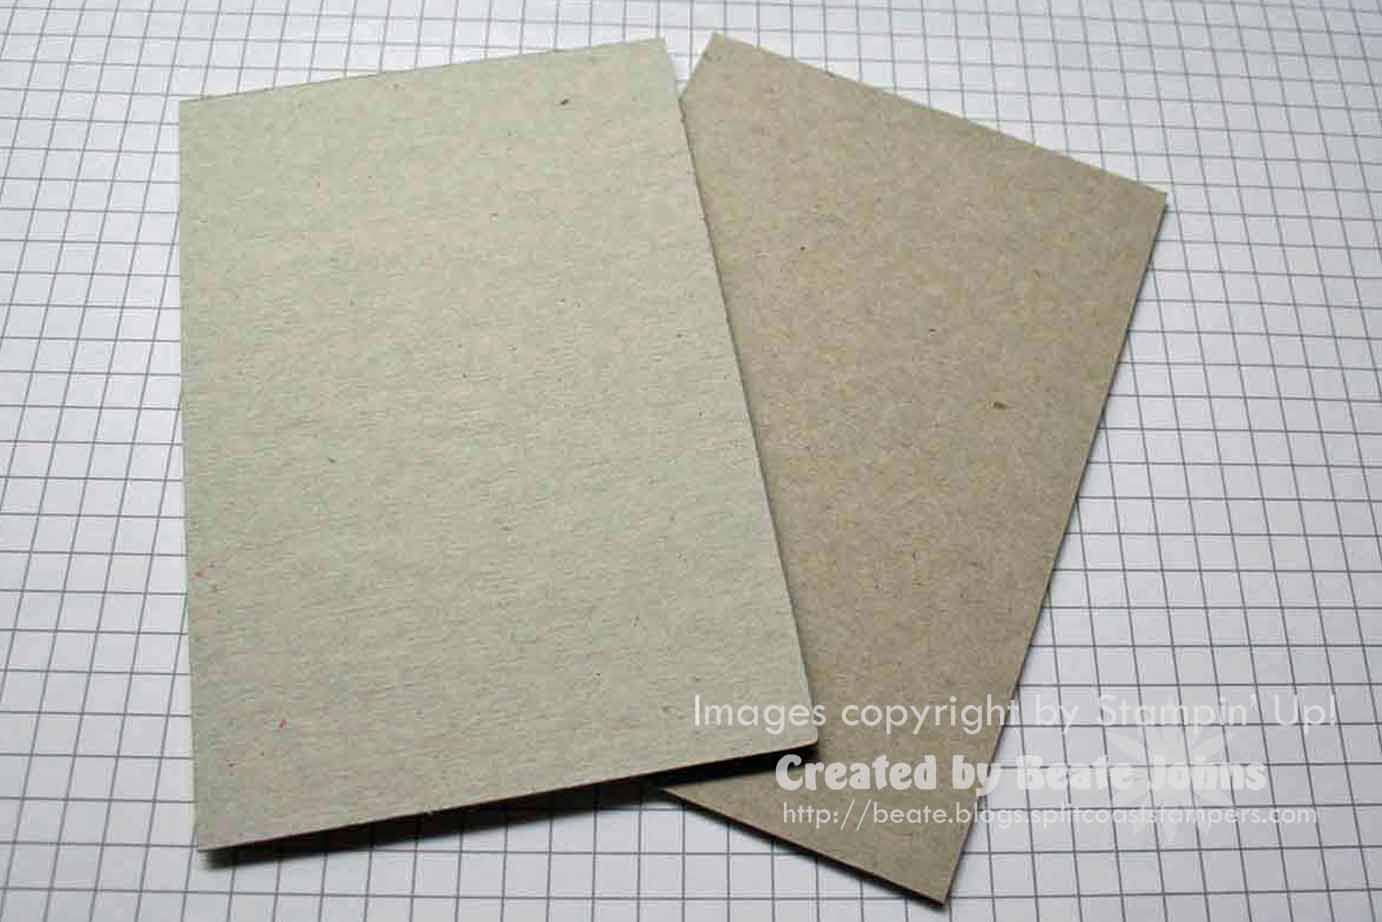
- 4 pieces of 3 1/2″ x 5 1/4″ cardboard (I cut mine with my Carls Cutter. You could also use a Quilting rotary cutter and ruler)
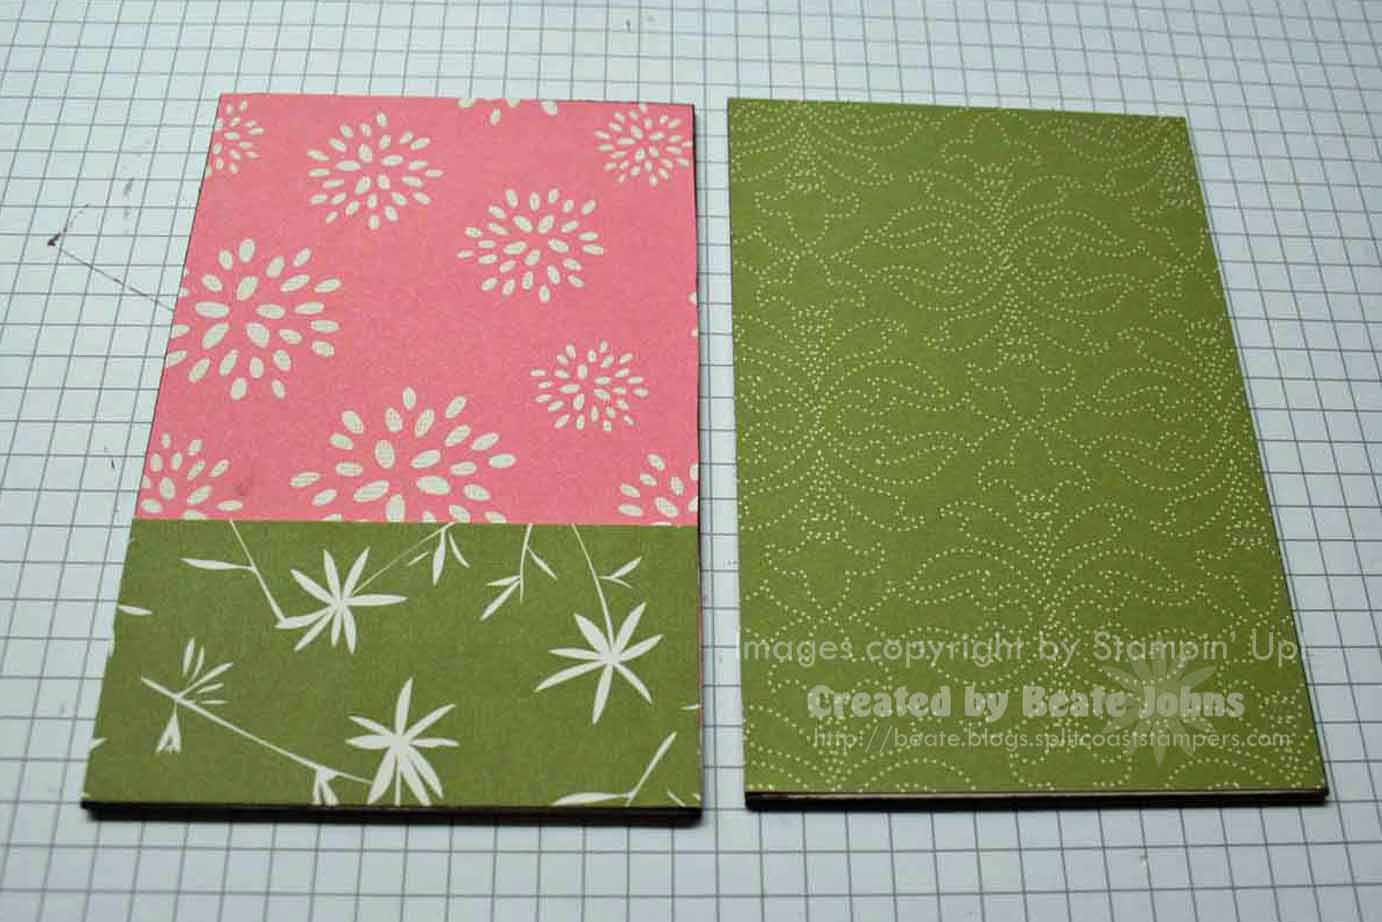
- 4 pieces of 3 1/2″ x 5 1/4″ designer paper to cover both sides of front and back cover
- additional designer paper, ribbon, other accents to decorate the cover
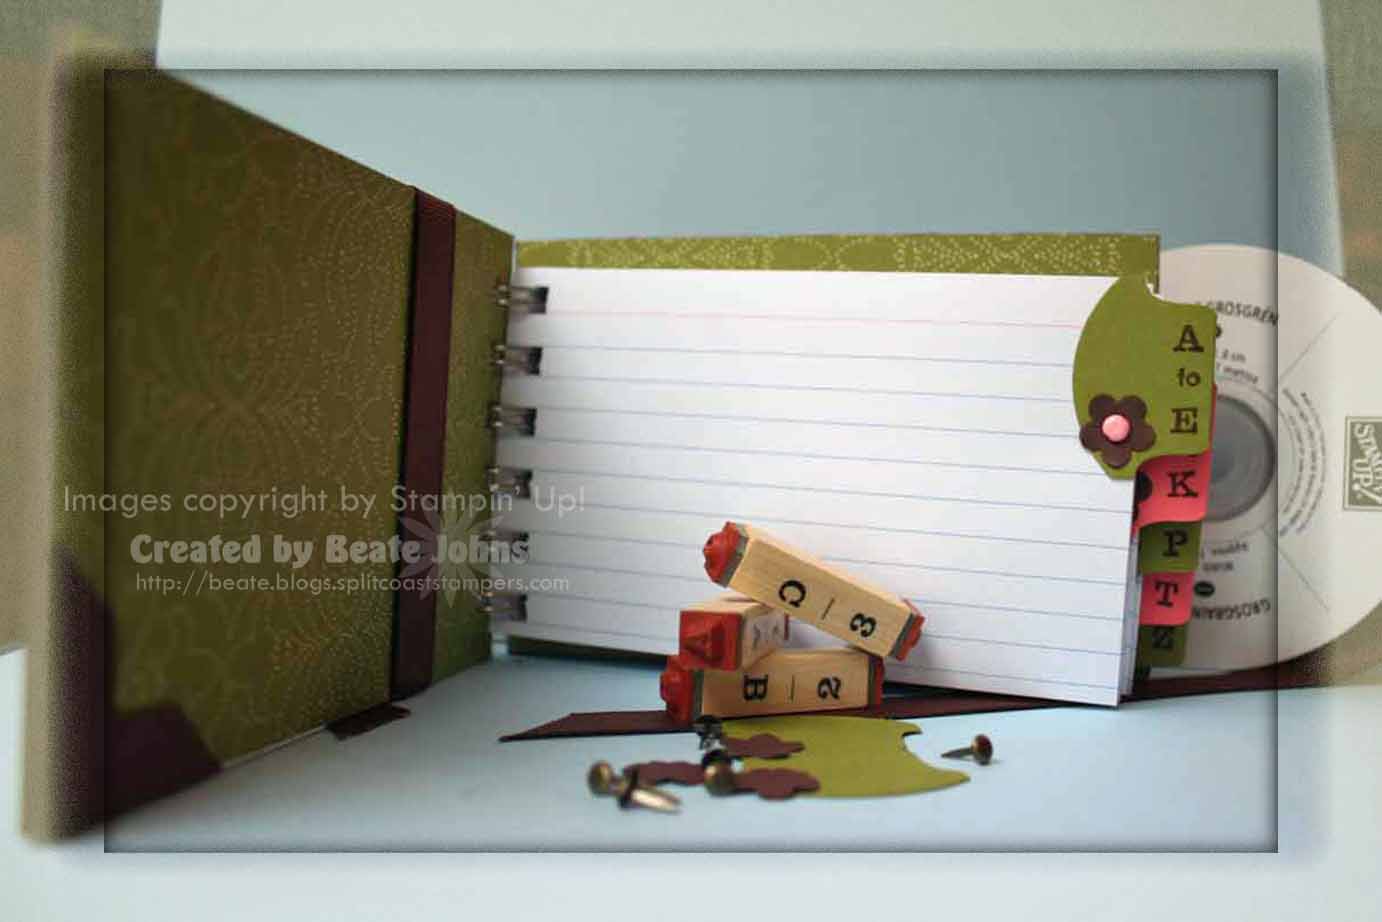
- 3″ x 5″ index cards for pages
- Bind it all and wire (I used 7/8″ wide wire for 40 pages)
- optional: Round tab punch to make dividers

Step one:
Add mono adhesive or an adhesive of your choice on one of the cardboard pieces.
Step two:
Press a second piece of cardboard on top to make one of the covers.
If you are using chipboard, you don’t have to do this. I used free cardboard that came with my postage stamp order.
Step three:
Repeat step one and two to make your second cover piece.

Step four (optional):
Ink up the sides of your covers with craft or classic ink. When using craft ink, make sure they are completely dry before going on to the next step.
Step Five:
Cover both the inside as well as the outside of your covers with your Designer paper.
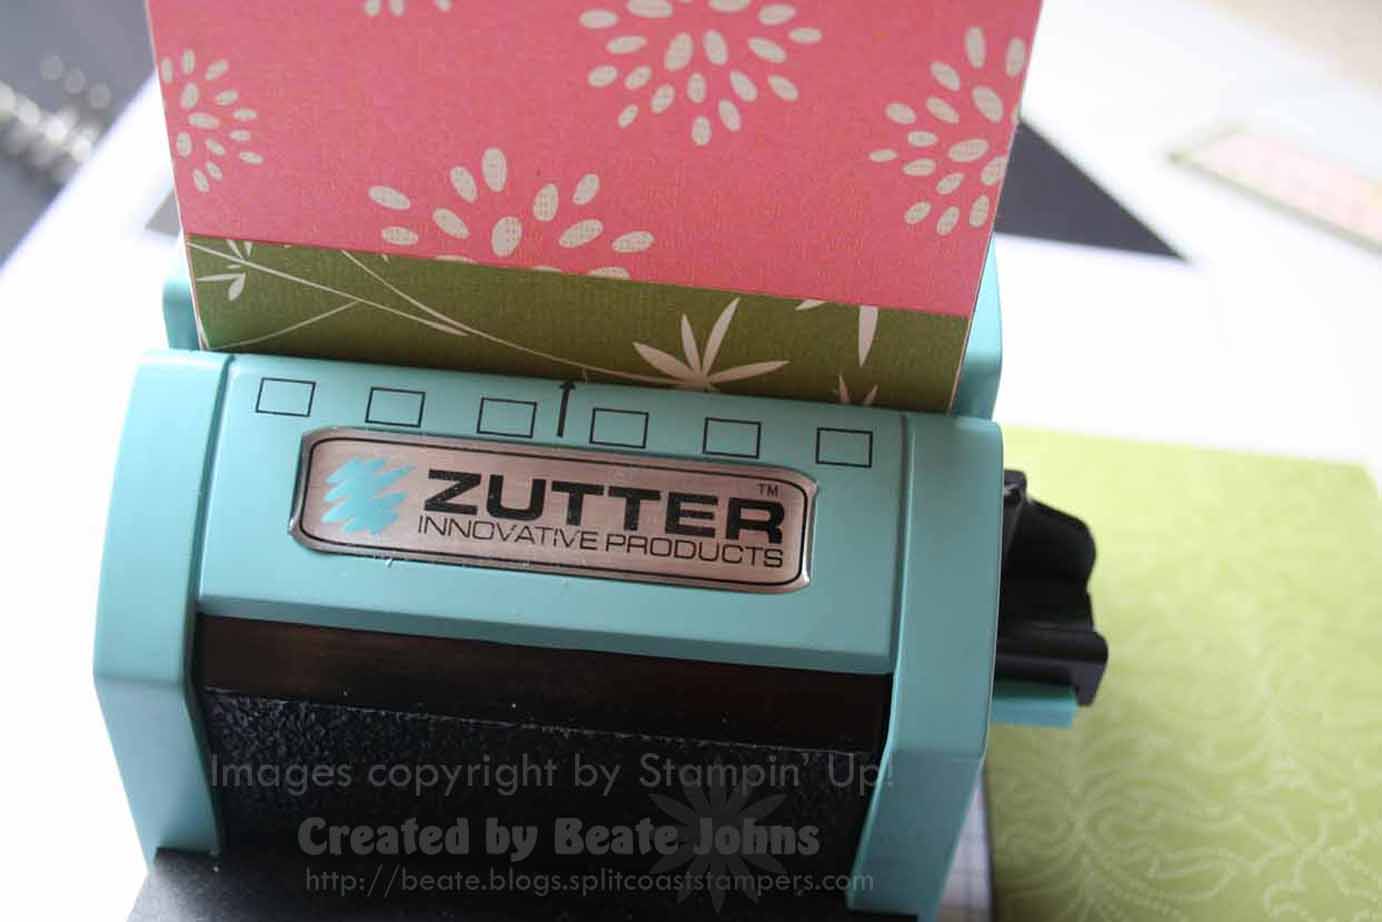
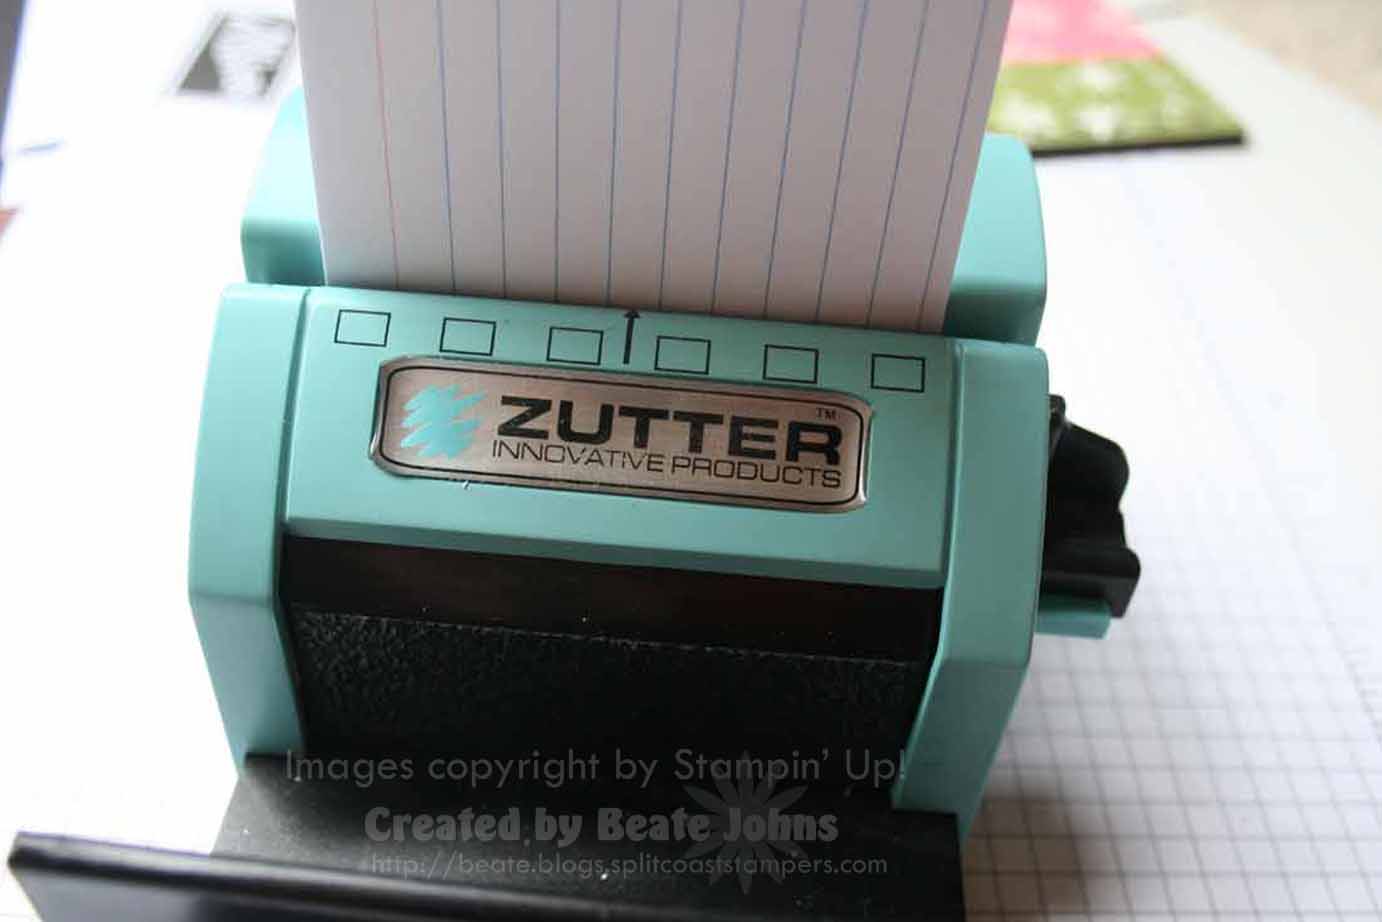
Step six:
Slide your front cover in your BIA . Your outside of the front cover should face the Zutter label. Center the cover and press the lever down to make your binding holes.
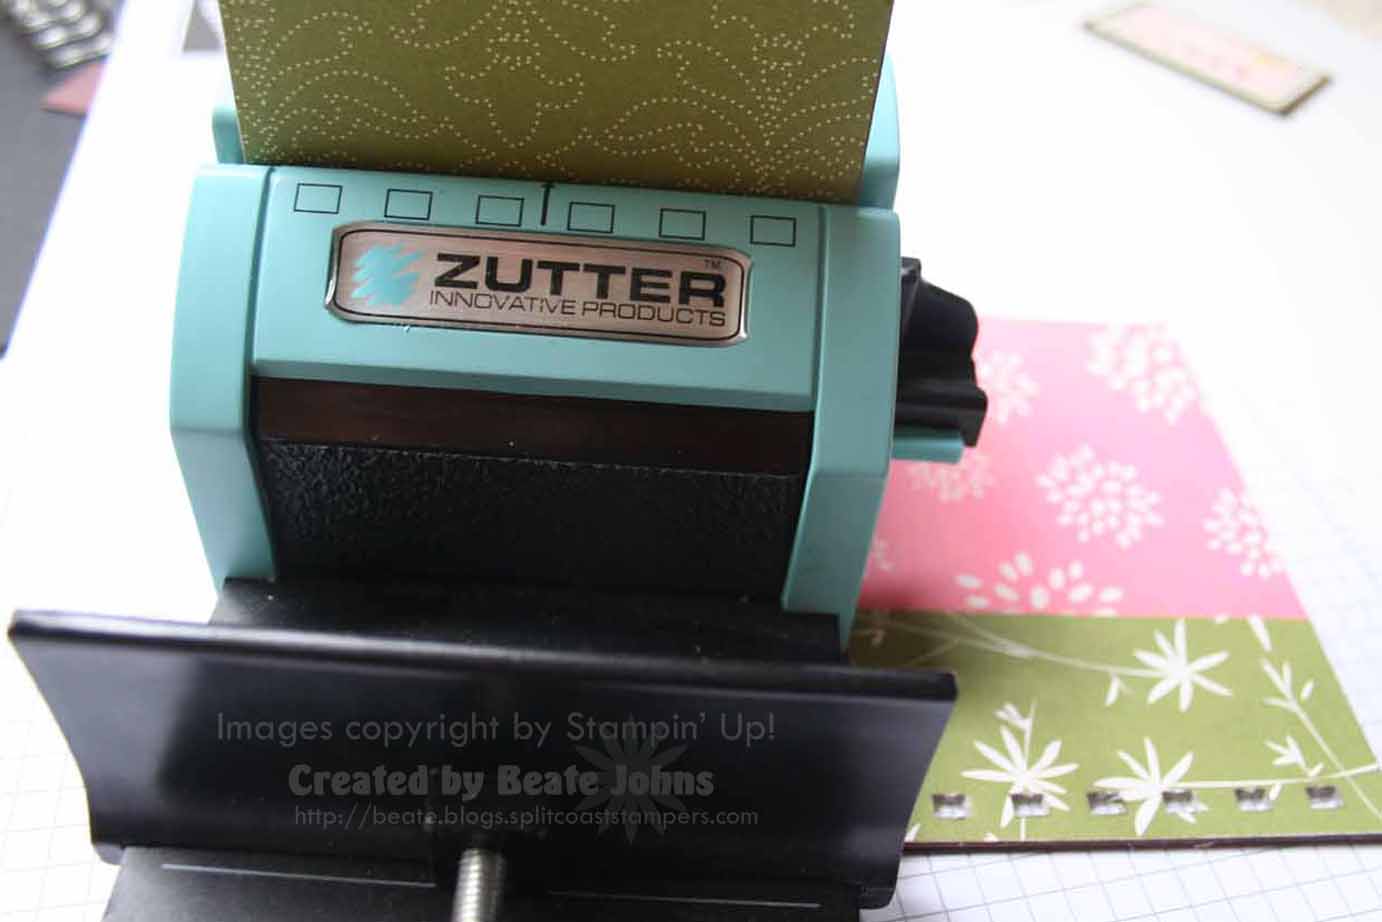
Step seven:
Slide your back cover into the machine. Let the inside of the cover face the label. Press lever to make holes.
Step eight:
Center your index card and make holes.

Step nine:
Now stack your cover/pages the following way:
- your back cover the right side facing up
- your front cover the right side facing down
- your pages lined side facing down

Step ten:
Slide the wire into the holes and align the open end of the wire facing away from your book.

Step eleven:
Put your book into the front slot of the machine. Make sure that the wire opening is facing down. Now press the lever down. It will push your wire together.
Now just decorate the front and add tabs if wanted. Done! Easy Peasy!
Beate
43 Responses to “Bind it all Adress book”
Sorry, the comment form is closed at this time.


Awesome! OK you have got me hooked now…off to make one of these today…will head to the store to buy some index/recipe cards! Thanks for the GREAT instructions. Can’t wait to do this AND the sketch!
this turned out beautiful! you make it look so easy 🙂 thanks for the tutorial…
What a great project, Beate! Wonderful idea to use index cards — such a cute address book! Thanks so much for the tutorial!
I saw the other BIA address book you made a little while ago too. They are so pretty and a great idea.
I wanted a bia so much I mistakenly bought 2 ~ LOL!!!. I love this. I think I am going to make one today
HUGS
OK you have made me want to use my BIA! I have had it since June! It’s been sitting on my shelf waiting for me to break it in. I have to make these address books. What a great idea and gift!!
Thanks for the great idea!!
Oh, Beate, you are really pushing me towards that BIA, LOL. You keep making such beautiful things with it. I’m even coming up with things that I want to do with it. So, I guess, now I NEED it and that means I have to have it, teehee. TFS.
Oh I do have a bind it all, thank for the great ideas! That’s why I come back for more and more!
I’ve heard a lot about BIA but have been scared to try it. You make it look so easy. Now I want to try it! 🙂 This address book is adorable!
I don’t have one of these,yet, but I really appreciate seeing how it works! Thanks!!
Awesome project too!
Beate, these project knock my socks off! You rock my world!
After your last address book I ordered one and decided to make address books/journals as Holiday gifts! Now I am just waiting……
BEATUIFUL creation, but I wouldnt expect anything less from you!
I’m a friend!!! I’m a friend!!!! Send it to me! Send it to me!! I love it!!!
I started reading this post and thought you were making fun of me. . .”do you own a BIA and haven’t used it yet?” I keep threatening to make one of these gorgeous little books of yours and haven’t yet! They are so stinkin’ CUTE! You’re making me CRAZY! LOL
I bet those BIA’s are flying off the shelves at EP after everyone sees these books you’ve made. I LOVE this one!! Beautiful papers, and your whole design rocks!
If I ever break down and get one of these cool gadgets…I know where to come for an awesome tutorial. Thank you!!
Beautiful!!
You got me! I bought a BIA. You shared such a cute idea, how could I not?! Too bad you don’t you get a % of all the sales………. 🙂
You sold me for sure! THX again.
This is awesome, I love to make notebooks etc, but never heard of the bind it all. I will have to check into it, this looks like too much fun. Thanks for the tutorial!
do you have any secrets on closing the wires so they are “round” everytime?
I am having trouble with the 5/8 in. size being round….boohoo!
thanks for the wonderful idea!
You rock Beate! I have a BIA and don’t use it that much so now you’ve inspired me to use it. Thanks!
Ok you got me hooked…lol…I made 3 yesterday! Love them…so fun and easy!
Hi Beate
I love your project.
If you were to compare BIA with Rubicoil which would you prefer and why?
Thanks,
Judi
Hi Beate,
Thanks for the tutorial on the BIA address book. I now have the BIA and plan to have each child in my son’s class write a note to the teacher, then I’ll bind it and give it to her for an “end of the year” gift. I did this last year (without the BIA…LOL, not too easy!). I also took the child’s yearbook picture, ran it through Xyron, cut apart and placed it on each page. Teacher cried when she saw what the book was. Cannot make a better gift than this!!
Thanks again — I love your cards and blog!!
This book is awesome and I would love to make some of these for Christmas gifts! Sooooo where do I buy the BIA? Any other helpful info I need to buying wire sizes would be great!
Beate, everything you do is gorgeous! We have a plastic BIA type thing at school. I want to give this a try! Thanks for all the fabulous ideas you so willingly share!
Mary
Beate! This is just too cute! Thank you so much for doing the tutorial to show us how to make one.
I can not buy a bind it all. I can not buy a bind it all. I can not buy a bind it all. (One more project my friend and I think I’ll be the proud owner of a bind it all.)
Okay. I just want you to know, Beate, that this little tutorial MADE me order a BIA two days ago and it just arrived today. Guess what everyone’s getting for Christmas this year???? Hahaha!! Thanks for your enabling!!
It’s all your fault……here is my first attempt!!
http://kraftinkimmieskorner.blogspot.com/2007/09/fun-with-my-bind-it-all.html
Now I think I need to go get one of these bind it all thingies. Thanks for the great tutorial!
I was wondering if you could use SU chipboard journals to make one instead of buying the bia? Beate, where did you purchase your bia?
Thank you for this tutorial! I just got a Bind it all and was looking for projects to do with it. I was dreading cutting paper to put inside the book. The index cards are a great idea. Following your example I made a recipe book out of the 4 x 6 index cards.
I can’t find the 7/8 wire, what other size would you recommend?
I’m really excited to try this as my bind it all arrive today!
I am ordering a BIA as we speak, next the cutter.
thank you for all the time you put into your tutorials. they are excellent!!!
Thanks for the great idea with instructions. I am going to make these for Chistmas for my girlfriends.
Do you cut your bind it all wire or do you order it that legnth?
I have to try this ASAP! I just got my BIA yesterday (ask me what Brown can do for me…lol) and I have TONS of coasters! Off to BIND! Thanks for your cool tut!
Do you know if the BIA is the only product out there or are there others?
I love this. I do not have a Bind It All, but it is on my list. Hope to get one soon.
Linda Duensing
I found more here if anyone’s interested
Just a quick note to let you know I put a link to this post on my blog site this week http://antiquesdiva.blogspot.com/2009/03/guest-blog-contessas-bibles.html.
Thanks for the info!
Toma
קורס ברמנים…
… – גם חוויה, מגבשת ייחודית לצוותים ממקומות קורס ברמנים חינם, אשר המסע בטבע מהווה עבורם חלק מיום ו/ או גיבוש. טיולי טרקטורונים, בלילה מיוחדי…