
Today’s tutorial on splitcoast is for Faux Shaving Cream.
It’s a quick and fun technique to add a marbled look to your image.
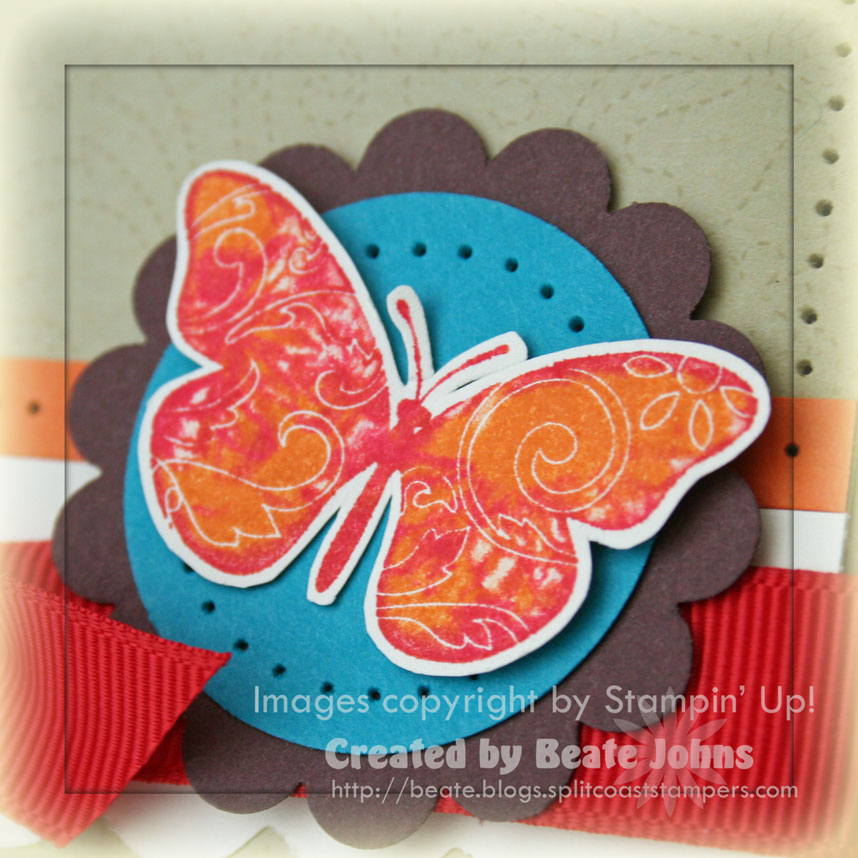
The butterfly is from Kind Thoughts.
I inked it first with Pumpkin Pie.
Next I inked up the wheel Solitude with Real Red ink and twisted the wheel over my stamp to create the marbled look.
I used the Real Red Marker to trace the outline of the stamp, huffed it to re-moisten and stamped it on Very Vanilla cardstock.
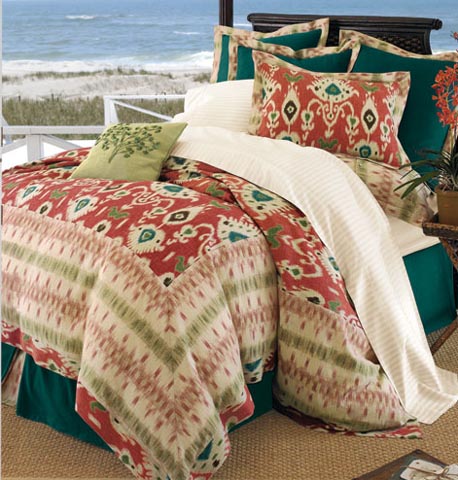
The inspiration for this card came from Saturday’s Inspiration challenge on Splitcoast.
I really liked the pattern of the bedding and the color combination.
My card base is a 4 1/4″ x 8 1/2″ piece of Taken with Teal cardstock folded in half, followed by a 3 3/4″ Chocolate chip square with corners that were punched with the Ticket Corner punch.
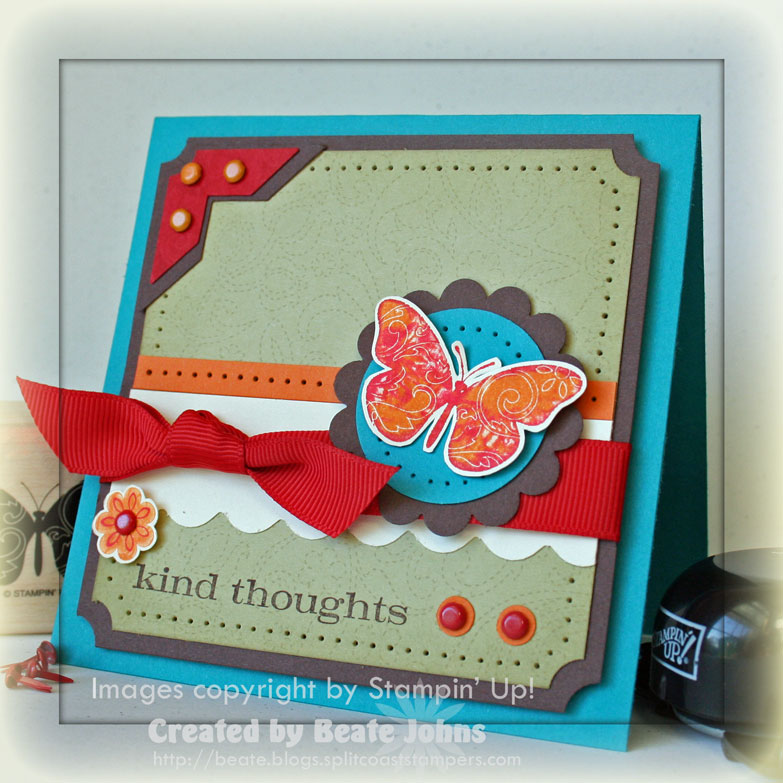
The corners of the 3 1/2″ River Rock square were ticket corner punched as well.
The square itself was stamped with the background stamp Stitched in River Rock and the edges were paper pierced.
I added a double photo corner on the top right.
The red photo corner was stamped in real red ink with the butterfly to add a little bit of texture. Three More Mustard brads were added over it. (Did I mention that I would love brads in ALL colors??? )
I added scallops to a 1″ x 3 1/2″ Very Vanilla cardstock strip and adhered it over the River Rock square. Over that I taped a 1/4″ x 3 1/2″ paper pierced strip of Pumpkin Pie and I tied 5/8″ real red grosgrain ribbon around it.
I taped a 1 3/8″ Taken with Teal paper pierced circle on a Chocolate Chip scallop circle. I mounted the butterfly on top of that by adding dimensionals under the wings.
The sentiment is from Kind Thoughts and is stamped with Chocolate Chip on the bottom left of the card. I added two 1/4″ Pumpkin Pie circles next to the saying and topped them with real red brads.
Last I stamped the solid flower in Pumpkin Pie and stamped the outlined flower over it in Real Red. I cut the flower out, taped it to the card with a dimensional and added a red brad in the center.
Beate
24 Responses to “Tutorial on SCS – Faux Shaving Cream”
Sorry, the comment form is closed at this time.


Very very pretty, I just love the colors on the butterfly.
As always Beate you do such wonderful creations. I love the colors and flow of the card. Thanks for sharing.
Tammy
This card is so cute!!!! I love it …… The colors look awesome together ……
This is beautiful! I love these colors and your layout is gorgeous!
The card is stunning! And the color combo is so unique! I never would have thought of it!!! Beautiful!
Beate, I JUST got my Weekly Inkling and I LOVE this card! It’s gorgeous!
Thanks Beate. I am doing a class with shaving cream in a few weeks so will have to try this…
What an awesome technique! I just tried it using the same colors, but instead of the butterfly, I used the solid flower from Spring Solitude. Too cool! Thanks for sharing the directions and for your wonderful inspiration!
I love this…it’s gorgeous !!! What an easy way to create beautiful dimension on a card !!!
Beautiful! And a great tutorial on SCS, as always! You always do such clear instructions and pictures. I love the faux shaving cream…never tried the real thing because it just seemed to messy! ;o)
I love how you pulled the color combo from the inspiration challenge, and the layout and details are perfect! Thanks for all you do!
~Michelle :o)
What a lovely card! The colors on the butterfly are stunning…they remind me of a sunset.
Beate, I like this color combination! You put together a great tutorial. Have a great day! 🙂 Julie
This is really pretty. I have not tried this but will now! Thanks for the great tutorial Beate! *STAMPIN HUGS* Alex
Man, I just love these colors together! Neat technique…thank you so much for experimenting and sharing with us non-creative type (that would be me!). And I’m loving the Teal!!
fairydust.indy
What a fun card and a great challenge! I was so happy to play!! THANKS!!
Your creativity is a minefield!!! You did a fabulous job with the colors, layout, and every aspect of your card, I love it!
I love the inspiration photo…for approximately 4 months I’ve had a photo of the same bed, not the bedding, hanging on my wall for our next furniture purchase. TFS.
OMG – this is so…beautiful!!! Love everything about it!!!
Have to go and check that tutorial out too…
Great technique Beate! The bold beautiful butterfly is great! Hugs, Deb
So very pretty! Love this! TFS and have a wonderful day! 🙂
You always come up with such outstanding creations. This card looks AWESOME!
I am totally in love with this cards. Nice work. The colors are amazing and really pop!
Beate, what a cute card! Love the colors and that butterfly!!!! So great!
Your card is so beautiful, and I love this technique! Awesome, girl!!
I love this card Beate! It’s just gorgeous! I actually went back and cased it – my version is on my blog 🙂