
Today’s tutorial on Splitcoast is for the Chalkboard Technique. It is usually done on black cardstock, but I like the softer look of Chocolate Chip as base better (who knew, right? LOL).
I started out with a 2 1/2″ x 4″ piece of Chocolate Chip.
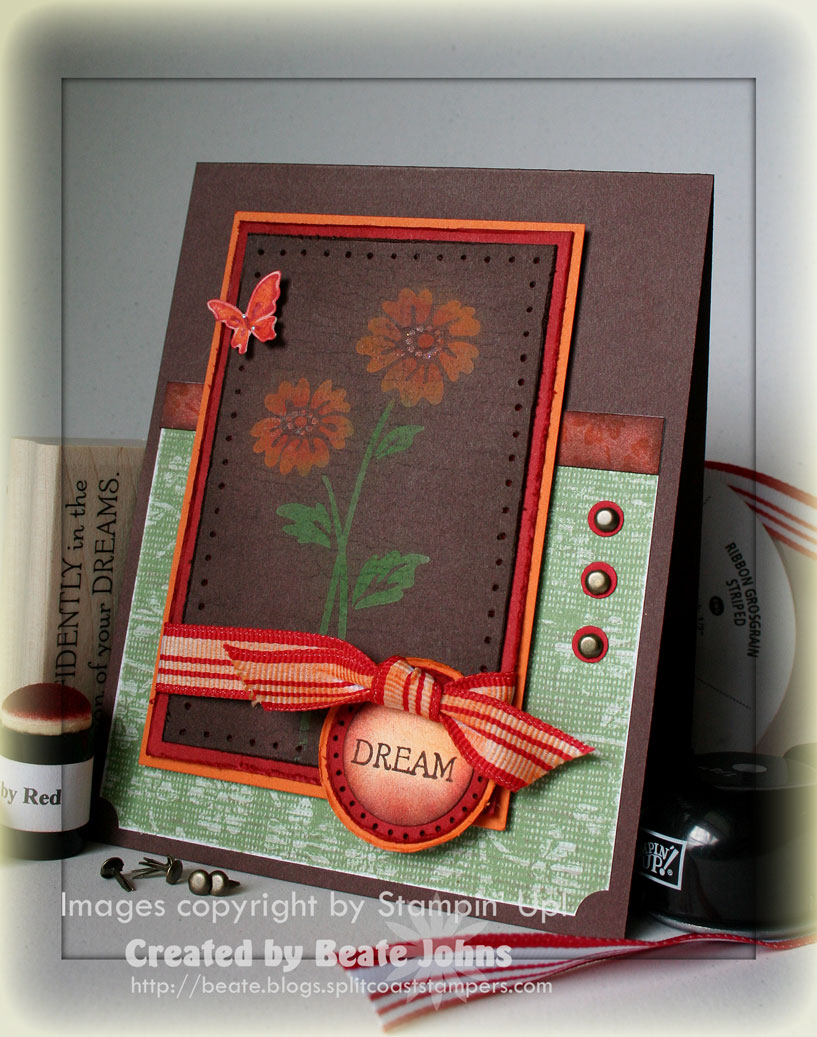
I stamped the flower image from Live Your Dreams in White craft ink and used sponge daubers to apply Stampin’ Pastels (Pumpkin Pie, Real Red and Old Olive) over it. I didn’t wait for the ink to dry. I dabbed the chalk over it right away.
After I liked the way it looked, I wiped the excess chalk away with a swiffer towel.
Next I stamped the background Weathered over the image in VersaMark ink. It’s hard to see in this photograph, but it adds more texture to the center image.
I didn’t seal the image. The chalk seems to stay put real well without using a sealant.
I sponged and paper pierced the edges of the Chocolate base and distressed them with the Cutter Kit. Next it was layered on a 1/4″ bigger piece of distressed and sponged Real Red cardstock and then again ona a 1/4″ bigger piece of Pumpkin Pie cardstock.
The card base is a 4 1/4″ x 11″ piece of Chococlate Chip cardstock, layered with a 3 1/2″ x 4″ piece of Tea Time Designer paper. The bottom corners of the paper were punched with the ticket corner punch.
Next I cut a 3/8″ x 4″ piece of Very Vanilla cardstock, stamped it with Real Red ink and the small flower cluster from Live your Dreams, sponged it first with Pumpkin Pie and then with Chocolate chip and taped it to the top edge of the designer paper.
I punched out three 1/4″ circles from Real Red cardstock and taped it to the right side of the paper and topped them off wit Antique Brass Brads.
I used the Chocolate Chip Marker to only ink up the word Dreams from the sentiment in Live Your Dreams and stamped it on Very Vanilla cardstock. It was punched out with the 1″ circle punch, sponged first with Pumpkin Pie, then Real Red and lastly with Chocolate Chip cardstock and layered on a 1 1/4″ Real Red circle and 1 3/8″ Pumpkin Pie circle.
Red Red striped grosgrain ribbon was tied around the main image. The white was too bright, so it was sponged over with Pumpkin Pie ink and sponge daubers.
Last I stamped the tiny butterfly, added red into it’s white spaces, sponged it and added it to the top left of the main image with part of a dimensional.
Beate
42 Responses to “Today’s Tutorial: Chalkboard Technique”
Sorry, the comment form is closed at this time.


I absolutely love this card. Thanks for sharing the chalk board technique. Going to have to go try that.
This is soooo gorgeous! I love the colors you chose.
Stunning card! Just love this color combination and all the dimension!
TFS!!
this is great! leave it to you to try it on Chocolate Chip! now I’m kicking myself for getting rid of my pastels – ugh!
absolutely gorgeous! makes me want to go order daubers (no, i don’t have any!!) right NOW! plus, i should get some white craft reinker ~ ok, like you wanted to hear my shopping list!! hehe! thanks so much for sharing your talent!!
Wow…WOW! This card is *gorgeous* and thanks for sharing the technique – it’s not one I had heard of.
This card is GORGEOUS! The colors are fantastic. This chalkboard technique gives me a reason to use my UNused pastels!!
I love this technique and I would not have think of using this brown as a background.
Beautiful ! Have a great day.
what a totally stunning card! Holy Moses Beate!! I think I need to try this – have not done it before, but sounds like fun to do! I agree – chocolate chip over black anyday LOL! So, it’ cold there, huh?! It’s been in the 60s here – warm for this time of year! I miss Florida! *STAMPIN HUGS* Alex
I saw your tutorial over a SCS…and it’s awesome! I LOVE your gorgeous card too!!!
I forgot about this technique. I’m so glad you posted this. Gorgeous card! TFS!
Gorgeous warm colors! Makes me want to break out my pastels-haven’t used them in awhile. Thanks for letting me know where to find the accessories from your other card as well! Have a great day!
wow! I love it! I guess I need to check out this technique!
So very beautiful! I just checked out the tutorial at SCS…can’t wait to give this a try. You are so awesome and sooo creative! Thanks for all you do! 🙂
WOWZA!! This card is AMAZING! (Not that all of your cards aren’t) Thanks for sharing how you did the chalk technique. I will have to try it out.
Stellar job Beate!! 🙂
What a fun technique, I am going to go try it out right now!
This card is so gorgeous – what a neat technique! TFS!
This is lovely! I am going to have to try out this technique soon. I almost never use my Pastels because I never know what to do with them. Gorgeous card!
I have not used my chalks in FOREVER!!! I will have to dust them off and give this a try!
That is just gorgeous !!!!!!! I am going to have to try that
A fabulous work of art, TFS.
Absolutely stunning !!! Great tutorial and the card is beautiful 🙂
Dance on !!!
I’ve never done this technique before but the result is so beautiful! And I don’t think I would like it as much on black cardstock, so I’m glad you used your trusty chocolate chip!
stunning!
barb hendrickson
I haven’t done the chalkboard technique in several years, but definitley am going to have to play around with the chocolate chip paper! It is stunning and such a different look than the chalk on black paper! It makes me think of Thanksgiving and fall festivals, pumpkin patches, and apple cider. YUMMY!
Beate – OMG – this is sooooooo gorgeous!!! I love it!!!
Love your card for the tutorial Beate. The colors really pop out, and against choc. that isn’t always easy.
Gorgeous!! WOW I love it in this colour!! I just got my SU! order so I’m off to mount stamps and want to give your tutorial a go this evening….yippeee!
This card is so nice…very rich looking. I’m gong to try the tutorial when I’m putting together my sketch challenge. Thanks for all your ideas, “lessons” and inspiration Beate.
Jaw on the floor. . .GORGEOUS, Beate! Oh my, I LOVE it!
I LOVE this! How have I never heard of this or tried it?! How bad is that for a teacher?! I’m definitely trying it, thnaks so much for sharing the technique!
Beate, this is way cool! I love the technique! Must give it a go! TFS-Deb
this is beautiful! thanks for sharing the card and the technique
Such a fabulous technique! I tried it out and LOVED it! Thanks for always sharing your wonderful ideas and serving as such an inspiration!!!
I love this card and plan to try it for my next class. May I use your ideas?
Another WOWSER! I have done this with black CS but I think I like it better on the brown! LOVE LOVE LOVE it!
Wow, this card is really beautiful! I have to try it!
Oh…I hope this is the one Lisa told me about and it lands in my mailbox soon! It’s stunning Beate! You must have telepathically inspired me on my swap to you. Pretty wild! Love this sooo much!
I have to tell you I love love this simple technique. Great to “dust” off the chalks! I will try it again. I posted mine to SCS and my blog. Thanks for the great technique.
This is beautiful! Who who have know?? I’ll have to give this technique a try. I love using my chalks!
Beautiful…, I love it!!!!!
What a fabulous technique!