
Donna Moore, aka. Shadowmills, started the craze of the Dahlia fold on Splitcoast a while back. It got even more popular when it was a Technique challenge a month or so ago. Today we are revealing a step by step tutorial on Splitcoast written by Donna for the Dahlia Fold. I finally couldn’t hold out any longer (yes, that’s right…didn’t do it yet!) and had to try it out.
This is going out to Charmaine’s Mother-in-Law today! Keep her in your thoughts and prayers and help us shower her with well wishes and cards.
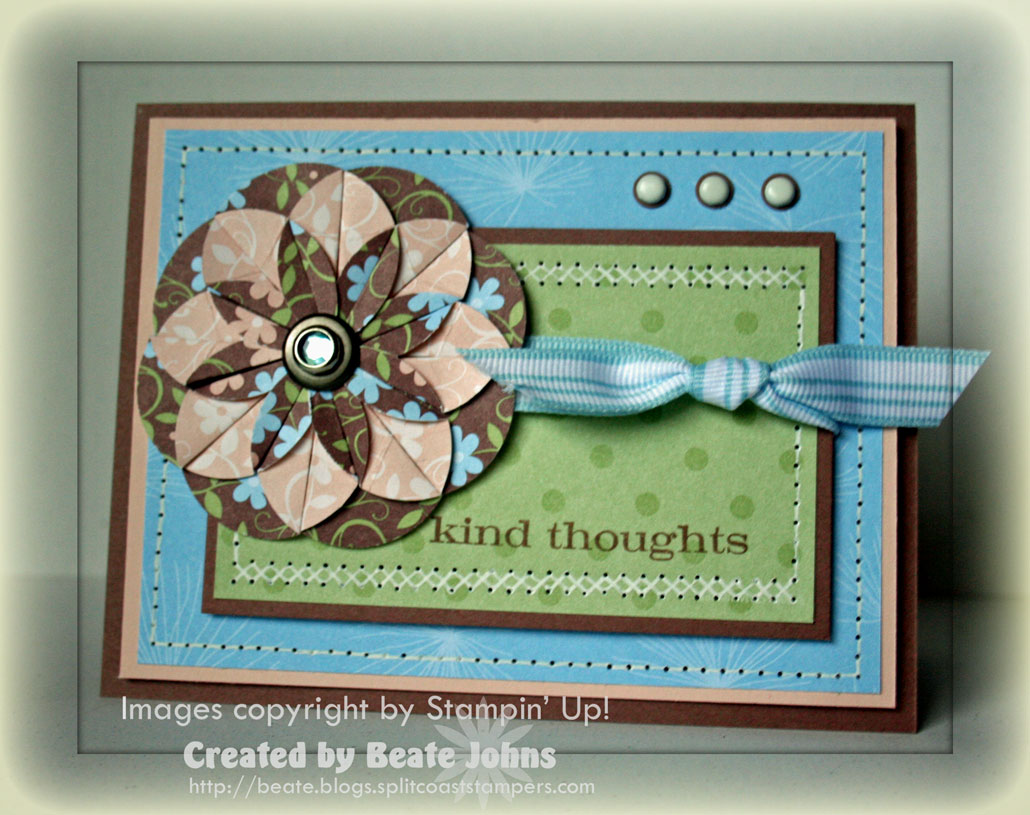
Are you proud of me? I kept it a rectangle card.
You might not know that, but most of my cards start out as a 4 1/4″ x 5 1/2″ card only to be chopped back down to a 4 1/4″ square because I can’t make them look right!
This is a card with a lot of favorites of mine on there: Paper Piercing, my first LOVED designer paper, white brads, rhinestone brads, white gel pen, striped ribbon…..What’s not to love! LOL
So…back to the card! The card base is a 5 1/2″ x 8 1/2″ piece of Close to Cocoa cardstock folded in half, followed by a 4″ x 5 1/4″ piece of Blush Blossom and a 3 3/4″ x 5″ piece of Petal Patch Designer Paper. I am still sad this discontinued. I like it okay in the new colors (Fall Flowers), but I absolutely LOVED this one.
I taped the Blush Blossom and DP layer together and paper pierced the edges. Next I added the white gel pen lines to make it look like faux stitching.
The inner rectangle layers measure 2 5/8″ x 4 3/8″ for the Close to Cocoa layer and 2 1/2″ x 4 1/4″ for the Certainly Celery Prints designer paper. I added more faux stitching to these layers, tied Bashful Blue Striped Grosgrain Ribbon around it horizontally and stamped the sentiment from Kind Thoughts on the bottom right in Close to Cocoa classic ink.
I used eight 1 3/8″ circle punch outs from the Petal Patch Designer Paper (sniff, sniff) to make my flower and added a Jumbo Pewter Eyelet with a Ice Circle Rhinestone brad in it’s center.
To finish it off, I added three 1/4″ Close to Cocoa circles on the top right with white brads in their center. I can’t help myself. I love doing that!
Beate
31 Responses to “Tutorial on SCS – Dahlia Fold”
Sorry, the comment form is closed at this time.


This is GORGEOUS, Beate. . .and she will absolutely LOVE it! Thank you so much for all your thoughts and prayers. I’m so blessed to call you my friend! HUGS!
sooo pretty. I think that it is time for me to give in and make one of these!
Stunning card. You did a great job keeping it rectangle.
I’ve never tried this fold either — maybe I’ll be brave tonight when I get home from work 😉
Your card is wonderful!
Great…I love the Dahlia, love the piercing, your colors are wonderful…TFS…:-) By from Germany…Silke
I think this is a stunning card and I thank you for sharing it and the details about how to create it.
I’m also tickled to read why your cards tend to be square. I wondered! Do you still mail those 4 1/4 inch square ones in a standard envelope or do you pay extra postage? Or do you just keep ’em in your stash?
I really enjoy your blog! Thanks for all the sharing you do!
This is gorgeous Beate – totally love it all!! I am so with you, paper piercing, ribbon, dp, aaaaahhh…aren’t they awesome!! Great card and I am sure Charmaine’s mom will love it. I am making one today to get in the mail!! *STAMPIN HUGS* Alex
And I thought I was the only person who hadn’t done one of those flowers yet! It is on my to do list. I love your card!
Beate this is so pretty, i have this DSP and it’s so hard for me to use it and esp now that its discontinued.. =)
A work of art! I love your card and all it’s elements, each one adds the perfect touch. I’m soooooory you used up your designer paper, I know what it feels like. TFS.
Beautiful flower. Beautiful card, Beate. LOVE the piercing with the faux cross stitching!
Ach, wieder so schön, Beate! Und ich glaube, ich brauche diese Rhinestone-Brads!! Thanks to you! 😉
i really love this card! i like the techniques you used and the colors/papers are perfect together! fabulous!!
chelle
This is just adorable! I will have to check out the tutorial. I haven’t tried this yet either. Yours is beautiful! TFS and have a great day! 🙂
WOWZA WOWZA WOWZA GIRLIE !!!! This is gorgeous !!! Making these flowers is top of my list for tomorrow !!!
WOW!! Great job with the folds! Love your layout and colors you chose!
ooooooh! aaaaaaaaah! pulchritudinous!! Gotta try this!
Your card is wonderful! I’ve never done that fold before either and you’ve got me trying things I don’t normally do…lol…so will try this tonight once I finish the Easter treats for Chloe’s class.
Oh, that’s just beautiful, Beate! I love the paper you used for the Dahlia–it has great contrasting colors!
I so love you Dahlia fold! Love the paper you used to do it! 🙂
I really love this card. Now I am going to have to go try this technique.
This is very pretty Beate! I wasn’t going to try this technique but I think you sold me on it with this card!
Fab.. card thank you for sharing
Wow, I love this medallion. It’s fantastic. Joan
Gorgeous Beate! Charmaine’s MIL will love this card! Hugs, Deb
So pretty, Love your colors, tfs the instructions!
Thanks Beate! I’ve been itching to try this. Love this card!
Rhonda
This card is absolutely beautiful! I especially love the color choice. I have been looking at all these on SCS, and you did a beautiful job. It is so nice, makes me want to give it a try. Keep up the good work! Have a nice one! Karen
I have yet to try this fold…and yours is soooooo pretty!! I love all of the papers you’ve used!! Beautiful card!!
So pretty and I love those colors too! 😉
I highly doubt that YOU of all people can’t make a 4 1/4 x 5 1/2″ card work! You rock! 🙂