I actually stamped yesterday. Just for a little bit after cleaning the house and going grocery shopping. It felt good. I think it has been a week. It’s hard for me to get back into a rhytm after getting off track in my stamping.
Anyway…here is my card for today’s inspiration challenge. I went with all those dots and tried to find a background paper matching. This one is from My Mind’s Eye Tres Jolie series.
I actually made a second card to match. I will post more details later. I have to get Rebecca to school first. Its’ good to be back. Thanks for all the well wishes. Unfortunately the darn migraine stayed it’s three day course. I am all better now though.
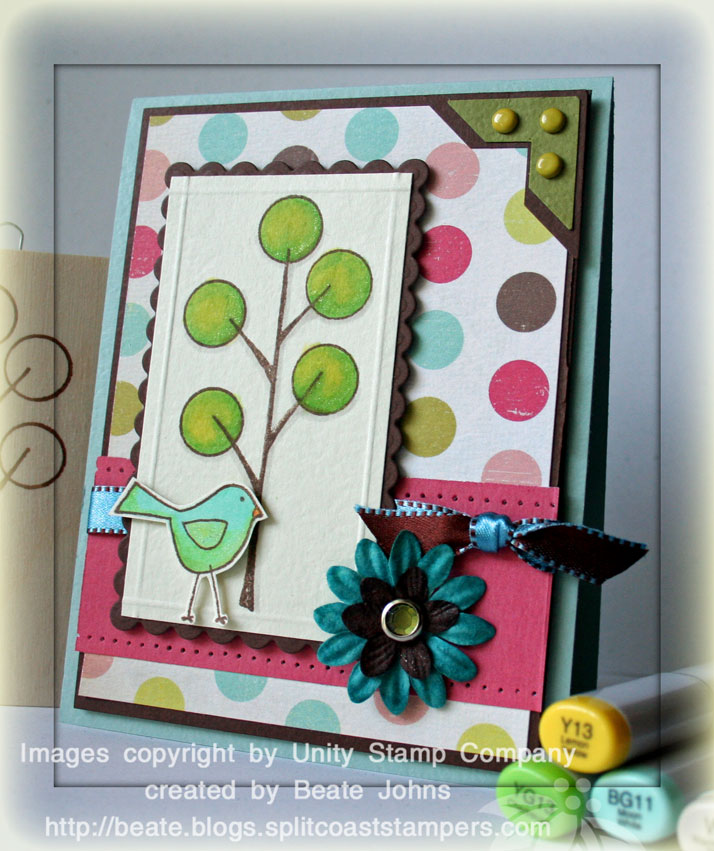
Like I said, I started out with the patterned paper.
I tried several different stamp sets (swirls from Fancy Pants – I was thinking stamping them directly over) and a girl from She’s all That. Nothing really tickled my fancy. I decided that I needed to use outline stamps, preferably non-Su, since the paper was already contraband.
I still had my basket with Unity Stamps on the table and grabbed the set Giggle Grove. I think the images in that set are too adorable. So I stamped the tree in Brown Palette ink on beige Prism paper, let it dry and then colored them with my Copic Markers (Y13, YG13, BG11 and W1).
Okay…I have to tell you, I LOVE my Copic Markers. Not that I have played nearly enough with them yet, but here is what I like so much. You can go over and over previous colored images and add and blend. Like for example the tree. I started with coloring the entire “leaf balls (hehe…I said balls)” with YG13. It’s a light green. I added more color the lower right hand side of each ball.
Next I took the Blender Pen and removed some color, where I wanted it to be lighter. That’s right. Those blender pens take away color. Then I went over the entire image again with Y13 to add yellow. I did that several times, then added more green to the lower right side again, then the entire image. I added shadow with W1, a warm, light gray underneath the branches. I also used it to make the lower right side of each leaf darker. Can you tell I am having fun adding those layers? Last I added some glitter with my clear spica glitter pen. I like that this pen is truly clear. It only adds glitter.
I worked on the bird the same way. Again the image was stamped in Brown Palette Ink on the same Prism Paper. It was first colored completely with BG11, a soft blue, . Next I added YG13 on the bottom of the bird’s body, it’s wings and a bit of it’s tail. Then I colored over it again several times in blue to blend both colors together. The beak is colored first with Y13. Next I picked up some R29 color the Y13 tip and added it over the beak to create my orange. The bird was cut out and added to the tree layer with dimensionals.
Okay…enough babbling about the copics. One more thing. Both of my Prima Flowers were colored with copics to make them match the other colors of the card.
The cardstock for the image was cut down to 2 1/8″ x 3 5/8″. I turned the image so it was facing down and scored lines 1/8″ from each edge to get the frame. The scallop background was cut with the long rectangle Nestabilities templates out of brown Prism Paper. That scalloped rectangle was a bit too long. So I cut it apart, cut two scallops off and taped it back together.
Both the 4 1/4″ x 11″ light blue card base as well as the 3 7/8″ x 4 1/8″ piece of chocolate are Prism cardstock. The photo corners were punched out of matching Prism cardstock as well. The layered photo corners were topped of with three celery brads.
The horizontal layer is the backside of the dotted paper. It measures 1 5/8″ x 4″ and it paper pierced on top and bottom. May Arts ribbon is wrapped around it.