
Apr 132008
Every once in a while I get asked how I space my brads so straight and even. My secret: The right tool!
I always use my paper piercing mat that comes in the Mat Pack Stampin’ Up! sells. For brads in one row, I use the paper piercing holes that are further apart and use pierce second hole.
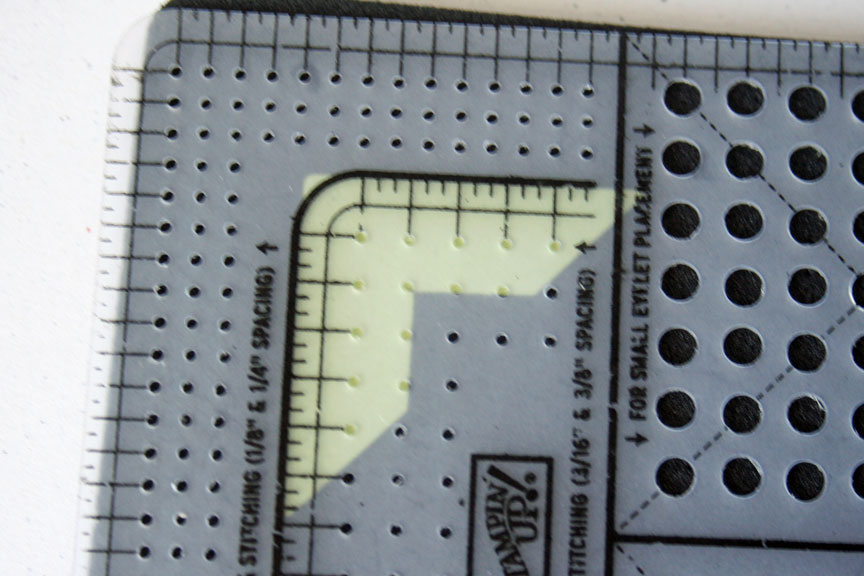
Here is what I do for my photo corners. You know I like to add brads on those!
Step one:
Line up the corner guidelines for the wider spaced paper piercing holes with your photo corner.
Step two:
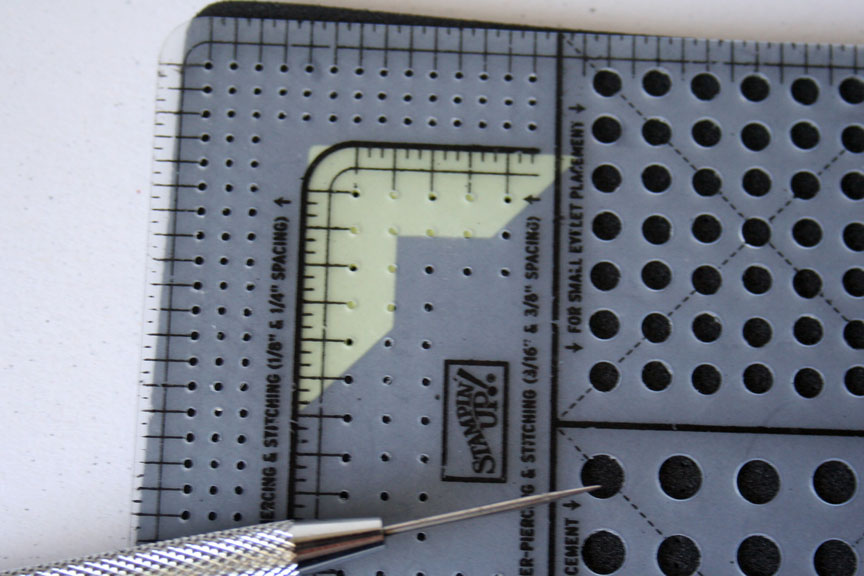
Pierce the hole in the corner, then the third and, if wanted, the fifth hole to the left and downwards.
Step three:
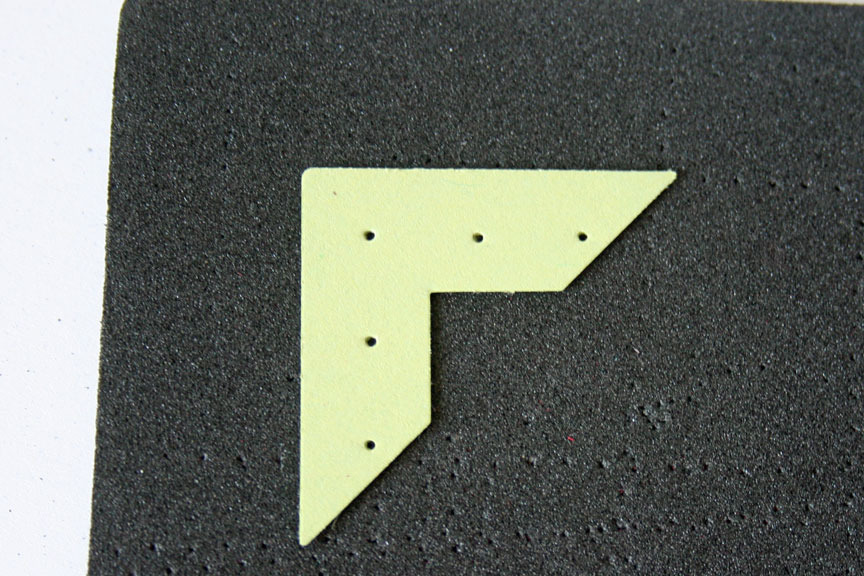
Add brads to your photo corner.
Hints:
- I always tape my photo corners on my project before adding the brads.
- When adding a smaller, second photo corner on top of the larger one, I often only use three brads.
More tutorials with this template:
Beate
14 Responses to “Spacing Brads made easy”
Sorry, the comment form is closed at this time.


Were you reading my mind?! I was just using this tool the other day and wondering if I was using it right. Do you think maybe in you’re spare time (ha) you could post more about using it? Please!! or maybe a link to somewhere that gives more tips. Maybe I just missed something in my demo manuals? Anyhow..thanks for all your work and giving everyone inspiration and help.
Thanks for the How-To. 🙂 I have a Mat Pack coming so I can’t wait to play with all my new SU! stuff! 😀
You know…I use this paper piecer so much that I need a new cushy mat…but it never…NEVER…occurred to me to use it for this! duh! Genious, girlie! TFS and have a great night! 🙂
Great tutorial, kiddo !!! I’m so glad you posted the link to piercing on a curve….definately going to try that out !!!
I’ve been wanting on of these tools for a looooong time. Time to get one. Thanks for the tutorial.
Couldn’t live without my mat pack! 🙂 Thanks for sharing all of your amazing ideas and tutorial! 🙂
OK, have to say BRILLIANT! I use my mat pack all the time, but NEVER thought to use it on my corners. DUH!
Thanks for sharing! That’s a great and handy tool!
Wow, thanks for the great tutorial! I have never thought to use this tool for this purpose! DUH! HAHA 🙂
thank you for sharing this! uneven brads annoy me so this is so helpful! Now if only my mat pack would arrive!!
Could you clarify a bit on this bit “For brads in one row, I use the paper piercing holes that are further apart and use pierce second hole.”
Thanks!
FYI – a good stamping friend of mine shared her secret with me a few years ago.
She uses plastic canvas! I now just take a piece of plastic canvas and line it up on my card or paper. I just decide how many holes I want between the eyelets or brads and I mark them with a pencil through the plastic canvas. I then punch the holes with either a hole punch or a punch tool. Simple and inexpensive!
You’ve got to be kidding! That’s too easy. I’ve often wondered how you got those brads to fit just right. I love using brads especially since my CAD and I still don’t get a long 🙁 and have a hard time lining them up right. Now to go find mine. lol Thanks Beate.
mmmh….guess I need to organize that tool for myself…..grrr, its so difficult to get things over here….
THANKS so much for the tutorial/info!! Can’t wait to space my brads more easily!!