
Today’s tutorial on SCS is the reason yesterday’s card looked the way it did. It’s about the Grid technique.
I made three samples for this technique, all a bit different. I will show two today, one tomorrow.
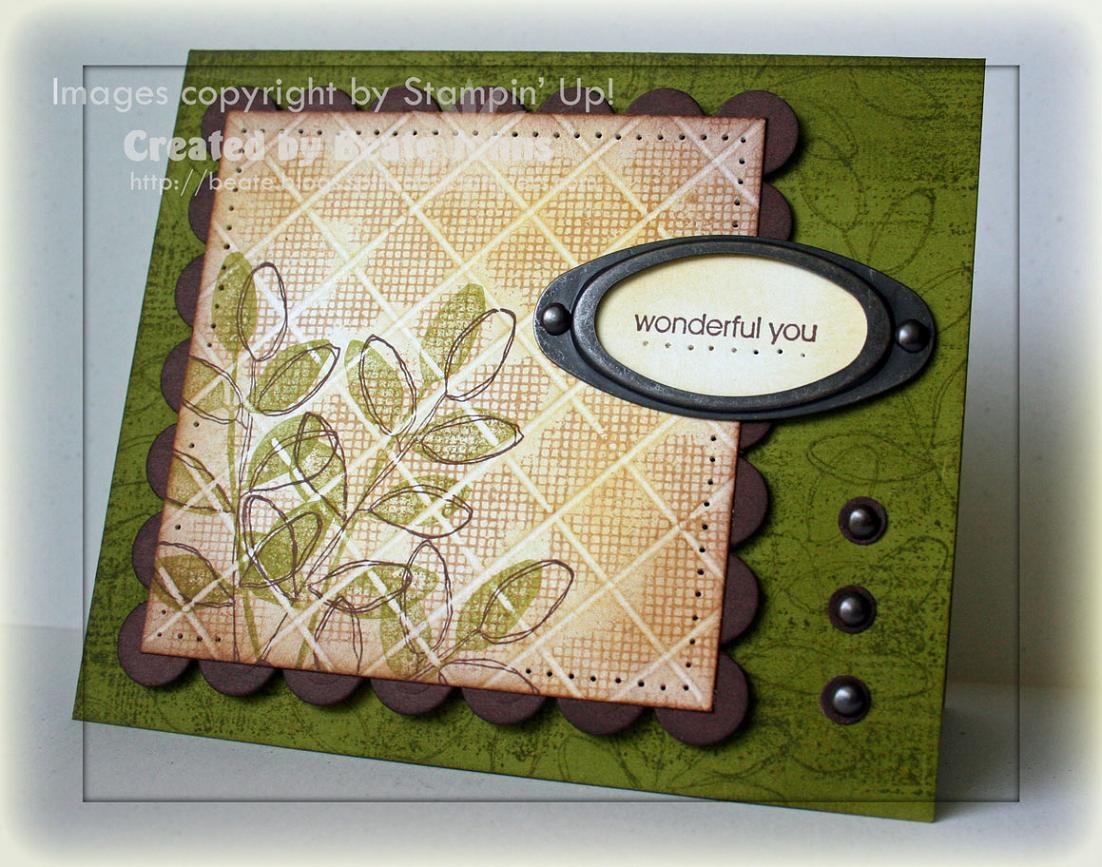
This is the card I made for the main tutorial.
The card base is a 5″ x 8 1/2″ piece of Old Olive cardstock folded in half and stamped first with the Flannel Plaid background, then with the outlined fern leaves from Wonderful You. The edges of the card front were sponged with Old Olive.
For the main panel, I scored diagonal lines in 1/2″ interval both ways on a 3 3/8″ Whisper White square. Next I inked up my Canvas background with Creamy Caramel ink, layed it down on it’s wooden side, placed my cardstock on top of it and just pressed the cardstock down unevenly by walking my fingers over it. Then I sponged the edges first in Creamy Caramel, then in More Mustard and last a little bit with Chocolate chip.
I stamped the outline leaves from Wonderful You in Chocolate Chip, the solid leaves second generation (stamped off once) in Old Olive. The square was layered on a scalloped Chocolate Chip square, that was cut out with Square Nestabilities, a paper pierced border was added and it was attached to the card front with dimensionals.
The sentiment from Wonderful You was stamped in Chocolate Chip on Whisper White, punched out with the large oval punch, sponged, paper pierced and attached to the right side of the main panel with a Aged Copper Hodgepodge Hardware book plate over it. The hardware was tied in with three addtional Aged Copper Brads over 1/4″ chocolate chip circle on the lower right hand side.
To show the difference it makes on what side you stamped on, I repeated the center piece, but this time, stamped on the side with the score lines facing up to create this card.
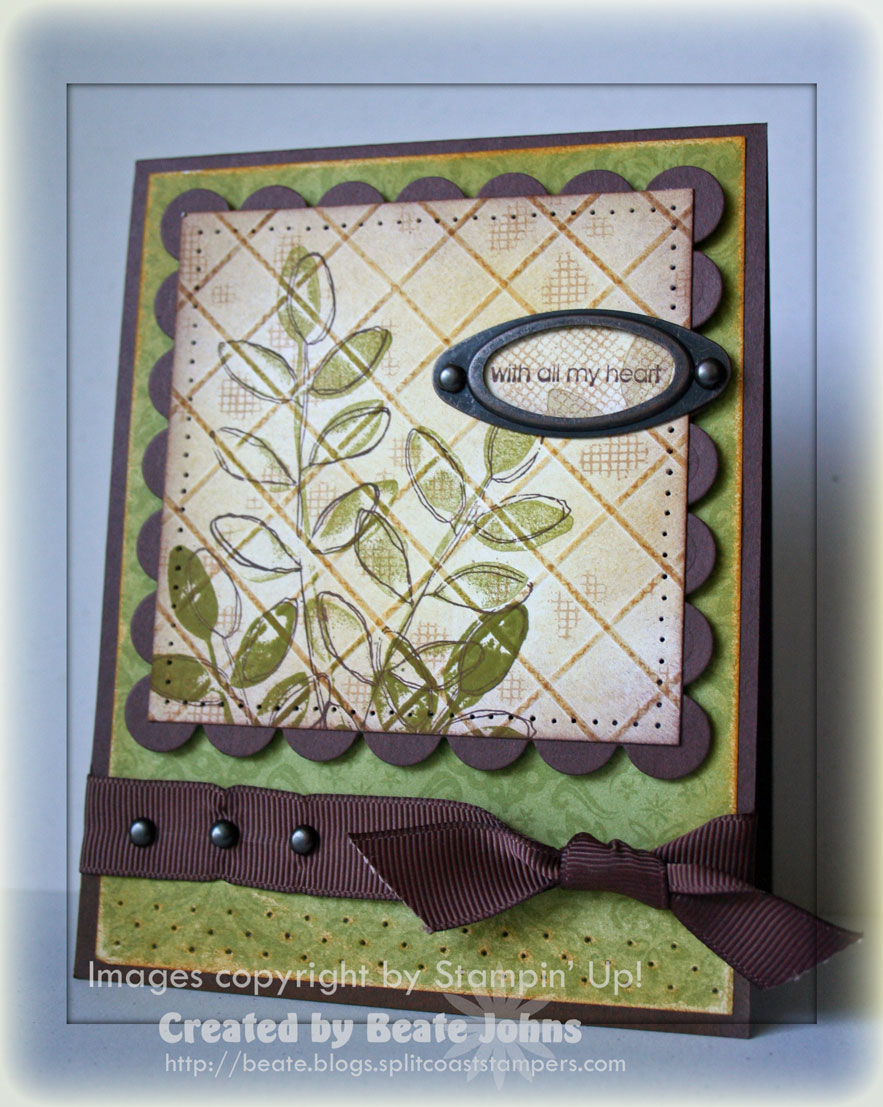
Here the card base is a 4 1/4″ x 11″ piece of Chocolate chip cardstock, followed by a 4″ x 5 1/4″ piece of Old Olive Prints Designer paper.
I added paper piercing to the bottom of the Designer Paper, distressed the paper with my sanding block and sponged More Mustard over it.
5/8″ wide Chocolate ribbon was tied around the bottom with three Aged Copper brads placed through it.
The sentiment is also from Wonderful you and was stamped in Chocolate Chip on Whisper White cardstock. It was punched out with the small oval punch and a small Aged copper book plate was added over it.
Beate
31 Responses to “Tutorial on SCS – Grid Technique”
Sorry, the comment form is closed at this time.


Awesome Beate! Soon as I get back from the dog groomers…I’m going to do this! TFS!
Very nice. Thanks for all of the details.
great idea Beate…off to try it….
sorry, forgot – thanks for showing and sharing…. love and hugs
Love, love these cards Beate.
Great cards! Especially love ‘wonderful you’! Thanks for sharing! I love my scor-pal!
I love my Scor-Pal and what you do with yours!
Beate, this is totally unrelated to your scoring projects – although I really like them and they give me lots of good ideas 🙂
I made your cake for Mother’s Day. My mom absolutely LOVES cherries so I thought this would be a fun fun thing to try. Except I never bake cakes and never ever from scratch! So I messed up the batter 🙁 I forgot to add the egg yolks before I folded in the whites. And there was NO WAY I was starting over at that point. I had begun trying to spread the batter onto my pan and finally figured out that there is no way this could be right. That’s when I realized I had totally ignored the egg yolks. So I SCRAPED the batter back into the bowl and mixed in the yolks. So, I’m sure my cake would have been lighter if I had done it right. But it still tasted yummy. AND… I had no idea how to make buttercream frosting… so I just mixed all of those ingredients together (yup, the raw yolks)… and then it occurred to me that that was probably not right either – but there was no saving that. So I found a different buttercream recipe online – with no eggs and no cooking.
All in all I liked the cake and it was a very good learning experience for me. Everyone who tried it also liked it. I can’t wait to try it again though. I’m wondering how much of a difference your buttercream would have made. Do you warm the egg yolks then mix all of the rest of the ingredients to it? Do you have to use a candy thermometer? (btw… the buttercream ingredients list listed the same ingredient twice so I just assumed that you meant confectionars sugar for one and butter for the other).
Thanks so much for all of the inspiration! I have also printed out the strawberry shortcake roll to try soon 🙂
Andrea ([email protected])
Wow, Beate! I love this card and I love this look and I LOVE that I have all of these stamps and can totally CASE this one! You are a plethora of creativity and inspiration. Thank you for your dedication to sharing your projects. I’m so excited to show some of my most enthusiastic stampers this one!
Okay, I am doing this one TODAY for my DT entry – I love this!!! Thanks for sharing this wonderful technique Beate, I see me using this lots!! ! *STAMPIN HUGS* Alex
Wow, thanks for sharing this fantastic technique! I love the look and can’t wait to try it. Beautiful cards!
This is so gorgeous!!! Thanks for sharing your wonderful tutorial, now I NEED a scorpal!!
Totally cannot wait to give this a try! What a fab technique! Love the finished product! Your cards are beautiful! TFS…hope you have a wonderful day! 🙂
Both of these are beautiful. I love how you’ve added so many features to one piece of paper. Awesome. Joan
Beate, deine Karten sind mal wieder der Oberhammer. Wahnsinn, was du hier wieder gezaubert hast. Mir gefällt diese Farbkombi ausgesprochen gut. Super Idee! Wüsche dir einen schönen Tag…:-) Liebe Grüße, Silke
What an awesome technique. I love the colors of these cards…gonna have to try that!!!
These are beautiful. I’ve been wanting to try this out for a while now, but you may have given me the push to check it off of my list.
Your cards turned out much better than when I tried that technique! Maybe I used too pale of a color. Anyway, your cards are lovely, thanks for reminding me to try that!
Oh how fabulous! You rock!
what a cool technique!
Awesome!!
I received my Scor-Pal in the mail TODAY!! Cannot wait to play with it!! 🙂
Thanks again for another great tutorial!
-Kristin
Love both of these cards, what a great technique – and what a great tutorial, as always!!
Love it! Love it! I must try this!
this scoring technique is really neat, gotta try it!! lovely card, beate!
Beate you just never cease to amaze me! You are the SU QUEEN! Thank you for sharing all of your swesome talent! Be well, hug, Deb
Beate this is a gorgeous card. I love the effect of the scoring in a crisscross. Very cool technique. You wrote a wonderful tutorial for it too.
And very nice cards they are too Beate.
What an inspiration you are.
Wow, Beate! You never cease to amaze me. That main panel with all the combined stamping plus the grid….WOWZA! What eye catching cards! 🙂
I love these earthy colors, and the way your ink resisted your grid scores! Just beautiful, Beate!!
These are beautiful Beate!! I think if I had a score pal I would give it a try, for now I’ll just admire the hard work of others 😉 TFS and thanks for the GREAT tutorial!!
Hi Beate
I have been a regular “stalker” for months … and I just wanted to say thank you so much for your wonderful generosity! It is amazing that you have shared so many beautiful projects … and are so happy to help us out with ideas! You must get so much pleasure in knowing that you are an inspiration to so many! Thank you!
Stampin’ Hugs, Andrea – EnchantINK (Australia)
PS … Here is my sample of this gorgeous technique! http://andrealowcock.wordpress.com/2009/02/22/another-quick-faux-tile-card/