
Bonnie wrote not just the Tri-Shutter card tutorial for SCS, but she also wrote one on how to make beautiful Fan Fold Flowers. Here is one of the samples I made with that tutorial.
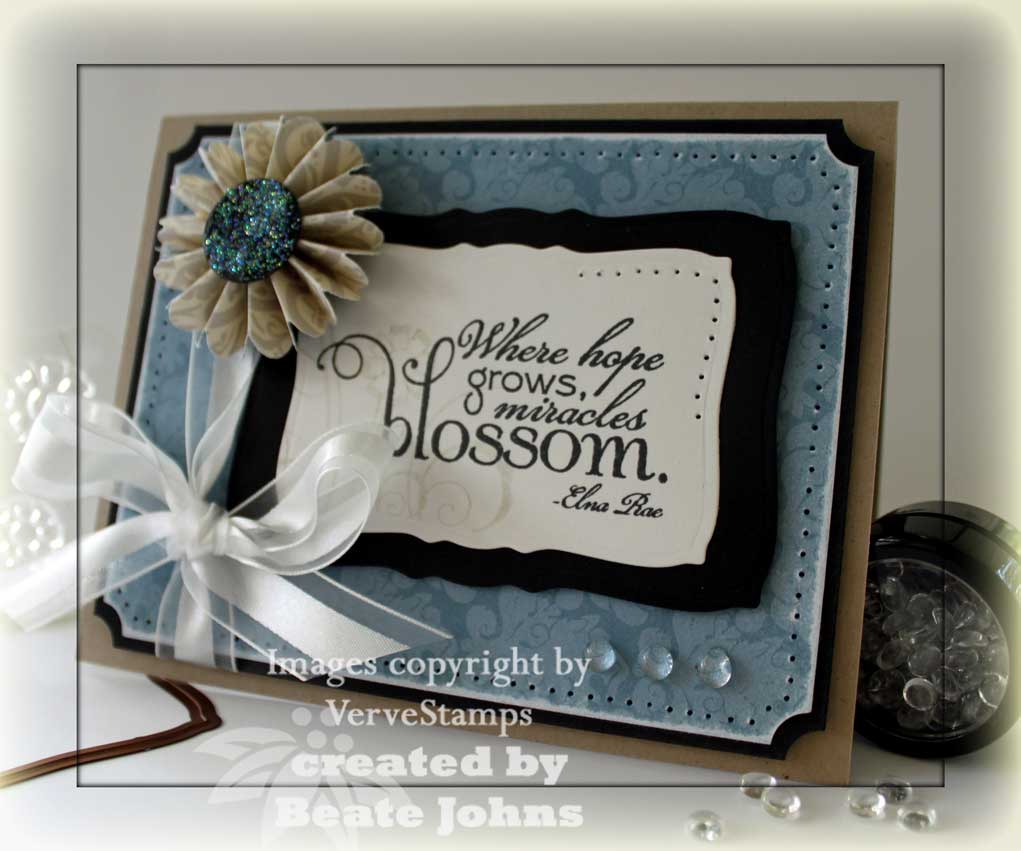
My card base is a 5 1/2″ x 8 1/2″ piece of Kraft cardstock folded in half. The first layer is a 3 7/8″ x 5 1/8″ piece of basic black cardstock. Each corner was punched with the ticket corner punch. Next is a 3 3/4″ x 5″ piece of Bella Bleu Designer Paper. The corners were punched with the ticket corner punch, the edge paper pierced and then sanded with the sanding block. White Organza Ribbon was tied on the left hand side. I actually tied a bow. It’s not perfect, but that’s as good as my bows get.
The sentiment is from another Verve Stamp set. It’s called “Miracle Blossom“. It was stamped with Tuxedo Black Memento ink on Shimmery White cardstock. It was cut out with Nestabilities and layered on the next size of cutout in Basic Black. On the left hand side of the sentiment I stamped a flower stem stamp from the same set in second generation Sahara sand. The top right corner was paper pierced.
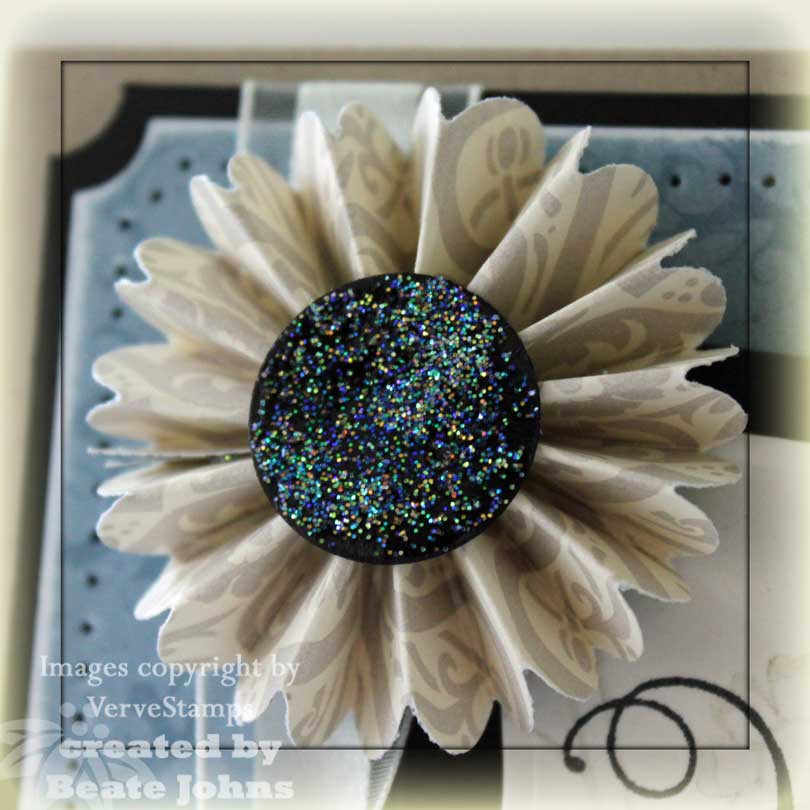
My Fan Fold Flower was created out of a 3/4″ x 12″ strip of Bella Bleu Designer Paper. One long side of the paper was punched with the scallop edge punch. A score was added between each scallop and the scores were folded mountain/valley style. The ends were taped together to created a zig/zag circle. Push the inside of the circle down and tape a 3/4″ circle in the center to hold the flower down. I added Crystal Effect over the circle and sprinkled Dazzling Diamond Glitter over it.
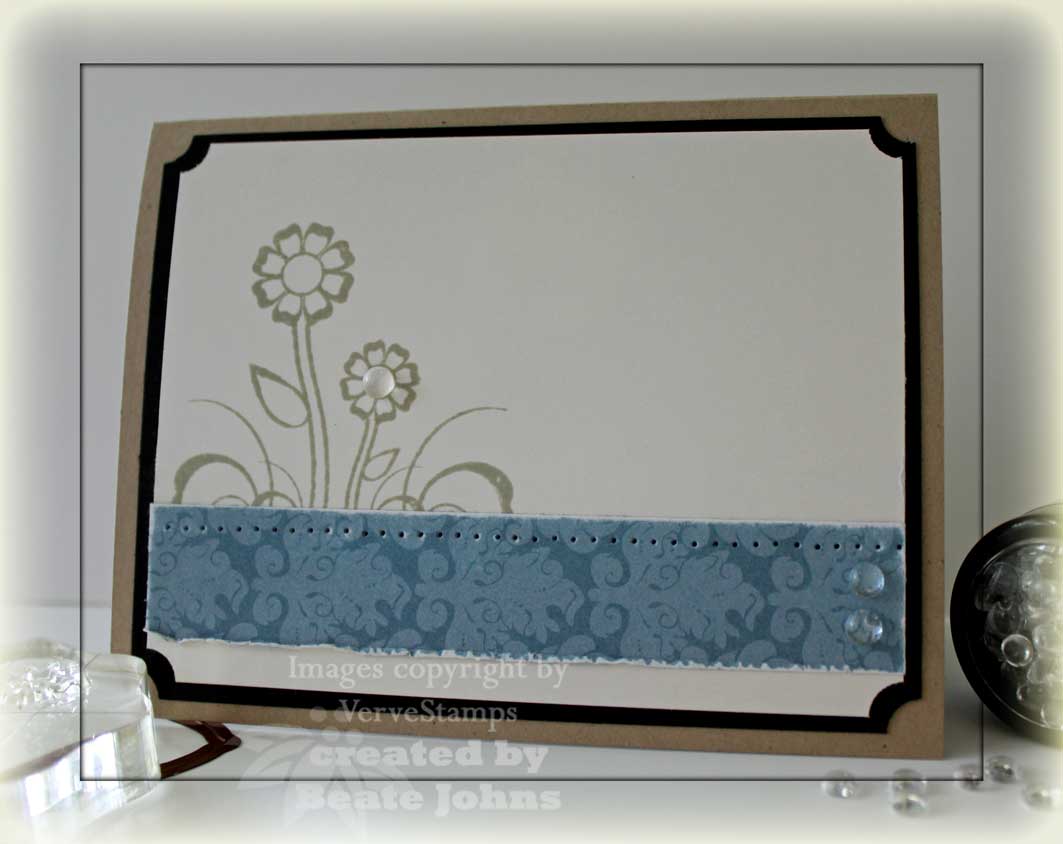
For the inside I cut a 3 7/8″ x 5 1/8″ piece of basic black cardstock and cut the corners with the ticket corner punch. Next is a 3 3/4″ x 5″ piece of Shimmery White cardstock. I stamped the flower stem along with two flower heads of Miracle Blossom in Sahara sand on the center of the left hand side.
A 7/8″ x 5″ piece of Bella Bleu Designer paper was added to the lower half. The top of the strip was paper pierced and all the edges were distressed with my sanding block. Clear dew drops in the smaller flower head and two on the left hand side of the designer paper strip finish off the inside.
I created a video tutorial for these darling flowers. You can find it here:
[youtube]https://www.youtube.com/watch?v=TWCyBjs_1Dc[/youtube]
Beate
21 Responses to “Tutorial on SCS – Fan Fold Flower”
Sorry, the comment form is closed at this time.


I still haven’t tried those flowers yet. Didn’t I spot one out of the corner of my eye on the sample card for the trifold tutorial? I love the combination of the flower and the soft pretty ribbon here.
Uber cool Beate!!! I have made those flowers before but always struggled with the adhesive part of holding them together!!! Love your videos!!!
You did a great job on this video, I am looking forward to trying the flower.
I really needed the visual on this one. I have seen so many beauties around, but I couldn’t wrap my brain around it. Thanks for all of your hard work!
It’s a good life!
Terri E.
I love the colors you used. It’s so peaceful looking. What a gorgeous flower. I made one last week and it took me a bit to figure out the adhesive and getting it to lay right. I wish I would have waited until now and would have had the visual to go by.
Jenn
PS. I’m going to Cincinnati on Saturday the 12th too!
Thanks for sharing. It is fascinating to listen to the tutorials – having seen your face on your blog to now know the voice that goes with it! Loved both the fancy fold card and this flower. Thank you.
Great tutorial, Beate! Thanks for taking the time to do this for us and keep those tutorials coming! 🙂
Your flower is so sweet! I need to try one of these…
I really enjoyed your tutorial Beate. And it was so lovely to hear you say your name in the beginning…I have often wondered how to pronounce it:-) Thanks for sharing!
I love these video’s that you are doing!! Your instructions are so detail and clear! Thank you so much and keep up the good work!!
Beate – Just love the new look and the tutorials! Am so glad you are settled and back to stamping and posting. Have fun at CHA!
Beate, it’s so good to see you back stamping!! This is really beautiful – as is all your creations!!!
What a nice tutorial! You make it look so easy! I’m off to try it right now while I remember how! Thanks so much – hope you are having a blast at CHA!
I love your videos. Hope you have tons more. Please, Please, Please!!!!!!
smallcity
Gorgeous cards, beautiful flowers, fantastic tutorial!! Thank you!!
fantastic tutorial, Beate! thanks you!
Love the tutorial. Makes the process much simpler. Thanx for sharing.
Here’s my first attempt at the fan fold flower:
http://creativeantics.blogspot.com/2009/08/sunshine-and-laughterand-surprise.html
Beate, this is a very pretty and simple paper project. Love the tutorial. Thanks for sharing.
Love this tutorial! Thanks!!! I will try it tonight!!
This flower seems like I could make this…you give such good directions! Thanks!