
Sorry I was so quiet over the weekend. I had a great time, just didn’t get to stamp. Friends from Illinois came to visit and stayed until yesterday. Our kids are friends with each other, the men are good friends and so are Sharon and I. Good times, good times.
Today’s tutorial on splitcoast is written by Lynn Mercurio and is for the Recessed Window. You can make your own little shadowbox. I think it looks so pretty.
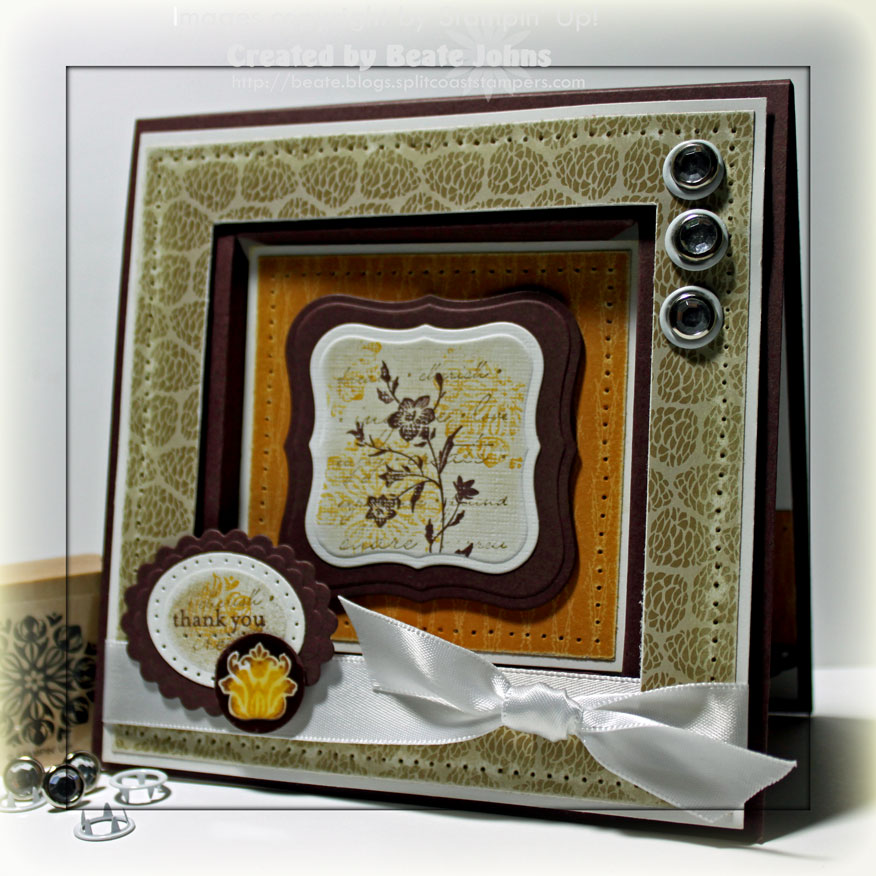
My card base is a 5 1/4″ x 10 3/4 piece of Chocolate Chip cardstock piece scored at 5 1/4″ and 5 1/2″. This will create a small spine as wide as my window. The spine will help the card to lay flat instead of gaping open when you just score the card base regularly.
My window sits 1″ in from each card side. For the frame I taped a 4 3/4″ square of Autumn Traditions Designer Paper on top of a 1/4″ bigger piece of Whisper White. I cut the window 3/4″ in, paper pierced and sanded the outer edge.
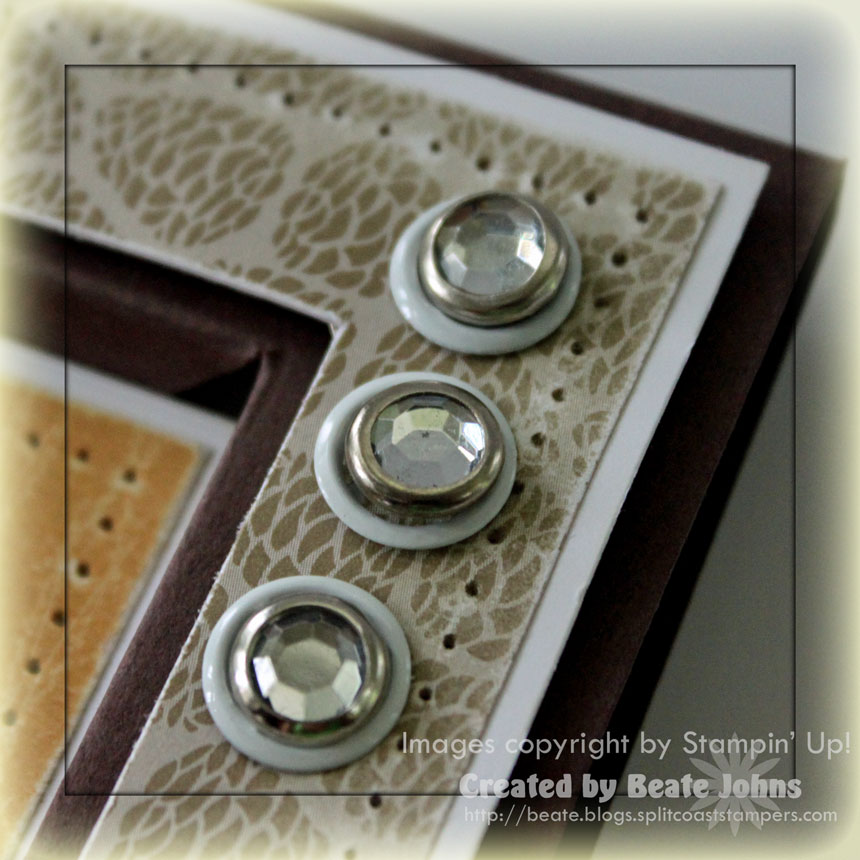
I finally ordered some small grommets. What the heck was I waiting for? I love how you can use them as outline for brads. I added three to the top right of my frame and added clear Rhinestone brads in each center. White Organza Ribbon was tied around the bottom edge of the frame. The frame was adhered to the card base with dimensionals.
The sentiment is from the stamp set Charming (Holiday Mini catalog). It was stamped in Chocolate Chip on Textured White cardstock. That was cut out and embossed with a small oval Nestabilities. I left the next die on, sponged over it with Soft Suede, stamped over it with a background stamp from Charming in second generation Soft Suede and stamped the medallion stamp from the same stamp set in second generation More Mustard. The oval was layered on a slightly bigger Chocolate Chip scallop oval that was cut with Nestabilities as well. It was adhered to the frame with dimensionals.

For the centerpiece I cut my base out of Textured White cardstock with the Nestabilities Label 1. Again I left the die over the cardstock, sponged Soft Suede over the center and stamped the main image in Chocolate Chip. Then I added the background stamp and medallion stamp over the cardstock just like I did with the sentiment piece. It was layered on the next size up Label 1 cutout out of Chocolate Chip cardstock. The center base is a 3 1/8″ square of Whisper White cardstock followed by a 2 7/8″ square of Autumn Tradition Designer Paper. The edges were paper pierced and sanded.
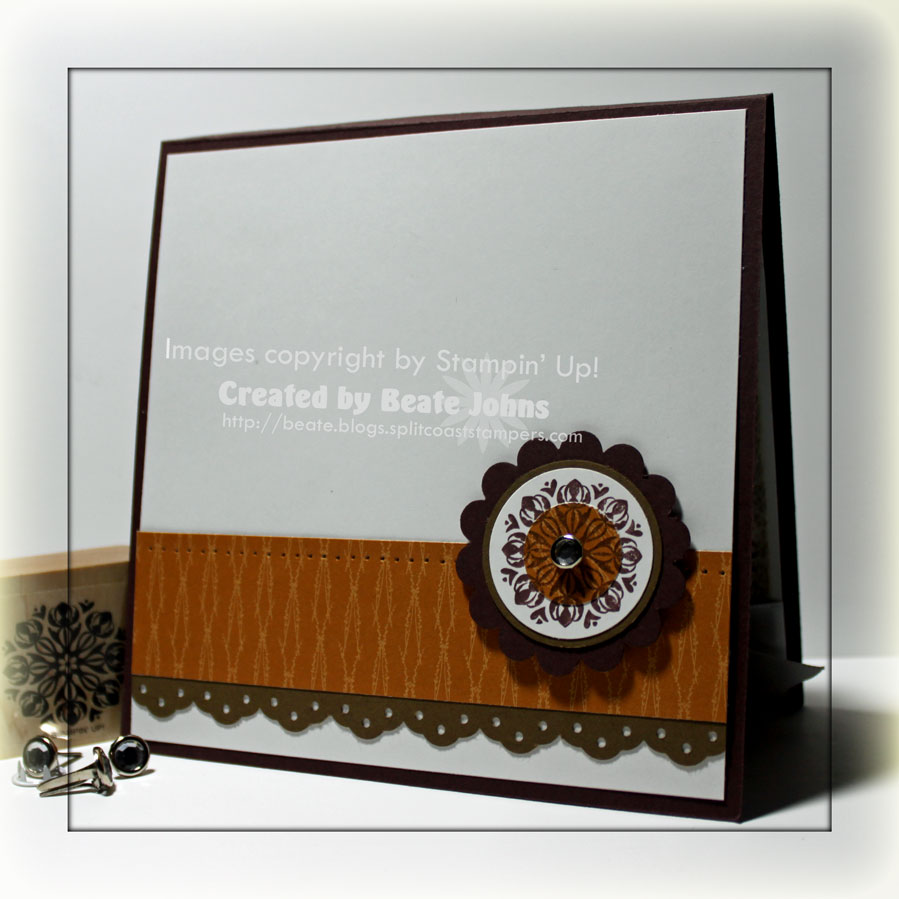
The inside the card is a 5″ Whisper White cardstock square. A 1 1/4″ strip of Autumn Traditions Designer Paper was added on the lower half. Underneath that is a strip of Soft Suede cardstock that had been punched with the Eyelet Border Punch. For the medallion I stamped the medallion from Charming twice, once on Whisper White cardstock, once on Autumn Tradtions Designer Paper. I punched out the center of the Designer Paper with the 3/4″ circle punch, taped that to the stamped White cardstock. That was punched out with the 1 1/4″ circle punch. Next is a 1 3/8″ Soft Suede circle and a Chocolate Chip scallop circle. A clear Rhinestone Brad was added in the center. The medallion was adhered to the card with dimensionals.
Here is a video for the visual learner:
[youtube]https://www.youtube.com/watch?v=HdFpXaor-ts[/youtube]
Beate
21 Responses to “Tutorial on SCS – Recessed Window”
Sorry, the comment form is closed at this time.


Oh Beate, I love i! Must make some of these. Loving your video tutorials too – thanks for doing them.
Woooah! Beate, this is STUNNING!!! The blinged grommets are amazing and the focal layer looks SO amazing…like gorgeous textured DP!! Man, you ALWAYS enable me! I just ordered and didn’t get this set, now I know I need it!!
Hugs,
Laurie
GORGEOUS card Beate! Absolutely stunning piece of work! 🙂
Thanks for the great tutorial – liked the video, well done! your card is as usual stunning, like those grommets… mmh, seems like a must have….lot’s of effort decoration inside and outside!
Absolutely gorgeous card!!!
ABSOLUTELY BEAUTIFUL card, Beate!! I love it, and I love that stamp set and this makes me want it even more!!! TFS
WOW Beate, was für ein Wahnsinnswerk *umfall*
GIGANTISCH SCHÖN !!!
Liebe Grüße
von Anke
Wow, Wow, Wow, I love it. beautiful colors beautiful everything.
smallcity
Gorgeous! And your video tutorial is perfect! Can’t wait to make one tonight
Wow, Beate, this is such an elegant card! I love the recessed window and your main image and sentiment are so pretty! I think I need to try a few of these for some very special Christmas cards! Thanks for the tutorial!
I LOVE this card style, your pretty colors, and images!! Beautiful!! Thanks for the video too!! So inspiring!!
This is SO pretty! I love that set, it is definitly on my list! 🙂 I will have to try this technique…looks really cool!
Wow I am going to have to try this one .
You have a great Blog 🙂
Beate, this is such a pretty card! Glad you had a great weekend–gotta enjoy what’s left of summer!
I am ssssssoooo glad that you are doing videos….love your voice and your explanations are so thorough…beautiful!!
Hi, thanks for sharing all wonderful ideas, cards, turorials and videos.
You are very creative and talented.
Have a nice time,
hugs Anja from germany
Great tutorial, Beate !! LOVE IT !!! You’re card is absolutely stunning !!!
Fabulous cards! Absolutely lovely!
Just Beautiful, pretty stamping and love the colors, tfs the video!!
Wowser…I have to try one of these!
Love this video!! I’ve been wanting to make this and the video really helps.
Thanks What kind of envelope would I use?