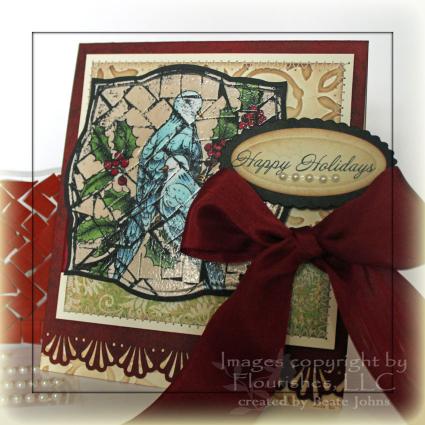
A few month ago I thought it would be cool to make a mosaic stamp with left over rubber from Stampin’ Up! sets. I showed it to Lydia Fiedler, she helped me name the technique Stained Mosaic. It is today’s tutorial on SCS.
For my sample I chose the Holly and Dove set from Flourishes. As soon as it came out I knew I wanted to use it for this technique. The card base is a 4 1/4″ x 8 1/2″ piece of Ridinghood Red Cardstock folded in half and sponged with Aged Mahogany Distress ink. The bottom of the card was punched with the Deco Shell Border Punch from Martha Stewart.
A 3 5/8″ square was embossed with the Victoria Cuttlebug embossing folder and sponged the raised part with Antique Linen, then the edges with Vintage Photo Distress ink. A small strip of Fruitcake Basic Grey paper was taped to the lower part and it was stitched to a 3 7/8″ square. Burgundy Silk May Arts ribbon was tied around the layers before they were taped to the card base with dimensionals.
The image was stamped with Tuxedo Black Memento Ink and colored with Copic Markers. I cut it out with Label 3 Nestabilities, stamped my Mosaic stamp over it with Versamark and embossed it with clear embossing powder. After the embossing powder cooled, I rubbed my black ink pad over the image, then buffed it with a paper towel, leaving the ink only in the cracks that were left by the stamp.
The sentiment is from the same stamp set. It was stamped on Vanilla cardstock, cut with Petite Oval Nestabilities, sponged first with Antique Linen, then a bit with Vintage Photo distress inks. Tiny white pearls were added under the the sentiment and the oval was adhered to a black scallop oval.
Here is a video for the visual learner:
[youtube]https://www.youtube.com/watch?v=vwXR7q9CyHU[/youtube]
On a personal note, sorry I haven’t been posting. I had another cold and then got stuck on a new book series. Have a wonderful day! Hugs and smiles
13 Responses to “Tutorial on SCS – Stained Mosaic”
Sorry, the comment form is closed at this time.


Beate, this is so beautiful. I am going to rummage in my garbage because I just tossed some rubber extras. Thanks for this wonderful tutorial.
WOW Beate! This is SO super cool! LOVE this!
This is such a pretty card, Beate! That looks like a fun technique…gotta try that myself. Thanks for the video!
This is ssooo beautiful, Beate!! Thank you for the great tutorial!
I hope you’re doing okay in this northern cold weather. Hugs!!
Wonderful tutorial, Beate! Your card is just beautiful.
This is a beautiful and very special card.. What a wonderful technique. Thanks so much for sharing.
Very cool technique!! What a great use of left over rubber!
~Lacey
I have to try this!!!
oh yeah… feel better soon too =)
clever idea, it was very interesting to watch
What punch did you use on the maroon paper. I don’t see that you tell us.
wow, that’s cool! i’ve not seen that technique yet. really pretty!
This is the most amazingly creative technique I have seen and one I must try! Thank you so much for the fabulous tutorial!!!