

For yesterday’s product review we ran a tutorial by the sweet and talented Linda Duke. I had seen her gorgeous embossed Vellum Nestabilities die cut during the Spellbinders blog hop and asked her if we could run it for our review. She graciously agreed. I loved her card so much, that I had to try it out right away. I didn’t have the beaded Oval Nestabilities dies Linda used, so for my sample I used the largest of the Crowned Oval die.
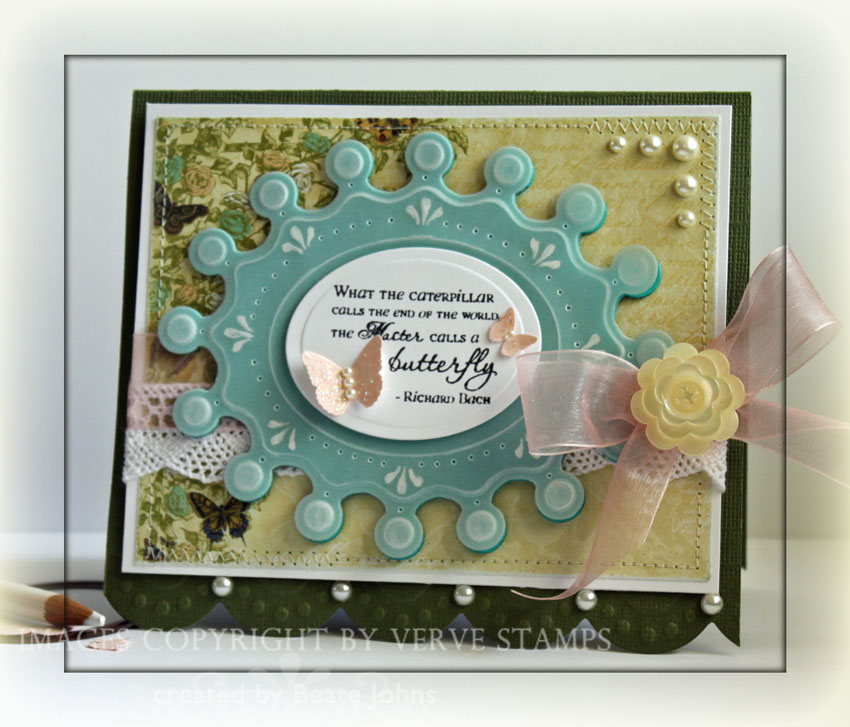
For my Frosted Nestabilities I used a small stamp from Verve’s Accent Notes. I drew it on the back of my vellum cardstock with my white opaque pen after I cut, embossed and paper pierced it. The Vellum was adhered to a Bermuda Bay Crowned Oval. I don’t have Vellum tape yet (I know, I need some), so I just added adhesive where I later placed my smaller white oval, that had been cut and embossed with Classic Oval Nestabilities. The classic oval was stamped in Tuxedo black Memento Ink with a sentiment from Verve’s Beautiful You.
The card base started out as a 5 3/4″ x 10 1/2″ piece of Evergreen Core’dinations cardstock. It was folded in half and the bottom edge was cut and embossed with the Jumbo Scalloped Borderabilities. The edges of a 4 1/8″ x 5 1/8″ piece of Webster’s Pages patterned paper were sanded before the layer was stitched to a 1/4″ bigger piece of Neenah Solar White cardstock. White lace (Jo’Ann’s) was adhered horizontally and Antique Rose Sheer ribbon was tied around it and topped with one of Tim’s gorgeous button.
The Crowned Oval die-cuts were adhered to the card base with dimensionals. Butterflies were punched out of the retired Blush Blossoms cardstock (Stampin’ Up!) wand adhered to the sentiment. The wings were covered with Stardust Stickles. The center of the bigger butterfly received Pearl Kaisercraft pearls, the smaller one White Opal Liquid Pearls. More Pearl Kaisercraft Pearls were added to the top right as well as on the top of each scallop to finish of the card front.
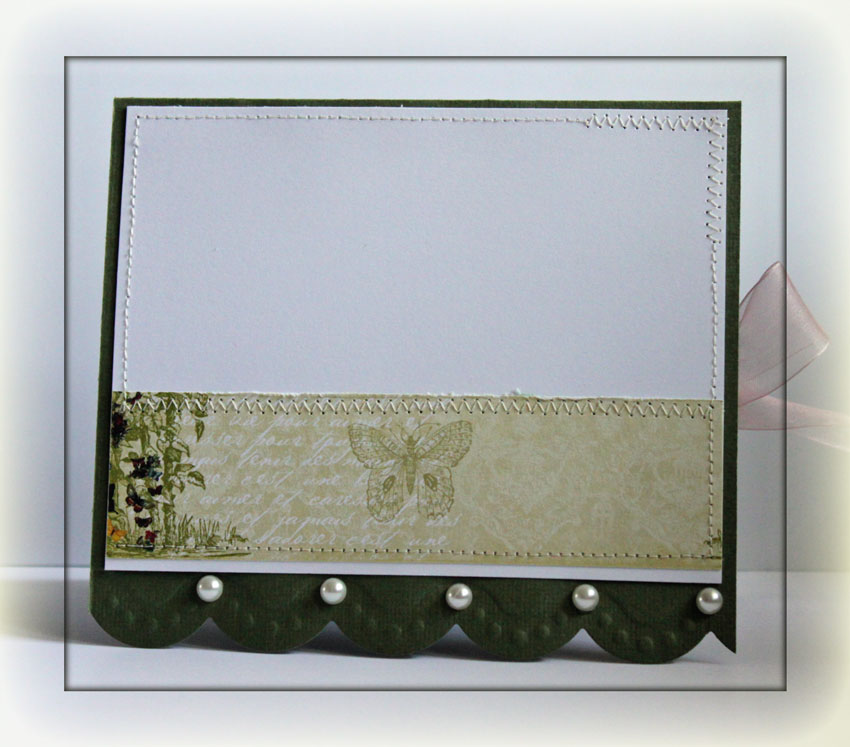
The inside of the card was kept was very simple. A 1 1/2″ wide strip of Webster’s Pages patterned paper was stitched to a white piece of cardstock. Pearl Kaisercraft Pearls were adhered to the top of each scallop.
Thanks so much for stopping by! Have a wonderful day! Hugs and smiles
Update:
I just saw the new Beaded and Lacey Decorative Nestabilities in the Flourishes store. Along with two of the new label dies. I so ordered them already!
Beate
11 Responses to “Tutorial on SCS – Frosted Nestabilities”
Sorry, the comment form is closed at this time.


Oh my, Beate…this is STUNNING!!!!! What a wonderful technique to add a little glam and elegance to a project…love that fabo crowned oval die, too!!!!
So elegant Beate! I can’t wait till my nesties arrive! I’m getting so impatient to play with them!
Beautiful card, Beate! I love the colors, papers, and vintage embellishments. That die is beautiful, too.
LOVE the Butterflies and Julee Verve stamp… It’s one of my favs. What a cool new die cut behind your oval nestie… Great color and layout…
HUGs
BROKE
This is absolutely stunning, Beate! I love everything about it!
Fabulous card – love that fancy oval nestie!!!!! Very cool.
This is sooo stunning with the embossed velum!! I REALLY need to give this a try!
Loooooove the look of this frosted vellum!!
…and I need to get myself some vellum tape too, lol!
Oh…I’m loving this beauty as well, Beate!! Such pretty papers, elegant script, and I love your ribbon layers and beautiful button!! Sweet little butterflies too!
beautiful effect with the vellum! gorgeous card as always! love it!
Beautiful, so love your colors and the framing of the sentiment is out of this world!