
I love the Vintage Christmas set from Crafty Secret. The santa is gorgeous and so are the coordinating stamps. So when I was looking for a set to use for creating a sample for the Retiform video tutorial, that set popped into my mind.
I cut a piece of Natural White cardstock with Tim Holtz Baroque Sizzix die and stamped the Santa in Rich Cocoa Memento Ink in it’s center. Next I created a reverse mask out of copier paper with a Classic Oval Nestabilities die and sponged an oval around the Santa first in Vintage Photo, then just the edges of the Oval in Walnut Stain Distress Ink.
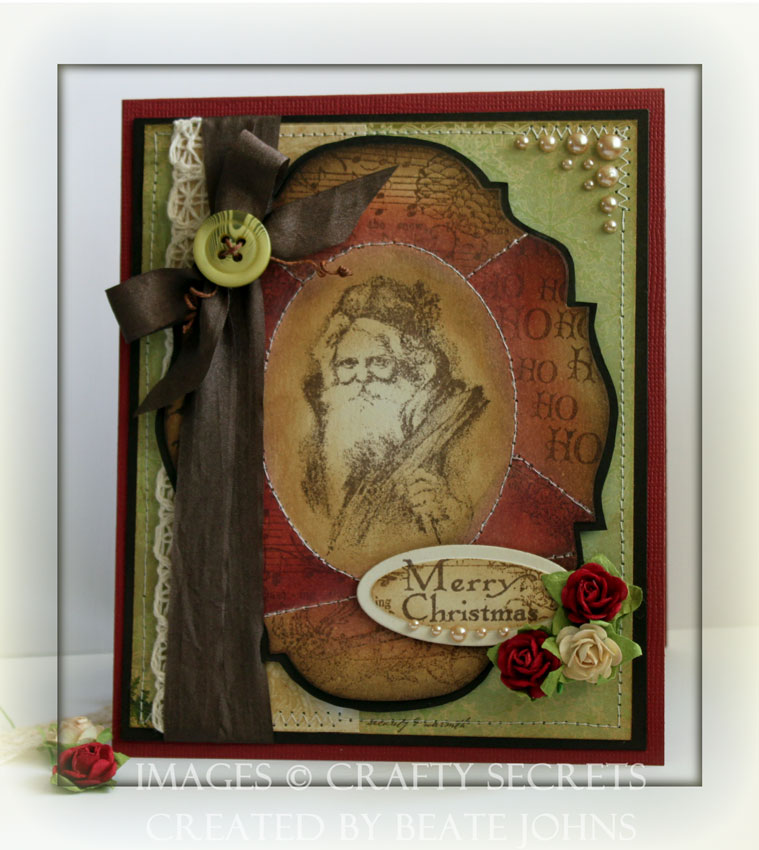
I removed the reverse mask and covered the sponged oval with the copy paper oval I had cut in order to create the reverse mask. More copy paper was used to sponge several panels. One side of the sponged lines was created with Vintage Photo, the other with Fired Brick Distress Ink.
Once the panels were sponged, I covered all up but one and stamped an image in from Vintage Christmas. After all panels were filled, the layer was adhered to a bigger piece of Early Espresso cardstock . I cut around it to create the matching layer. I sewed over the sponged lines.
The sentiment is from Season’s Greetings. It was stamped in Walnut Stain Distress Ink on Natural White Neenah cardstock, cut and embossed with Petite Oval Nestabilities. I left the die over the cardstock, stamped the musical score over it with Vintage Photo and then sponged the panel with the same ink. Latte Kaisercraft Pearls were adhered underneath the sentiment and three Prima Mini Roses were adhered to the right of it.
A 1 3/4″ x 5 1/2″ strip of Webster’s Pages Holiday Paper was adhered to the left on to a 4 1/2″ x 5 1/2″ piece of different pattern of the same paper pack. Melissa Frances lace was adhered to the left of the vertical paper strip before the layers were stitched to a 3/16″ bigger piece of Early Espresso cardstock. Brown Wrinkled May Arts Ribbon was wrapped around the layers twice before it was tied into a bow. It was topped with a green button that was attached to the ribbon with Butterscotch waxed Linen. I twisted the ends of the waxed linen around my paper piercer to curl them up.
5″ x 12″ piece of red Core’dinations cardstock was folded in half and used as card base. More Latte Kaisercraft Pearls were added to the top right corner to finish off the card front.
Here is a video for the visual learner:
[youtube]https://www.youtube.com/watch?v=UCKcRcBQTzE[/youtube]
Thanks so much for stopping by! Have a wonderful Sunday! Hugs and smiles
Beate
25 Responses to “Vintage Santa”
Sorry, the comment form is closed at this time.


What a beautiful card. You truly are an inspiration. Thanks for sharing. My sister and I are taking a vintage Christmas class today using a lot of Tim Holtz techniques. I love using Distress ink on my cards. Can’t wait
Wow! Beautiful, just beautiful!
Sandra
Gorgeous card, Beate! Love your vintage Santa!!! I’ve missed your blog…off to catch up!
I adore vintage Santa images. This is a stunner, Beate!
Thank you for your wonderful video! I love watching you work, and listening to you talk. You are an excellent teacher. That card is just a real stunner! I love the Tim Holtz die, but the only cutter I have is a Cuttlebug, and I don’t know if the TH dies will work in it, or what the recipe is. Do you know? Thanks again, Beate, for being such an inspiration! You are wonderful 🙂
Oh Beate – this card is absolutely gorgeous! I love the vintage look. I can’t wait to watch the video. Your videos are always so helpful and easy to follow – thank you for providing them for us.
WOw- I LOVE this- and thanks for the visual…..I have a Santa that would work great like this! Hugs!!
Beate ~ You know that you were the first to inspire me about sponging…Oh my how I loved this video!!! It made me feel like I was right there with you learning…This is one of the prettiest cards ever…and your use of so many different stamps around the focal image just inspired me more…Thanks girl!!
Gorgeous, I tell you, Just Gorgeous! You have done it again. This image is wonderful! Well done!
Awesome card, and awesome tutorial.. thanks 🙂
Awesome card and tutorial!!!!
Eine wunderschöne Weihnachtskarte liebe Beate, der Vintage Look ist Dir perfekt gelungen.
Liebe Grüße
von Anke
WOW Beate! A lot of work, but gorgeous! Thanks so much for making the tutorial- will have to give this a try at some point.
Just stunning!!!
wow! it looks really amazing with all the masking and inking you did. gorgeous holiday card. off to watch “some” videos!! =)
Wow that is so neat and love how you stitched between the panels too!
What a gorgeous card, Beate. That Santa is wonderful and I love, love, love that arrangement of pearls in the corner!!! I haven’t done this technique in AGES….thanks for the reminder.
beautifully done Beate! Love that image and how you framed him!
Thanks so much for the tutorial!!!! I ALWAYS enjoy your creativeness…much appreciated!
Jan Castle
WOW! Gorgeous card Beate! Love the way you showcased that Vintage Santa image!
Wowwwwww, such GORGEOUSNESS!!
Just beautiful! Love the vintage design, colors and layers! WOW!
gorgeous in every way!!!!
very vintage !!!!
tfs:)
Very cool technique! Great video and awesome vintage card!
~Lacey
http://www.stampandcreate.com
Hi Beate,
Another fantastic, creative project!!
I love all of your video tutorials, I have taken so much inspiration from them all – Thank you so much!
Could you please tell me which card stock you use? I really love the one that looks as if it’s a burnt orange colour.