
Today’s tutorial on Splitcoast is written by Anne Harada. It is called Faux Pressed Flowers.
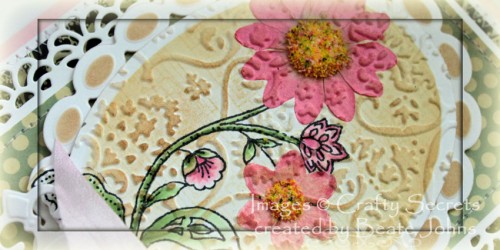
For my sample I started out by stamping a stem stamp from Crafty Secrets new Art Blooms stamp set in Tuxedo Black Memento Ink on Neenah Solar White cardstock. I was cut with the Out of the Box Technique and Classic Oval Nestabilities die. Next I masked the stem and stamped over the image with the note border from Artsy Banner in Antique Linen Distress Ink.
The image was colored with Copic Markers (G40, G82, G85, RV32, RV35) and the oval was sponged first with Antique Linen, then with Vintage Photo Distress Ink. Prima Flowers were adhered over the stem, then the entire oval was embossed with ProvoCraft’s Textile Texture Embossing Folder. Next I sponged some more Vintage Photo Ink over the embossed part of the oval. Citrus Crush Flower Soft was added in the center of my Prima Flowers.
The oval was adhered over another piece of Neenah Solar White cardstock, that had been was cut and embossed with Beaded Oval Nestabilities die and sponged with Vintage Photo ink.
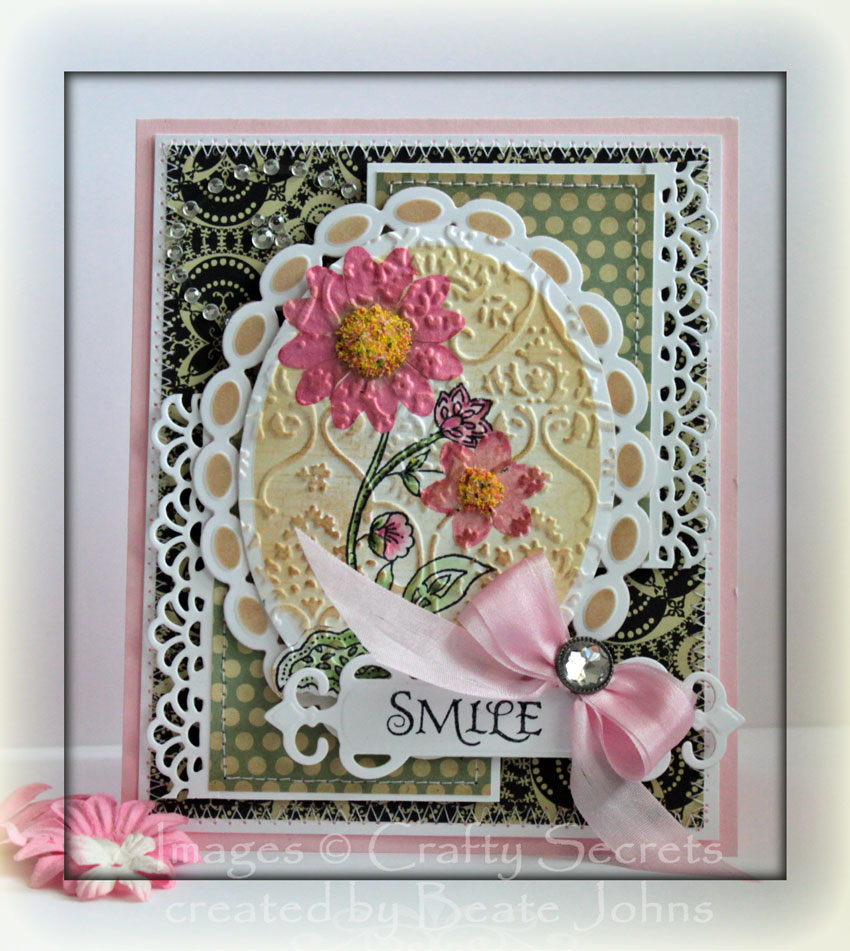
I created the card following the Midnight Madness Sketch challenge from last week. For the card base a 4″ x 5″ piece of Circa 1934 Cosmo Cricket patterned paper was stitched to a 3/16″ piece of Neenah Solar White cardstock. Two 2″ x 2 7/8″ piece of Circa 1934 paper were stitched to 3/16″ bigger piece of white cardstock. Two 2 7/8″ long strips of white cardstock were cut with the Faux Crochet Border Dienamics, adhered to the rectangle pieces before those were taped to the bigger layers.
The layers were adhered to the card base, a 4 1/4″ x 11″ piece of Pink Pirouette cardstock folded in half. Recollections Rhinestone swirl was adhered to the upper right corner. Another piece of Solar White was cut and embossed with Spellbinders Fancy Tag dies. One of the sentiments from Art Blooms was stamped on it with Tuxedo Black Memento Ink.
A pink silk bow was tied with the Bow Easy and topped with a Recollection Rhinestone brad. It was adhered to the upper right side of the sentiment panel to finish off the card front.
Here is a video for the visual learner:
[youtube]https://www.youtube.com/watch?v=ecfSfwNJSKo[/youtube]
Thanks so much for stopping by! Have a wonderful day! Hugs and smiles
Beate
17 Responses to “Tutorial on SCS – Faux Pressed Flowers”
Sorry, the comment form is closed at this time.


This is SO lovely and vintage looking! Truly gorgeous!!! Looks like a FUN technique!!! TFS!!!
Absolutely beautiful! I love all the detailed layers you have on your cards and this one is no exception. I’m going to have to check out the midnight madness challenge – I love sketches!
Gorgeous card, Beate. So much texture and so many fabulous layers.
this is sooooo cool!
Beautiful card, thanks for the tutorial, we visual learners really appreciate it!
Oh! Very pretty! I need to watch the video now!
Wow Beate! I would never have come up with this idea…it looks just like “pressed flowers!” Thank you again for another wonderful inspiration! Just Beautiful 🙂
Get out! This is gorgeous! Wow! So pretty! Love all that texture!
Absolutely beautiful! Will have to try this technique!
Little wonder why your Blog is called Fresh and Fun…this is the place to come to find fresh ideas and this Faux Pressed Flowers technique is yet another. I have a ME day today so now I have a new technique to try … thanks, Beate!
Have I told you how much I LOVE it when you make these videos? I am a visual learner and these make my life so much easier.
I love the pretty paper and that flwoer image was perfect for this technique. I will try this for sure…and give you credit of course. 🙂
Hugs~
What a stunning card! All the color and texture is wonderful!
Lovely card and very easy-to-follow video. What a very nice effect! 🙂
this is gorgeous with all the textures. beautiful card, Beate! really love the pops of pink!
How neat is that, I love the look of pressed flowers, I am going to have to give this one a try very soon, maybe if I get some time today 🙂 thanks for sharing the videos I am a visual learner that is for sure
OMGoodness! This is one of the most GORGEOUS cards I’ve ever seen. I have gone on and on about this card to my stamping friends. I’m trying to figure out how to email my friends the tutorial. I will be trying this technique soon. TFSharing!
what a great idea! thank you for sharing…..really pretty how that turned out. Pam