
Last Monday the technique challenge on Splitcoast was to create a different shaped card. I had wanted to create a circle Easel Card for quite a while and the challenge was all the motivation I needed to get started.
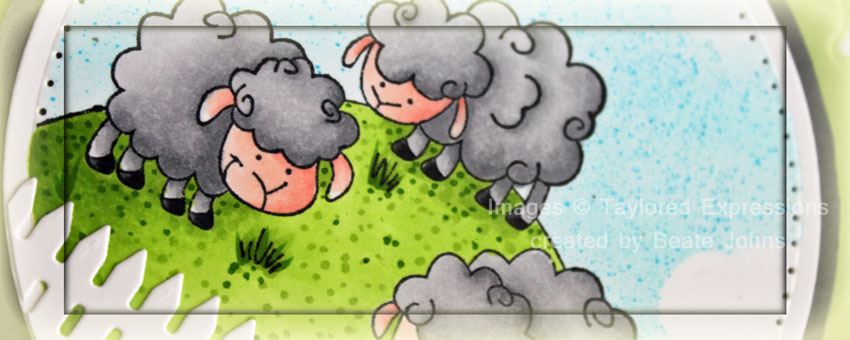
I cut a piece of Neenah Solar White cardstock with the largest of the Classic Circle Nestabilities die, stamped the hill image from Taylored Expressions Hello Spring in Tuxedo Black Memento Ink and colored it in with Copic Markers (Sheep skin: N0, N1, N3, Sheep Face: R00, R20, Hooves: N5, N7, N9 Hill: YG01, YG03, YG17).
I masked the image with Eclipse Tape, covered the edges back up with my Circle die and airbrushed the sky first with the Chisel tip side of Marker B00, then switched to the brush tip of marker B04 and ever so slightly added stipple flecks with that. I had added some cloud masks at different points of the airbrushing. Those clouds were cut out of Tim’s Mask sheets with the Cloud Die-namics die. White cardstock was cut with the Picket Fence Border die and adhered to the bottom of the hill.
The image was adhered to Basic Gray cardstock, which was cut by hand into a slightly bigger layer. The edges of the image were paper pierced before the layers were adhered to a Scalloped circle cut out of with the smallest of the Sour Apple cardstock Grand Scallop Circle Nestabilities dies.
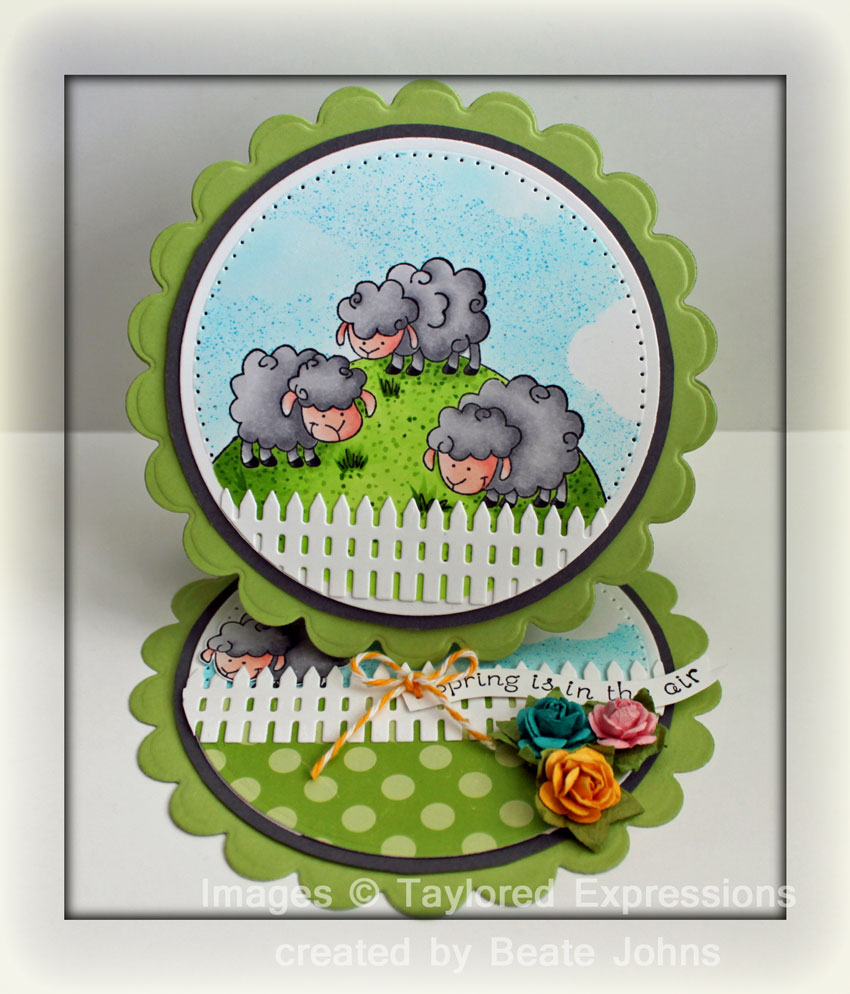
A Sour Apple cardstock strip was folded in half and and a base was cut with the same Scallop circles. One of the circles was folded in half and the card top was adhered to one half of the folded side. The bottom/inside of the card was decorated similar then the top.
The sentiment is from the same stamp set. It was stamped in Tuxedo Black Memento ink on Solar White cardstock. It was cut into banner form and tied to the fence on the bottom of the page with Lemondrop Twine. Three Recollection Flowers over Little Boy Echo Park paper finish off the card.
Thanks so much for stopping by! Have a wonderful day! Hugs and smiles
Click on more if you want to see a couple of pictures on how to create a circular Easel card.
Circular Easel card step 1:
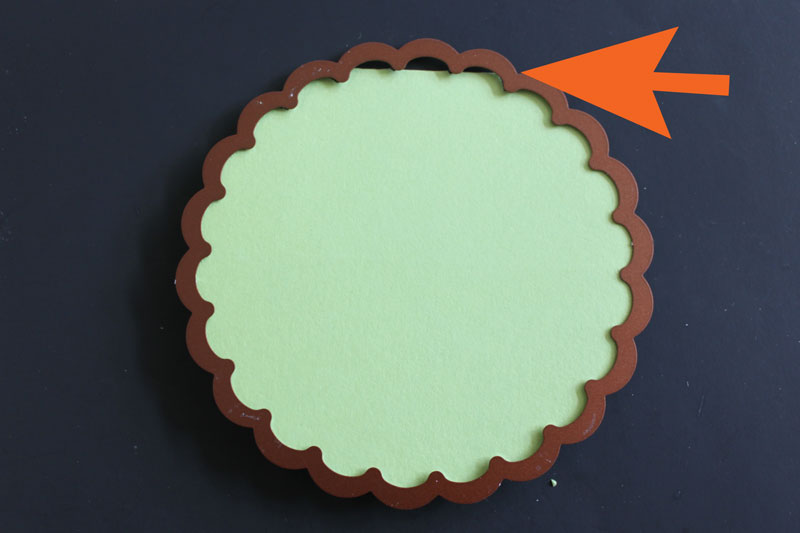
Take a piece of cardstock, fold in half and cut with die cut template. Make sure the fold of your card base is inside the template, so it won’t be cut.
Circular Easel card Step 2:

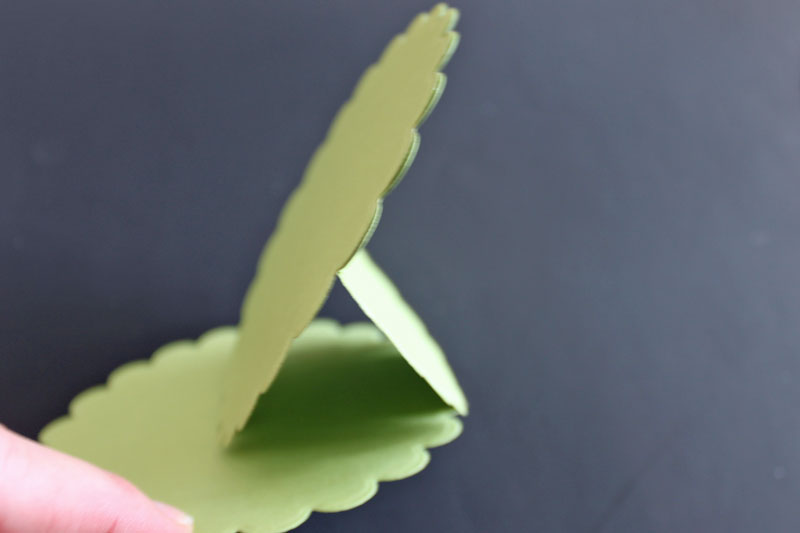
Score one of the card base pieces in half and add adhesive on 1/2 of the scored card side.
Cut a single scallop circle out of the same cardstock you use for the card base with the same die you used for base.
Circular Easel Step3:
Adhere the single circle over the 1/2 of the card base to create your Easel base and decorate the top and bottom of the base.
Beate
34 Responses to “Round Easel Card”
Sorry, the comment form is closed at this time.


This is just adorable Beate.
sooooo cute! i’ve never seen a circle easel! 🙂
Such a darling card Beate! Thanks for the tutorial! I saw one at Valentines made with heart shapes and never had time to figure out how to make one! lol!
SWEET Beate I LOVE circular cards and just finished up a few easel ones, too FUN
Just an adorable fun card Beate! Love love this…I too have been wanting to try a circle easel card…thanks for the inspiration!
Oh my goodness, this is so adorable, Beate!!!
WAY too cute girlie! LOVE this circle card and your coloring and these sheep are DARLING!!!
A round Easel card?! How cute is this!! I love your adorable sheep and your picket fence!!
This is just the most adorable card ever! I love it all!!
Hugs,
Peggy
Super cute! I just LOVE round easel cards like this. I need to get my hands on some of the Grand Nestabilites. This is just adorable and I really love the images you used and what a great idea to use the masking sheets for clouds… brilliant!
Awww… This is so sweet. The fence makes for a perfect stopper on the Easel fold too. Adorable Beate.
This is so cute Beate! and I love that you showed how to make them as I wondered!!
Oh wow, what an idea! It looks amazing! That image is darn cute. Gorgeous sky Beate! I just ordered that fence and I cannot wait to get my hands on it.
Have a great day!
Jose
AWWW Beate this is totally ADORABLE! I LOVE circle easels and your scene you created with the fence is just the SWEETEST!!! beautiful!!! Happy Friday!
Oh my word, look at those cute little lambs…and that cute fence! What a great circle/easel card lady!
…die sieht himmlisch aus…, muss ich auch mal versuchen… absolut spitze Beate…und das sie rund ist, gefällt mit besonders gut!
thanks for sharing a round easel card – this is just ADORABLE!!!
This card is just darling! You never cease to amaze me. Thanks for another great idea!
this is too cute, Beate! LOVE the pretty scene you created. just makes me smile! =) fabulous work!
Beate this is absolutely darling!!! Your coloring is incredible as always and the details and design are perfection!
I love your easel card, Beate. Lots of detail, and beautiful colouring x
Genius!!! So fun, and ADORABLE!!
I adore this! The combination of the cute sheep, the circles, and the easal makes it irresistably sweet!
is that ever cute 🙂 I wondered about how I would go about making a circle one, thanks for sharing, great coloring and love the fence with it!
Always enjoy your posts and have learned so much with your tutorials – THANKS!!
Oh my gosh, can this get ANY cuter? This is absolutely ADORABLE!
Hi Beate I made a round easel card have directed my readers here to your directions. Thanks for such and AWESOME Tutorial!!!
http://cindyhaffnerscorner.blogspot.com/2011/03/round-easel-card.html
Beate, you card is fabulous. Thank you so much for sharing the instructions. I am definitely going to give this tutorial a try!
I have made easel cards before, but never a round one. I have held onto this tutorial until now and am making an Easter card based on this idea.
awwww! this is soo adorable!!
[…] image was adhered to a round circle easel card base, cut and embossed out of Imperial Core’dinations […]
I just love your cards and tutorials.
Very nice!
Thanks so much for the tutorial! I will refer others back when I have blogged mine! Appreciate it!
What a wonderful creation and colouring! Thanks so much for this tutorial!
Michi