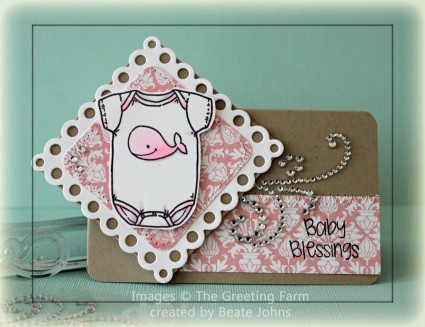
Today’s tutorial is for a fun fold I called Side Spring card. Instructions were posted back in 2005 in a forum post on SCS and a recent post from Dawn reminded me of it.
For my card I started out with a 5 1/2″ x 8 1/2″ piece of Kraft cardstock. The patterned paper is from the Echo Park Victoria Garden Paper pack. The strip on the left hand side measures 1 1/4″ x 4 1/2″. A sentiment from The Greeting Farm’s new Clear Set Build-a-Onesie Boy was stamped with Tuxedo Black Memento Ink directly on to the paper strip. Part of a Finesse Silver Rhinestone Swirl was adhered over to sentiment.
For the main image I stamped the onesie image on a piece of Neenah Solar White cardstock, colored it with Copic Markers (RV0000, RV10, N0, N1) and cut it out. A piece of white cardstock was cut and embossed with one of the Eyelet Square Nestabilities dies. A 2 3/8″ square of Victoria Garden paper was stitched to it after the corners were rounded. The image was adhered to the square with dimensionals. Three Silver Baby Bling Rhinestones on the left corner finish off the card front.
For the inside a 5/8″ x 4 5/16″ long patterned paper strip was adhered to a 2 9/16″ x 4 5/16″ piece of white cardstock. A small image from the same set was stamped to the right hand side of the strip with Tuxedo Black Memento ink.
Here is a video for the visual learner:
[youtube]https://www.youtube.com/watch?v=7nMekwqD3XE[/youtube]
Have a wonderful day! Thanks so much for stopping by!
Hugs and smiles
10 Responses to “Tutorial on SCS – Side Spring Card”
Sorry, the comment form is closed at this time.


Thank you for a great tutorial. I might have to try this one for sure!
What a fun fold! I never would have imagined it was all one piece of cardstock. Your baby card is so cute, love the pink and kraft combo!
I don’t think I have ever seen a side spring card! That onesie is too cute!
Love this very different card style! I’m going to have to make one to really understand how it works, but I’m sure once I actually do it myself, I will get it. Thanks for the video, I’d never get it from written instructions, I’m such a visual learner!
Always nice to see something different that isn’t too difficult to try. Thanks for the video tutorial, Beate … it really does help.
Beate another unique creation. Love it. Thank you for sharing. ;0)
I am always amazed at the videos that you create. Been following you for a long time at the SCS site. It is nice to see you here at your own. Thanks for such a neat idea. Will have to share this with my friends.
That is a super cool fold, cute card, thanks for sharing the video!
that is a very fun and unique fold. and the stamps are sooooo cute! super duper cute card, Beate! love the video, too! thanks! =)
Eeeks! This is TOO cute!!