
When I first saw Tsukineko’s Goosebumps Texture Spray last summer at CHA, I knew I had to have it. You can create your own resist papers. You can also add great texture to your projects.
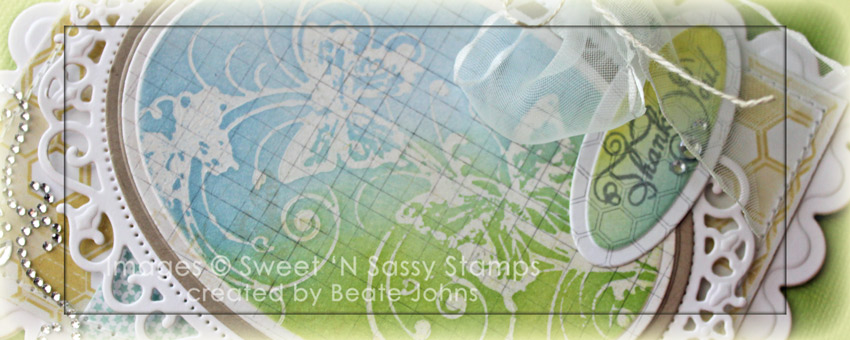
For this technique I added some Goosebumps Spray to a Blending tool. The image from the Butterfly Flourish was dabbed with the tool and stamped on My Mind’s Eye Be Amazing Patterned paper, that had been cut and embossed with a Petite Oval Nestabilities die. After the spray dried, the image was sponged with Summer Sky and Pear Tart Memento Ink. The oval was layered first on a piece of Kraft paper cut with a Petite Oval die, then on a piece of Neenah Solar White cardstock, cut and embossed with the largest Floral Oval Nestabilities die.
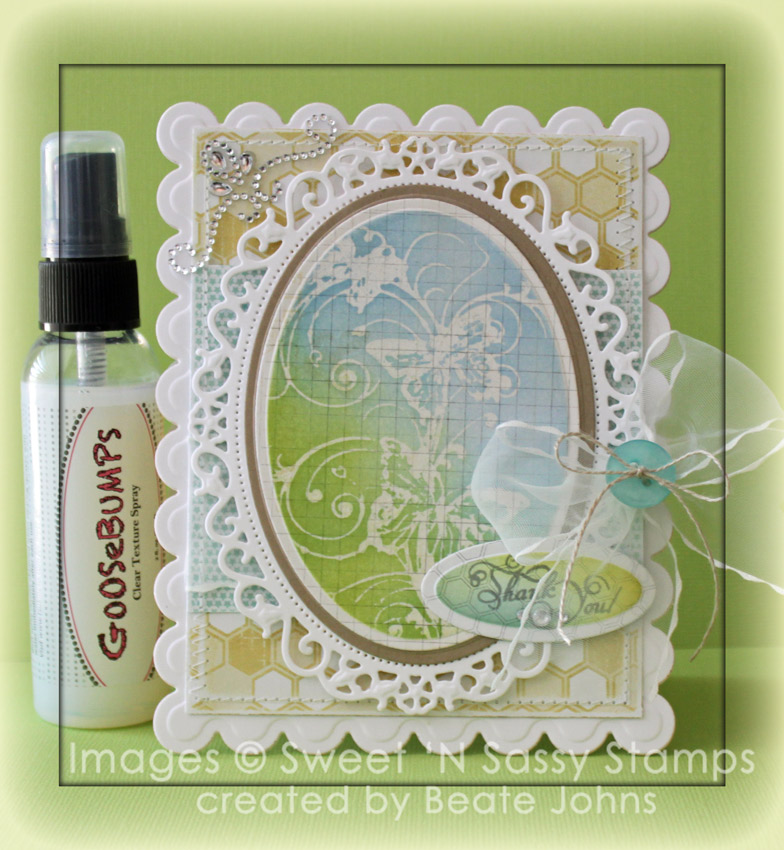
Two pieces of Be Amazing paper were cut and embossed with a Grand Rectangle Nestabilities die. The edges were sanded and stitched before May Arts ribbon was tied around the horizontal strip. The bow was topped with a button, tied on with embroidery thread before the layers were adhered to the card base, white cardstock cut and embossed with a Grand Scallop Rectangle die.
More patterned paper was cut and embossed with the smallest Petite Oval Nestabilities die, sponged with Summer Sky and Pear Tart Memento Ink before the sentiment from that set was stamped in London Fog Memento Ink. Fancy That! Border Bling on the top left corner finished off the card.
Here is a video for the visual learner:
[youtube]https://www.youtube.com/watch?v=KQJ3wUPouWA[/youtube]
Thanks so much for stopping by! Have a wonderful day!
Hugs and smiles
|
|
Beate
26 Responses to “Tutorial on SCS – Texture Spray Resist”
Sorry, the comment form is closed at this time.


Gorgeous card ♥
So beautiful card! Great job!
God Bless 🙂
I almost bought some of this a couple of weeks ago but chickened out because I had no idea how to use it LOL Love this tutorial and am adding goosebumps back to my wishlist!
Beautiful card! Gives me goosebumps lol
Gorgeous card! I’ve never tried this product and I can honestly say I don’t think I’ve ever seen it before either.
I love your video, thanks you for the idea. Your card turned out wonderful. I’m going to have to try this. I love the way your card turned out just stunning.
Such beautiful colors and the tutorial is really great. Hugs! Mojca
Hi Beate,
Before I talk about today post I just wanted to let you know that a used your fabulous tutorial to create a corner bookmark for my new blog. With respect to you and your work, I included your name and a link to your website and your tutorial. I just wondered if it would be ok to use your version for a tutorial of my own please. It will just be a basic step by step guide, (I am so very new to blogging, so no videos etc) that some of my followers may like. I hope you will approve, you can email me at [email protected]
Your card and tutorial today are fabulous. I love resist, you can get so many wonderful effects from it, your card goes to prove that perfectly. The colours you have chosen are really suited to you and your blog, was that pechance or forethought? Whichever, it is definitely ‘fresh and fun’.
I love your blog, you always offer such wonderful inspiration and have a range of fabulous tutorials. Thanks for all of it. Regards and best wishes Linda x
I’ve never seen this product before, but it sure looks interesting. Thanks!
Another amazing product! It’s so hard to keep up with all of the new and exciting changes in the paper world. Thanks for sharing this product and your beautiful card!
Well, your art gives ME goosebumps! So gorgeous, Beate! Love the colors you chose to work with, too.
Thanks Beate for sharing this fun design and technique-I have been wanting to try these.
Ohhhhh…this is so pretty!!! and something I never would have thought to try with the Goosebumps! Now I can’t wait to play around and see what I can come up with!! Thanks for the inspiration!
This is stunning, Beate!! I absolutely love the colors!! I have wanted to try the Goosebumps texture spray but can’t find it around here!! You have made me want it even more!! Thanks for the awesome inspiration 🙂
Lisa
A Mermaid’s Crafts
This technique turned out beautifully! I love the sweet butterflies and soft pastel colors. 🙂
hugs~
Oh I love it!!!! I was hoping to stop by my LSS today and see if they have some things I have been wanting….I will definitely see if they have this! If not, I’ll order online.
Your card is GORGEOUS!!!!
Awesome!! Thanks for the video, your card is so beautiful!!
Thanks Beate, quick and easy, love the results…….hugs
Another inspirational video, Beate…Thank You! Your card looks so pretty, and I love the effect x
Very pretty, like the swirls in the image the framing is perfect with it, pretty colors!
I’ve never heard of this product before. It reminds me of Versamark. Thank you for the wonderful tutorial. Now when I see Goosebumps in the store I can buy it and know how to use it. You make such fabulous projects.
What an Awesome technique! I have to try this, cos my Goosebumps has not been used. Thanks for sharing this. Your card is Beautiful, as always, Beate! {hugs}
no heat embossing needed for that effect?? that is sooo cool! must try this! beautiful card as always, Beate!
I have to say Beate, I saw this on SC and I so want to give this a go. Your technique and card is beyond gorgeous!!
hugs,
Chris
This is beautiful, I love the blue and green and perfectly they are blended! Thank you for the tutorial. Hugs, Karen
I love your card Beate and thank you for the tutorial.
hugs