
Today’s tutorial on Splitcoaststampers was created by the wonderful Shelly Hickox. She shows us how to use die cuts and turn them into 3d images. What a great idea! I had to try it out right away. Her sample is vintage prefection, so I tried to go a different route and see if it would work for a different style as well.
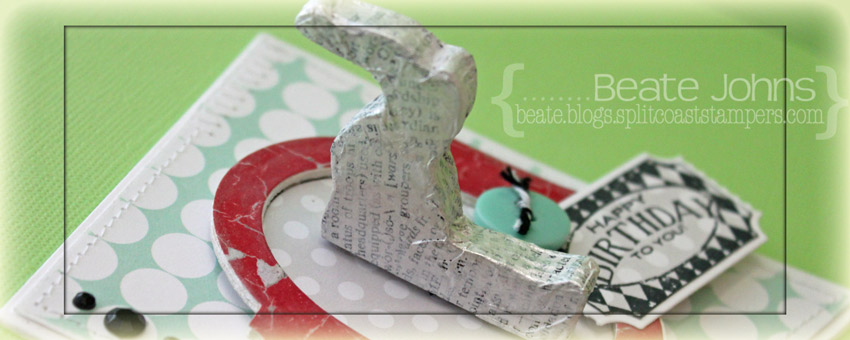
I used the elephant die from My Favorite Things Circus Spectacular and cut it 7 times out of light-weight coasters. The elephants were cut down adhered to each other with Beacon 3 in 1 Craft Glue. Once it was dry it small pieces of dictionary page pieces were adhered to the elephant with Glue N’ Seal. Once it was dry, Pearl Acrylic paint was added over it.
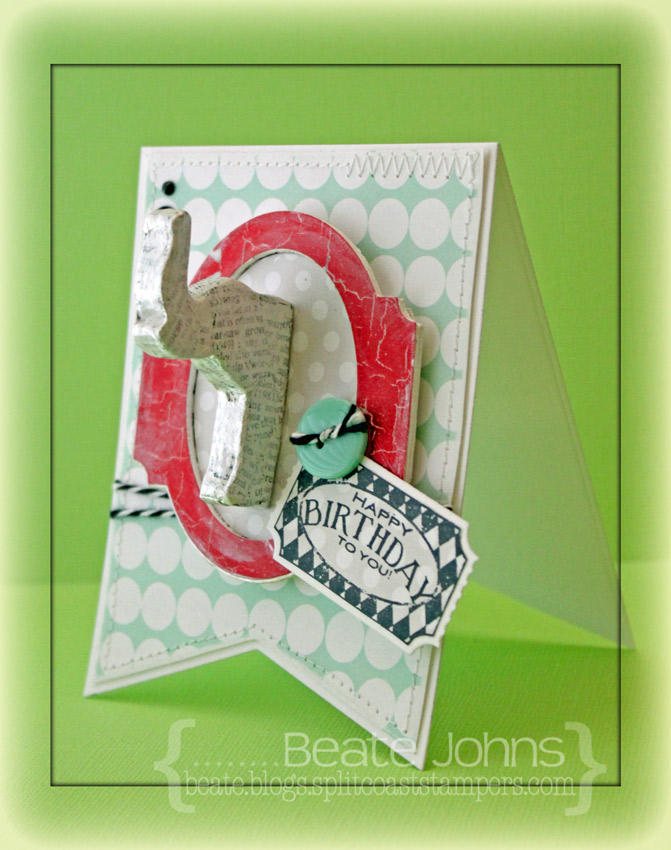
A frame was cut twice out of light weight coasters with the Vintage Cameo die. A piece of Fancy Pants The Good Life patterned paper was cut with the same die, adhered to the frame. The edges were painted with Acrylic Pearl Paint. Another piece of The Good life paper was adhered behind the frame and the elephant was adhered in the middle.
The card base was cut out of Neenah Solar White cardstock with the largest Stax Jumbo Fishtail Banners. More The Good Life paper was cut with the same die, sanded and cut down. The edges were stitched, Beetle Black doodlebug twine was tied around the layer before it was adhered to the card base.
A sentiment from Circus Spectacular was stamped on more The Good Life paper with Tuxedo Black Memento Ink. It was cut out and layered on Solar White cardstock, cut and embossed with the Ticket Strip Die-namics die. It was adhered on the left side of the frame and topped with a button to finish off the card.
Thanks so much for stopping by! I hope you have time to check out Shelly’s amazing tutorial and sample.
Hugs and smiles
|
|
Beate
29 Responses to “3D dies tutorial on Splitcoaststampers”
Sorry, the comment form is closed at this time.


Beate, this is adorable!! I love your take on the technique – totally you! Thanks again for being so amazing. xoxo
Love this, Beate–so fun!
Beate this is adorable!!! I wonder if it would work to just make little things for the kids to paint? Gorgeous!!
Hugs,
M
I love this, Beate!! I saw the tutorial this morning on SCS and knew I had to try it!! You did such a fabulous job!! The banner shape is perfect!! You are amazing!! Have a great day my friend 🙂
Lisa
A Mermaid’s Crafts
Wow, Beate! So cool! I can see lots of applications for this technique. Thanks!
You did a fabulous job on the technique, Beate, and your design is spectacular!
what a great card. I like those banner dies. will be looking for them.
stamping sue
http://stampingsueinconnecticut.blogspot.com/
Waw Beate such a great shape of the card. hugs! Mojca
Even though I don’t “do” many cute cards, this one is just so adorable. I love that you used the banner die for the shape of your card. Thanks for so many great tips and ideas, Beate.
Sounds interesting!!! Love this adorable card!
I loved this tutorial and plan to give it a try. Your version is really unique and original. TFS
How adorable!!! Never thought to make something else other than the deer….love it….
Adorable Beate! What a treasure it’ll be to the lucky person who receives it.
– DebbieK
Oh Wow that is such a cool idea, it is a bummer that most of my cards need to be mailed, like that you covered it with dictionary pages, neat style sentiment frame to go with it!
Such a fun idea and a great design, Beate x
so neat and fun! love it, Beate!
This is just TOO cool!!! Thank you for sharing this and where to find the tutorial! I will be trying this once the holiday season is over….or at least once I get all my Christmas cards sent out! LOL!
Watched the SCS you tube. Love the technique. Will use this technique on some Christmas tags for packages. Lots of fun. thanks as always for sharing.
I saw this project on SCS and really love that elephant!! Will have to remember this as I look through my dies!
I already love elephant motifs so this project is a real WOW!! I also loved seeing your video of your craft room. Don’t know how you keep it looking so neat and tidy…I wish I could say the same!
This is so cool! Can’t wait to try it!
What a cool way to make something 3D. Thanks for sharing how you did that. It looks great on the pennant shaped card, too.
How fun! Thanks for sharing.
Some gals have such inspirations-fabulous idea.
I’m not I’ve seen this before but what a fabulous idea! I’m working on birthday cards for my nephew and I’m definitely going to make one of these for him. Thanks for sparking my creativity!
Brilliant, Beate! Lightweight coasters? Great idea and fabulous card!!!
Genius idea!! You must never sleep because you are coming up with all these great ideas. Really cool!
Shirley L.
Roseville, CA
Love your card. Really like the technique. Gave me lots of ideas. Thanks.
so very clever — the card cut like a circus banner makes it perfect.