
Today’s tutorial on Splitcoaststampers is for a technique I first saw Jennifer McGuire use. It combines dies and embossing resist to create unique backgrounds. We call it Puzzle Piece Resist.
For my card I started with a 3″ x 5 1/2″ piece of Neenah Solar White cardstock. I stamped the zig zag background stamp from Simon Says Very Special stamp set in VersaMark all over the cardstock and embossed it with clear embossing powder.
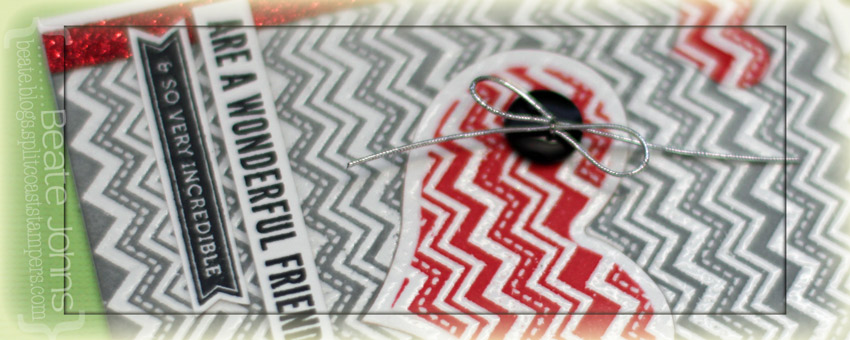
Two heart dies from a new Spellbinders die set (Hearts One) were cut and embossed out of the background. The hearts were removed and the big background was sponged with London Fog Memento Ink. The big heart was sponged with the die on with Ladybug Memento Ink, the little one was sponged after the die was taken off.

The background was adhered to the card base, a 3 1/2″ x 11″ piece of cardstock, folded in half. The right hand corner of the card was rounded. Before the big heart was adhered back into the background, a button was tied on with silver cord. The small heart was adhered back to the background as well.
A sentiment from Very Special was stamped in Tuxedo Black Memento Ink on white cardstock and cut out. Two sentiments from the new stamp set You were stamped also in black ink on white cardstock and cut out. A 1/4″‘ x 5 1/2″ strip of red Glimmer Paper (Stampin’ Up!) was adhered to the left hand side of the background strip before the sentiment pieces were adhere next and over the glimmer strip.
Red glimmer paper was cut and embossed with the small heart die. The heart was adhered to the lower right of the background strip. Red and black rhinestones on the upper right hand side finish off the card.
Here is a video for the visual learner:
[youtube]https://www.youtube.com/watch?v=M9s0jtJi7yk[/youtube]
Thanks so much for stopping by! Have a wonderful day!
Hugs and smiles
|
|
Beate
30 Responses to “Tutorial on SCS – Puzzle Piece Resist”
Sorry, the comment form is closed at this time.


Oh this is such a great card and a great tutorial. Thank you for sharing. hugs! Mojca
Hi Beate! Beautiful card and greate tutorial.
God Bless 🙂
Gorgeous card! I will definitely have to try this technique!
Love listening to you Beate!! Gorgeous creation love the red and gray together and what a fun technique too!!!
hugs,
M
Awesome card Beate, love this technique..
Oh THANK YOU for the video…no matter how many times I read through your step by step instructions. I was NOT getting how you created this card.
your extraa efforts are MUCH appreciated!
Loved the card and thanks for including a tutorial for us who are visual learners. Videos alway make it easier to understand. Thanks again.
What a fun technique! I need to file this in my brain!!
I LOVE this technique!! The card looks amazing!! The stamp you used is so beautiful!! And thanks for the awesome video tutorial…it helps so much!! Happy Wednesday 🙂
Lisa
A Mermaid’s Crafts
Lovely card, and great tutorial, Beate x
This is so amazing! what a great technique!!
Very cute and fun! Thank you for the video!
AH-MAZING!
My word this is so wonderful, I so appreciate your video because it makes a visual learner like me get it! I love this technique
Oh my goodness! I really love this technique. Will definitely have to give this a try. Very unique and absolutely lovely!
Oh, I love this! Soooo cool. Thanks for the great video…I always appreciate them. Thanks, Beate!
Okay this looks totally cool! Love your design that glimmer down the side! Awesome card, Beate!
I saw your video yesterday in the SCS newsletter and I love this idea. I also noticed you were using the Post It Note spool….great stuff, huh? LOL Anyway, back to your card….I really, really like it and will be using your ideas in some of my Valentine’s Day cards. TFS as always…..great tutorial.
Beate, this is gorgeous!!! Love the zig zag background sponged with London Fog, and the way the pattern inside the heart is lined up perfectly with the background! Very inspiring to say the least 😉
Thank you for the terrific tutorial! I’m going to try this. Your card design is clever.
very cool technique and I just love the way you broke up the sentiment, sweet card!
Absolutely gorgeous! Love the colours and layout.
love the effect this technique creates. beautiful card, Beate! thanks for the video, too! =)
Very cool! I’ve got to try this!
[…] Last week I created another card with new Simon Says clear stamps. Just in case you missed it, you can find it here. […]
Thanks so much for the video. When I first say this I thought you used patterned paper. What a great look!
I like the look of the embossing resist and will definitely try that. Being new to stamping, I’m impressed by the versatility and creative ways to use the dies and embossing techniques. Love Your Video, too!
Great card, and great tutorial. Thanks so much!
I love this card-it’s stunning. I’m one of those visual learners so your tutorial video was a big help. Thanks so much.
[…] Acts of Kindness – Act #10FREE Collapsible Apple Fruit PeelerFruit InspectionMACS LONDONfresh & fun /* */ var _gaq = _gaq || []; _gaq.push(['_setAccount', 'UA-9051204-12']); […]