

This weeks “From the Archives” Tutorial in the Weekly Inkling was the Tunnel Card. I used to love these cards and I haven’t made one of them in years.
For my sample I started by creating the card front. The mannequin image of Crafty Secrets Sew Special was stamped in Rich Cocoa Memento Ink on Neenah Solar White cardstock. It was colored with Copic Markers (Corset: R00, R11, R12, R14 Body: E50, E51, E53 Stand: E21, E23, E25, E27) and cut out. Clear Spica Pen was added over the lacy part of the corset.
A piece of white cardstock was cut and embossed with a Beaded Circle Nestabilities die. A sentiment from Sew Special was stamped in it’s center with Rich Cocoa ink and the panel was sponged with Antique Linen Distress ink. Images from the same set were stamped in it’s center with Antique Linen to give it some texture. The inner edge of the circle was paper pierced.

A 3 1/2″ wide strip of white cardstock was cut and embossed with a Lace Doily Accent Die. It was adhered under a 2 1/4″ x 3 1/2″ piece of MME Lost & Found Madison Street Patterned Paper which was in turn adhered to a 3 1/2″ x 5″ piece of the same paper pack. The layers were stitched to a slightly bigger piece of white cardstock.
White organdy Ribbon was tied around the horizontal layer and a yellow button was tied on top of the bow with embroidery floss. The sentiment panel was adhered over the panels with dimensionals and the mannequin was adhered slightly over it that. Baby Bling Rhinestones and a Finess Swirl finish off the card front layers. They were adhered to the card front, a 8 1/4″ x 5 1/2″ piece of Kraft cardstock folded in half.
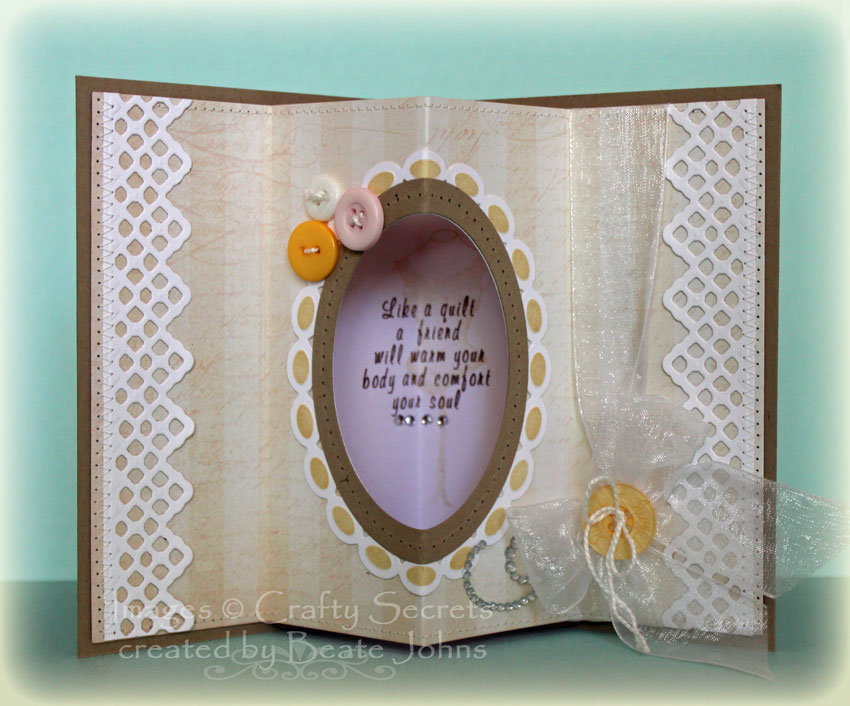
The inside of the card was created out of a 5 1/4″ x 8″ piece of MME Lost & Found Madison Street paper. It was scored at 2″, 4″, 6″ and 8″. A window was cut in it’s center with a Classic Oval Nestabilities die. A frame was cut with Beaded and Classic Oval Nestabilities dies out of Neenah Solar White cardstock and sponged with Antique Linen Distress ink. It was topped with a slim frame cut out Kraft cardstock. The Kraft frame was paper pierced before it was adhered around the window.
The top and bottom edge of the layer was stitched before two pieces of white cardstock, cut and embossed with the Lace Doily Accent die, were zig zag stitched to the side edges. Three buttons were stitched to the upper left of the frame. Before the inner layer was adhered, a sentiment was stamped in the center of a piece of 5″ x 7 3/4″ white cardstock in Rich Cocoa Memento Ink. The mannequin image was stamped lightly over it in Antique linen. The white cardstock piece was adhered to the inside of the card, before the inner, scored layer was adhered just to the side edges of the card.
White organdy ribbon was tied on the left hand side and topped with a yellow button. I get a lot of questions on how to mail my cards. Usually I just send them in a slightly bigger envelope. This one is quite bulky because of the inside of the card. I will either mail this card unfolded in a 6″ x 9″ envelope with crimped cardstock pieces on top and bottom of the card, or in a small box along with a gift.
Here is a video for the visual learner:
[youtube]https://www.youtube.com/watch?v=V8w9waiPUKw[/youtube]
Thanks so much for stopping by! Have a wonderful day.
Hugs and smiles
Beate
20 Responses to “Video Tutorial on SCS – Tunnel Card”
Sorry, the comment form is closed at this time.


As always, Beate, you have inspired me to try something new! I’ve seen these for years (didn’t know what they were called), and shied away from them. Now, I shall master them! lol… Beautiful card, dear friend. You have such a talent for mixing up your DP’s, choosing embellishments, etc. Great job! Thanks for sharing, and have a nice weekend 🙂
Ok now that looks soooooooo cool! Your card is GORGEOUS, as always 😉 Must try this! Thanks for the tutorial!!
Oh I remember this technique…so glad you had the video to show us how to again. I don’t know if I could have remembered how to do this one! This would make great Christmas cards! Thanks Beate!!
Fabulously vintage card! Love the tutorial!
Oh Beate, where do you find the time to create these wonderful cards. It makes my day everyday to stop by & see your amazing creations. Thank you for sharing & inspiring me everyday. ;0)
Traci Lord
Beate! You an AWESOME teacher! Just watched your video and cranked this one out myself. Hope you like it!
http://zacksnanaat.blogspot.com/2011/11/fresh-n-fun-with-beate-tunnel-card.html
Bin ganz begeistert! Über die Verträumtheit dieser Karte und wie du sie wieder coloriert hast, einfach traumhaft schön! Deine Liebe fürs kleinste Detail…
Wünsche ein wunderschönes Wochenende! Sibylle
absolutely gorgeous with a vintage touch and so many wonderful details….wow
Fabulous!
I’ve never seen a card like this. Your is so beautiful. Your coloring on that dress form is fantastic! Thanks for the tutorial! ~Hugs, Cheryl
wow! gorgeous colors and coloring, Beate! beautiful card. love love it!
a very beautiful card nice video as always..
bless you ..
thank you so much
frenchpossum — australia
LOVE, love this Beate. First: I love the vintage feel and especially the old dress form. You add the bling perfectly. 🙂
Hugs~
love this card too – printed out the instructions for future reference.
Absolutely gorgeous card Beate. I’ve never seen this type card before but I’m so inspired to try it now. How could anyone every throw away one of your masterpieces.
Thank you for the inspiration and great tutorial, Beate. I love the mannequin image and all your beautiful embellishments:)
LOVE this! So PRETTY! Love Crafty Secrets’ vintage style…they happen to be a local company for me, just one city over from where I live…I actually have this stamp set and have yet to ink it up…I have to get on that! 😉
I have never seen a tunnel card. I really like this and will be trying it soon. Beautiful card. I love all the details.
God bless,
Peggy
ZAUBERHAFT liebe Beate … ein unglaublich schönes Werk.
Herzliche Grüße
von Anke
Very Pretty, such a neat surprise and your decorting is just wonderful, the inside is as lovely as the outside!