
Today’s tutorial on Splitcoast is on Double Embossing. For my sample I created a card for an Inspiration Challenge on Splitcoast a while back. My inspiration piece was this rose frame.
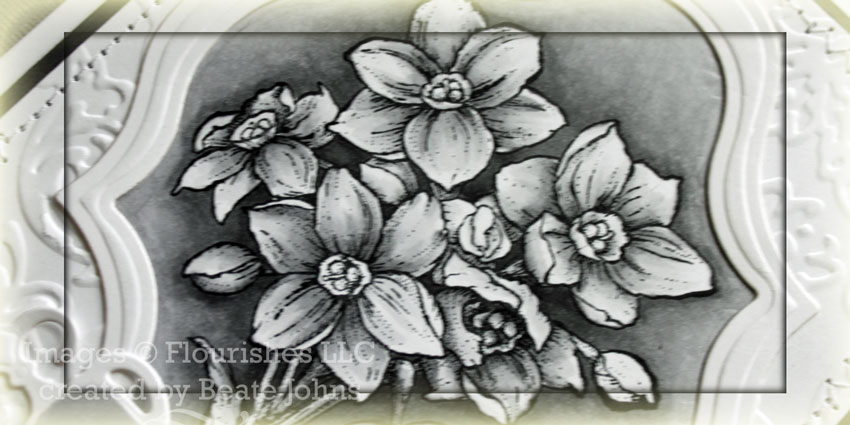
To start out with I embossed a piece of Neenah Solar White cardstock with the Regal Flourishes Embossing Folder and Label 13 Nestabilities die. I masked the embossed part and stamped the big image of Flourishes Paperwhites with Tuxedo Black Memento Ink and colored it with Copic Markers (N0, N1, N2, N3, N4, N5).
The layer was cut down to 4″ x 5″ and stitched to a 3/16″ bigger piece of Basic Grey cardstock. The layers were adhered to a 4 1/2″ x 5 1/2″ white cardstock base.
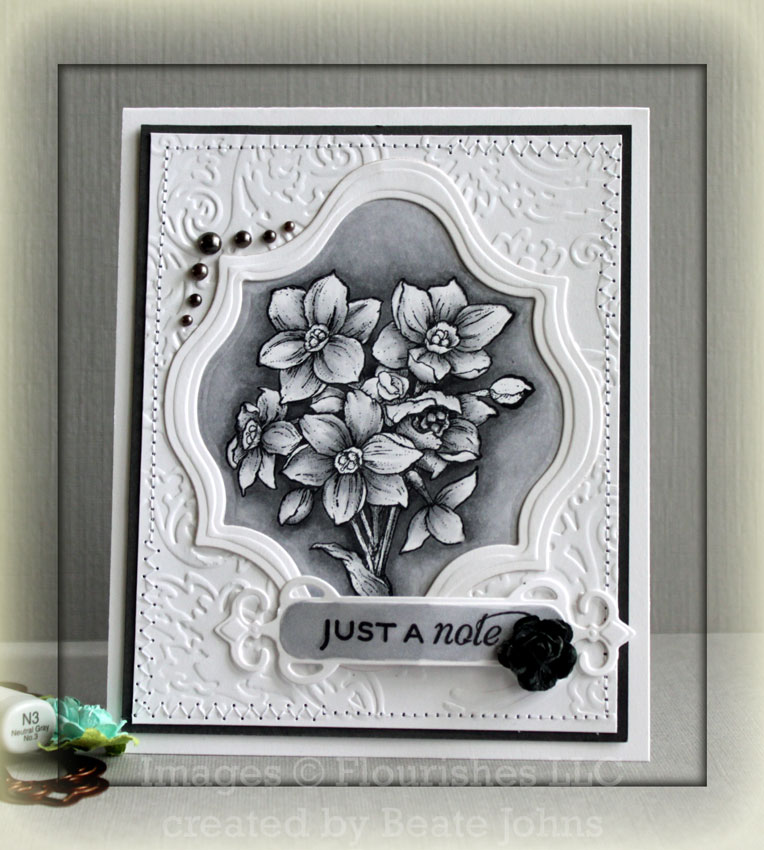
A piece of Neenah Solar White cardstock was cut and embossed with the two largest of the Label 13 Nestabilities dies to create a frame. That frame was used to frame the image.
Another piece of Neenah Solar White cardstock was cut and embossed with a Spellbinders Fancy Tag die. A sentiment from Flourishes Tag Lines was stamped in its center with Tuxedo Black Memento ink and the center was colored with N2 Copic Marker. Two dimensionals were stacked on top of each other in the middle of the sentiment, the ends received Scor-Tape to adhere the sentiment down.
A Recollections flower was colored with Copic Marker N3 and adhered to the upper right hand side of the sentiment panel. Pewter Kaisercraft Pearls were adhered to the upper left hand corner to finish off the card.
Here is a video for the visual learner:
[youtube]https://www.youtube.com/watch?v=6XFtZFgmvy4[/youtube]
Thanks so much for stopping by! Have a wonderful day! Hugs and smiles
Beate
35 Responses to “Tutorial on SCS – Double Embossing”
Sorry, the comment form is closed at this time.


This is incredible. You did a great job. Thanks for always sharing your talents..The copics colors you chose make this look so elegant..
Thank you so much Beate! I have been wondering how this was done! You are just incredible and I appreciate all that you do…I have learned so much from you.
Also, your cards are just stunning!
Hugs,
Lisa
I’ve seen this done b4 with ovals but you took it to a much higher lever. This card is stunning. Thanks for the inspiration.
Absolutely gorgeous! This card is simply stunning.
Oh my word, Beate, this is STUNNING. I love black and white cards and this just has soooooo much class. Gotta try that technique too – thanks for the inspiration.
Wow! Beate this is just stunning and so elegant. Thanks for showing how this is done on the video. I will try this out.
hugs
Marion
Oh my word Beate!! This is so so gorgeous hun!! LOVE the fab colors on this and I will have to check out your tutorial!! Thanks so much for doing these!! I do enjoy them so much…I go back to the older ones too all the time!! You’re a gem!! HUGS
OMG Beate!!! Your card is fabulous, love the colors, love the flowers… Great work…TFS! HUGS Silke
Your card is so elegant and beautiful, Beate!! I must try this soon. Thank you for the tutorial!
This is SO gorgeous! Love the colours – makes it look so elegant!
I think your work is amazing. I’ve been a fan for a long time, but I have to say it is sad you hardly use SU products anymore. I don’t think these products now are as cute…SU was the best. I know you are doing what you feel is best, it’s just sad. I miss your SU artwork. I’m not trying to be mean, just wish you could still inspire us with SU.
wowww Beate your card is very beautiful.
thank you for the visual.
hugs
STUNNING card Beate! Awesome tutorial!
This card is so beautiful. What a fabulous technique. I LOVE all the textures. Thanks for the tutorial, Beate, on how to achieve the center section with no embossing!!
Another amazing video tutorial, Beate. Thank you so much! Your card is so elegant too.
I left a comment over on Splitcoast, but wanted to leave another one here for you x
Love this technique…the video explained it so well!
Another awesome tutorial Beate!!! Thanks again for your inspiration !
Thanks so much for this wonderful tutorial. I will definatly have to give this a try, I love that look!
First of all, the grey/white color scheme is beyond striking!! OH MY GOODNESS!
Second, I cannot WAIT to give this technique a try!
Hello, I have a stupid question…why the first time you ran through the die, it cuts the template, but the second time, it only emboss. I notice the difference between tab 1 and tab 2 as well as the sham. Is that why?
Also, I love the image you have stamped. I was wondering if there was any technique to it or is it just a stamped image? It looks really really pretty.
Thanks.
Gee, this is beautiful! Love the black & white. That double embossing looks great! Will have a look at your tutorial now and try it out. Thanks!
Have a great day,
Jose
This is gorgeous! I love the elegant colors of this card too!
Just when I think that I’ve seen you outdo yourself, you go and do it AGAIN! This card is so striking and has so many interesting elements to it. You are one talented artist and a great instructor too!
Beautiful depth on your coloring!
so beautiful-thank you for sharing with all of us.
Cool embossing technique! Your card is beautiful! The gray color is lovely; what a unique way to color an image!! And the frame die cut is so elegant!
absolutely gorgeous card, Beate! amazing B & W coloring on the image. thanks for the fab video of the technique!! I’ll have to try this!
Zauberhaft liebe Beate, ssssoooo schön.
LG
Anke
Gorgeous coloring, love the grays and the embossing, gives it such an elegant look, lovely framing!
What a STUNNING creation….I LOVE the black and white.
gorgeous! this ones ny favourite!!!
[…] my sample I decided to try my hand on a Sepia card. I had already tried black and white on this and this card. I stamped an image from Flourishes new stamp set Hyacinth in Tuxedo Black Memento Ink on Neenah […]
gosh, Beate! this is sooo elegant and beautiful. love this technique, think I need to give it a go!
[…] still had a Label 13 die cut from my the Double Embossing sample and stamped the image on that with Tuxedo Black Memento Ink. It was colored with Copic […]
Awesome technique, Beate – I {heart} your tutorials!!!