Search Results : rocket man

Thursday’s Way to use it challenge was fun! It was called “It’s in the Notes”. We were to be inspired by Music.  While doing my morning chores I was thinking what sets I have and what would work for that challenge. Then the Rocket from Pun Fun popped into my mind along with Elton Johns’ “Rocket Man”. I was singing that song in my head all day Thursday.

pun-fun-wt155-rocketman.jpg

I started by deciding what Designer paper I wanted to use with the stamp.

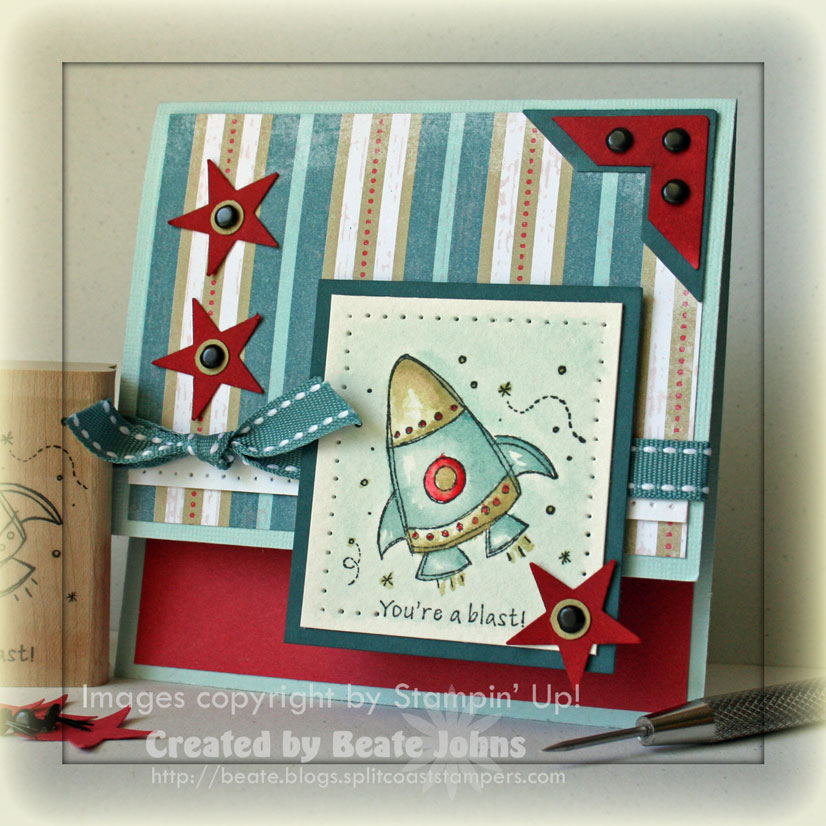
I picked the striped paper from the Western Sky Designer paper and picked my colors from that paper.

The Rocket was stamped in Black StazOn on a 2″ x 2 1/4″ piece of Watercolor Paper.

I colored it in with Aqua Painter and Classic inks (River Rock, Blue Bayou, Ruby Red and Soft Sky).

I layered the watercolor paper on a 1/4″ bigger sponged piece of Blue Bayou cardstock and paper pierced the edges.

My card base was a 4 1/4″ x 8 1/2″ piece of textures Soft Sky cardstock. I cut 1″ off the front of the card and layered the inside of it with a 4″ square of Ruby Red. I liked how the red of the inside peeked out.

The top of the card front was layered with a 3″ x 4″ piece of the Western Sky Designer paper. I added a 1/4″ x 4″ strip of paper pierced white cardstock on the lower part of it and tied Double Stitched Blue Bayou ribbon over it.

For my accents I punched  three small stars out of Ruby Red cardstock. I sponged all three, layered them with 1/4″ River Rock circles and added a black brad in each center.

The top right corner looked a little empty so I added a double Photo corner  out of sponged Blue Bayou and sponged Ruby Red cardstock. The photo corner were topped with three black brads.

I created this card as an entry for MFT’s November Guest Designer contest. I started by cutting Kraft cardstock with the Peek-a-Boo Squared Die-namics die.  The layer was stamped with the smallest diamond background from Distressed Diamonds stamp set with Moonlight Brilliance ink.  Winter blues Whimsy paper was adhered behind the openings and the edges were pierced.

The bottom corners of a 2 1/2″ x 3 7/8″ of Winter Blues paper were rounded and adhered to a 4″ square of white cardstock with rounded corners. Silver curling ribbon was tied around the top of the paper layers with a button before all layers were adhered to the card base, a 4 1/4″ x 8 1/2″ piece of Patina Bazzill Cardstock with rounded corners. The peek-a-boo layer was adhered to the card base with foam adhesive squares.

Neenah Solar White cardstock was cut with the two smaller dies from Let it Snowflake die-namic dies, stacked and topped with a rhinestone from a Sleek Strips Silver Rhinestones. Two small snowflakes were cut out white cardstock as well. The snowflakes were adhered to the panels that didn’t have the tree .

Another piece of white cardstock was cut with a Fishtail Flag Stax and a sentiment from Seasonal Sentiments was stamped in Rocket Red Gold Brilliance Ink. It was adhered in the center of the card.

Thanks so much for stopping by! Have a wonderful day!
Hugs and smiles

P.S.: Today’s Holiday Blitz tutorial on Splitcoaststampers is written by Cindy Hall. She shows us how to create a darling telescoping snowman card. I hope you have time to check it out!

Welcome to JustRite Stampers’ newest Wednesday feature, 12 Weeks of Christmas Blog Hops 7!   Every Wednesday up until Thanksgiving some of your favorite designers will be joining some of the JustRite design team for a series of Christmas blog hops, showcasing JustRite’s entire Christmas Collection of stamps!  You also might see some projects from the JustRite design team, using some of their newly released line of CLING stamps!  You can find our new collection of cling stamps HERE.  This week, the designers joining us are most of the Spellbinders and Caardvarks design teams!  So mark your calendars for Wednesdays at 9am Central for great Christmas gift, card & project ideas, starting at the JustRite Inspiration blog!

I had seen a cool layering of Spellbinder dies created by Aga on the Spellbinder blog the other day and had to try it out. Since  I didn’t want to case her completely I used pink as my color, added patterned paper and finished the card differently.

I stamped an image from JustRite Stampers  Whimsical Christmas  in Tuxedo Black Memento Ink on X-Press It Blending card and colored it with Copic Markers (Bird: BG11, BG32, BG13 Scarf: RV14, RV17, RV19 Ribbon: B000, B02, B04 Skates: N1, N3, N5). It was cut and embossed with Classic Circle Nestabilities and it was airbrushed with Copic Marker RV14.

Next I cut a frame with the same Circle Nestabilities die as well as a Blossom Nestabilities. Again it was airbrushed by Copic Marker RV14. Dew Drops from the Cotton Candy bottle I just picked up at my local Scrapbook store.

The layers were added to a piece of Neenah Solar White cardstock cut and embossed Fleur de Lis Pendant. Four small Fleur de Lis pieces were cut, airbrushed and adhered to the big Pendant.

The entire stack was adhered to a frame cut with Lacey Square and Classic Square Nestabilities. A dew drop was added to each corner.

The card base is a 4 7/8″ x 9 3/4″  piece of Pink Pirouette cardstock folded in half.  A 4 3/8″ Pretty Please My Mind’s Eye patterned paper was stitched to a 1/4″ bigger piece of white cardstock. The layers were adhered to the card base.

A bow out of silk ribbon, topped with a Recollection brad finished off the card.

Please visit these designers’ blogs to see what fabulous JustRite Christmas inspiration they have for you on the hop today!

JustRite Inspiration Blog
Spellbinders Blog
Debbie Olson
Kimberly Crawford
Sharon Harnist
Beth Pingry
Amy Crockett
Kellie Fortin
Latisha Yoast
Becca Feeken
Lucy Abrams
Sankari Wegman
AJ Otto
Beate Johns
Heidi Van Laar
Kazan Clark
Julie Overby
Peet Roeven
Michele Kovack
Judy Hayes
Kathy Racoosin
Stephanie Kraft
Terre Fry
Angela Barkhouse
Holly Simoni
Heidi Blankenship

Thanks so much for coming by! Have a fun time blog hopping.
Have a wonderful day! Hugs and smiles

fllcguidinglightfs172wide.jpg

This card was created for another Featured Stamper challenge. The featured stamper was Nikki Tanner. I picked her “Sometimes you’re the cat” card, changed the color scheme, the stamp set and added some stitching and embellishments. The colors I used fit the Just For Fun Stamps Color Challenge for last week.

I knew I wanted to use the new Guiding Light set from Flourishes for this case. I thought it would look great with Graphic 45 Le Romantique  paper. I stamped the sentiment, then the image in Tuxedo Black Memento Ink on Neenah Solar White cardstock and colored it in with Copic Markers (BG01, BG10, BG72, B21, W1, W2, E31, E41, E51, E53, E55). The image was cut with Circle Nestabilities and airbrushed with Copic Marker E31. It was then layered on a slightly bigger Chocolate Chip circle that had been (surprise, suprise) sponged with Walnut Stain Distress Ink. The bottle was covered with Glossy Accents.

fllcguidinglightfs172beate.jpg

Four 2″ squares were cut out of Graphic 45 Le Romantique paper and stitched to a 4 3/8″ Gina K. Pure Luxury Ivory cardstock square. The edges of the small square as well as the ivory square were distressed. Martha Stewart twill was taped around the center and tied with brown Burlap String. Three buttons (Basic Gray, My Mind’s Eye and Bo Bunny) were attached to the lower right corner with natural colored burlap string. A Sprocket Gear was adhered to the top left corner. The main image was attached to the layers with dimensionals.

fllcguidinglightfs172inside.jpg

As always, the inside of the card is kept pretty simple. A 1 3/8″ x 4 1/4″ piece of Le Romantique paper was sanded, then stitched to a 4 3/8″ square of Ivory cardstock. The light house stamp from Guiding Light was stamped over it in Antique Linen Distress Ink. A small My Mind’s Eye button was adhered to the lower right corner of the paper.

Thanks so much for stopping by! Have a wonderful day! Hugs and smiles

Okay…another last minute stamping! I seem to thrive on that. I just finished my sample. I have to run to get Rebecca to school, then meet my neighbor for a walk. I will take a better picture and write about all the details when I get back.

I loved the color combo on this dress!

burstingwithjoypumpkinburst.jpg

Okay…so after my walk I went to cool down (translated that means stop sweating and panting like a DOG!) in the backyard with my book and stayed there until noon.

After that it was time for a shower and then time to make cookies. Since the kids were off yesterday, they got their Monday cookies today.

I still haven’t taken a better picture (my neighbor came over to hang out and we just chatted) but I can tell you more about the card.

The card base is a piece of 5 1/2″ x 8 1/2″ piece of Basic Gray cardstock folded in half.

Under my 3″ x 5 1/2″ strip of Jersey Shore Designer Paper I added first an 1/8″ wide layer of River Rock, then another Whisper White layer of that width on the top of that paper. Underneath I added River Rock and White layers again, only did I scallop the white layer with my Long scallop Rectangle Nestabilities.

I stamped the sentiment from Bursting with Joyin River Rock on a 1 7/8″ x 2 1/2″ piece of Whisper White cardstock and again in Basic Gray on a scrap piece of Whisper White. I punched the gray sentiment out with my small oval punch and layered it over the River Rock stamped layer.  Then I layered that first on a Bashful Blue rectangle, then on a scallop rectangle that was cut with a rectangle Nestabilities die template. I paper pierced the edges of the white layer as well as the white oval.

I wrapped Striped Bashful Blue Ribbon around the card base and layers before attaching the sentiment with dimensionals. Over the knot of the ribbon I added two 1/2″ Bashful Blue circles, followed by 1/4″ Basic Gray circles and silver brads.

For my accent I stamped the medaillon from Boho Background four times all with Basic Gray ink. Once on Whisper White, once on Pumpkin Pie, once on River Rock and one more time on Basic Gray. I punched the Basic Gray medaillon out with the scallop circle punch, the River Rock with 1 3/8″ circle punch, the Pumpkin pie with the 1″ circle punch and cut the flower out of the medaillon stamped on white cardstock. I adhered them all on top of each other and added an Ice circle Rhinestone brad in the center.

pun-fun-wt155-rocketman.jpg

Today this card of mine was on the Stamper’s Showcase on the demonstrator part of the Stampin’ Up! website.

I hadn’t sent anything in to SU in a long time. I think this is the only thing this year so far. It was a swap card of mine.

It was nice to see a card of mine up there. Thanks to everyone who saw it and commented on it.

Hugs and smiles

© 2012 fresh & fun Suffusion theme by Sayontan Sinha