Today’s tutorial on Splitcoaststampers is written by Judy Maddigan and super fun. My little Santa cracked me up wobbling back and forth. I hope you try it out.

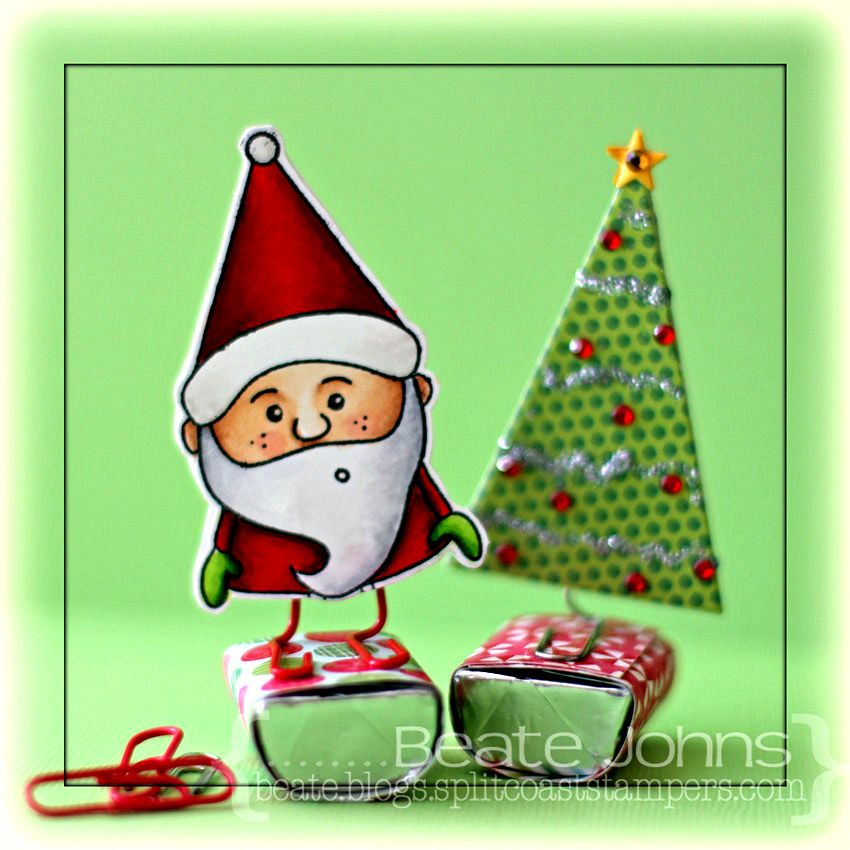
I made two samples. One really simple one with pieces cut out of Carta Bella Merry & Bright paper cut with Simon Says Stamp exclusive Christmas Trees dies. The tree was decorated with Silver Stickles and Red Baby Bling Rhinestones.  A tiny star was cut out of Desert Marigold Fourz Bazzill paper with another die from the Holiday Trees set.

The santa (from Simon Says Stamp Gnome Sweet Gnome ) was a bit more tricky, since the stamp comes only with his face, not the back.  I stamped it twice in Tuxedo Black Memento Ink on Neenah Solar White cardstockand cut them out. I flipped one over and traced the lines from the front to the back, leaving off his face and his thumbs.

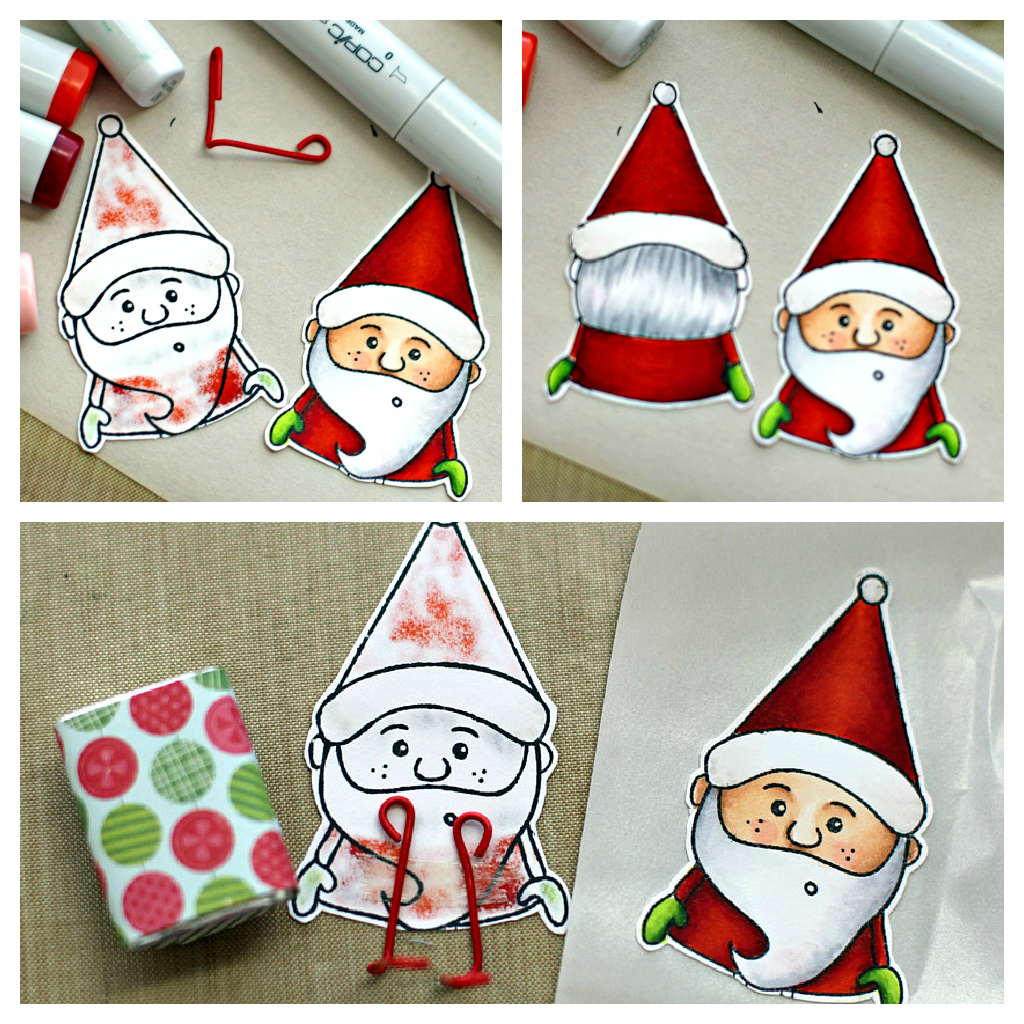
The images were then colored with Copic Markers (Red: YR09, R24, R29, R39    Mittens: YG01, YG03, YG17    Beard/Hair: N0, N1, N3   Hat trim: W00, W1   Skin: E50, E21, E34, R20). Red paperclips that had been unbend and reshaped were adhered to the inside of the back with Scor-Tape. The front was run through my Xyron and adhered over the back, hiding the paper clip ends. The Santa as well as the tree were adhered to a covered Hershey’s Nugget with Glossy Accents.

Here is a video what these little rockers do: They crack me up, especially that little Santa Gnome.

[youtube]https://www.youtube.com/watch?v=-dLGB22EbVY[/youtube]

And here is a video on how to create the rocker for the visual learner:

[youtube]https://www.youtube.com/watch?v=7CR8qa_D_c8[/youtube]

Thanks so much for stopping by! Have a wonderful day!
Hugs and smiles


Hello and welcome to Day four of Whimsy Stamps November Rubber & Die Release Showcase!

On Wednesday (21 November) Whimsy Stamps released this month’s new rubber designs, Shapeology dies, Whimsy Designer Paper packs, Shape EZ templates and *new* Whimsy Prints pre-coloured toppers. From then until 27 November the Whimsy Stamps DT and Special Guests are showcasing these fabulous new goodies with a daily mini blog hop and I am part of today’s hop!

Each mini blog hop has a new release prize hidden somewhere along the way and you have 24hrs to enter each prize draw.

To be entered into today’s mini blog hop prize draw, be sure to leave a comment on ALL of the DT’s posts listed below by 12.00PM EST tomorrow. All winners will be announced on the Whimsy blog on 28 November.

For my card today I used the new Wee image Berry. It was stamped in Tuxedo Black Memento Ink on Neenah Solar White cardstock that had been cut and embossed with the second largest Spellbinders™ Label Twenty-Five Nestabilities® die and colored with Copic Markers (coat: BG11, BG13, BG15, BG18   coat/boots/scarf: E41, E42, E43, E44   Scarf/Berries: R32, R35, R39   Holly Leaves: G40, G43, G46   Skin: E50, E21, E34    Hair: Y21, Y23, E33   Cat: T0, T1, T3, T5, R20   Ground: BG10, BG11, T0, T1    Background: C0, C1, BV00o0). White Opal Liquid Pearl spots were added to the background, Stardust Glitter over the ground.

A 2″ x 3 1/4″ strip of  Whimsy Winter Blues paper were adhered over a 3 1/4″ x 5 1/4″ piece of the same paper pack. The bottom corners were rounded and the edges were sanded and stitched. May Arts white organdy ribbon was tied around the horizontal strip was tied around the paper before it was adhered to the card base, 3 1/2″ x 11″ solar white cardstock, folded in half. The ribbon was topped with a white button, tied on with silver cord.

A sentiment from Snowflake Mini Letter Seals was stamped in Tuxedo Black ink on white cardstock and cut and embossed with a Standard Circle Nestabilities die. The center was colored with Copic Marker BG10 and BG11. The image was adhered to the card base with foam adhesive squares, the sentiment was adhered to the upper right of the image. A rhinestone from a Sleek Strips Silver Rhinestones was added in the center of the snowflake and Stardust Stickles was placed over the colored part of the sentiment panel. Part of a Fancy That! Border Bling on the bottom right corner finishes off the card.

To take a peek at today’s fabulous new release creations, please click on the links below…

Bev RochesterSpecial Guest
Erin Bailey
Heidy
Simonne
Tammy Louise

Remember that the entire new release is available to buy right now from the Whimsy Stamps store along with all your Whimsy favorites.

Thank you so much for stopping by! Have a wonderful day!
Hugs and smiles

If you would like to join Whimsy Stamps as their Guest Designer for the January 2013 release, please CLICK HERE for all the details. Entries close at 12.00pm on 28 November.

Today starts our 6th annual Holiday Blitz week on Splitcoaststampers! Every day for the next week a new tutorial will be published with cute Holiday ideas. Check here to find the project galleries (with links to the tutorials) from the previous Holiday Blitz weeks.

The first tutorial was created by the wonderful Deb Felts. Check out here Tiny Triangle Box tutorial.

My box base was created out of Limeade Canvas Bazzill cardstock. An image from Taylored Expressions The Cool Crowd was stamped in Tuxedo Black Memento Ink on a 2 11/16″ square of Neenah Solar White cardstock. The image was stamped again on patterned paper from Carta Bella’s Merry & Bright Paper pack. Pieces were cut out and adhered to the image on the white cardstock square. The image was colored with Copic Markers (R32, R35, R39, YG01, YG03, YG17, C5, C7, C9, BG10, BG11) and a border was doodled with a Copic Multiliner. A few snowflake from The Cool Crowd were stamped on the layer with Sea Breeze VersaMagic ink.

The layer was first adhered to a 1 3/4″ square of Kraft cardstock before it was adhered to the box base. Some glitter was added to the snowman and gingham ribbon was tied to a button with Linen Thread and adhered to the upper left side of the image.

Thanks so much for stopping by! Have a wonderful day!
Hugs and smiles

Today I am joining in as a special guest of Melanie Muenchinger in the Gina K Designs October Inspiration blog hop, showcasing the newest stamp set from Gina K Designs, Stately Flowers 5. Stately Flowers 5 is the fifth in a series of hand drawn official state flowers, and is available for purchase in both premium quality clear photopolymer and red rubber.
This set includes flowers for Oklahoma, South Dakota, and Kansas, but the mistletoe and sunflower have been specifically grouped together with all your upcoming fall and winter holiday cardmaking needs in mind, and the sentiments to match!


I am excited to be hopping with Melanie today. For my first card I started with by stamping the sunflower in Tuxedo Black Memento Ink on 3 1/2″ x 3 3/4″ piece of white cardstock. It was colored with Copic Markers (Y13, Y15, Y17, E97, E99, YG21, YG25, YG63, YG67, C00, C1, BV20). The image was masked, then a background was stamped over it in Antique Linen Distress ink. The image was cut in three 1 1/4″ wide strips and the edges were sponged with Antique Linen and Vintage Photo Distress ink.

I ran the strips through my Xyron and adhered them to a slightly bigger piece of black cardstock. The edges of the layers were stitched. The layers were adhered to the card base with foam adhesive squares, a 4 1/4″ x 9 1/2″ piece of Lizzard Bazzill cardstock folded in half.

A sentiment from the set was stamped on a piece of white cardstock, cut with one of the Sentiment Strip Die-namic dies. The edges were lightly sponged with Vintage Photo Distress Ink. A button was tied to the upper right hand side of the sentiment strip. The strip was then adhered to the lower right side of the card. Black Rhinestones finish off the card.

I created a second card with that set with last week’s Color Challenge on SCS.

I started by stamping the Mistletoe image in Pink Petunia VersaMagic ink on Neenah Natural White cardstock. It was cut and embossed with a Standard Circle Nestabilities die. The die was kept over the cardstock, the image was masked and the bigger sentiment was stamped over the circle with Antique Linen Distress ink. The edges were sponged with the same color. The image was adhered to a piece of Kraft cardstock, cut and embossed with a Scallop Circle Nestabilities die. Part of the right side was cut off and the edge was stitched.

A 3 1/4″ x 5 1/4″ piece of Natural White cardstock was embossed with the Elegance M-Bossabilities folder. The bottom left and top right corner  were rounded before the edges of the layer were stitched and the circle layer was adhered to the top left. A sentiment was stamped on to the circle layer with Versafine ink.

May Arts Crochet Ribbon was adhered to the lower part of the layer. Pink Seam binding was tied above it.  A Spellbinders Pennant die was used to cut and emboss more Natural White cardstock. The word Mistletoe was stamped on it before it was tied to the bow with Linen thread and a button. Everything was adhered to the card base, a 3 1/2″ x 11″ piece of Kraft cardstock, folded in half. Three rhinestones on the top right edge finish off the card.

Be sure to visit the illustrator of Stately Flowers 5,
today for more samples with her set,
as well as inspiration from the lovely talented 
who is also guest designing this month!
For a full link list of participating designers,

Thanks so much for stopping by! Have a wonderful day!
Hugs and smiles

Hello and welcome to Day 4 of our October Rubber & Die Release Showcase!

On Wednesday (24 October) Whimsy Stamps released this month’s new rubber designs, Shapeology dies, Whimsy Designer Paper packs and Shape EZ templates. From then until 30 October the Whimsy Stamps DT and Special Guests are showcasing these fabulous new goodies with a daily mini blog hop!

Each mini blog hop has a new release prize hidden somewhere along the way and you have 24hrs to enter each prize draw.

To be entered into today’s mini blog hop prize draw, be sure to leave a comment on ALL of the DT’s posts listed below by 12.00PM EST tomorrow. All winners will be announced on the Whimsy blog on 31 October.

For my sample today I used  the darling Birthday Baby Girl Wee image. It was stamped in Tuxedo Black Memento Ink on Neenah Solar White cardstock . It was colored with  Copic Markers (Hair: Y21, Y23, E33   Skin: E0000, E00, E01   Sleeper: G0000, G000, G00, G02, BG10, BG11, BG13, BG15   Flowers: RV10, RV13    Teddy/cake: E40, E41, E42    Frosting: YR30, YR31    Ground: W3, W5 W7) and cut and embossed with a Hexagon Nestabilities die. Diamond Stickles were applied over the bubbles and the cake frosting.

Two pieces of Echo Park’s Everday Eclectic paper were adhered to a 4″ x 5 1/2″ rectangle. The bottom corners were rounded and the edges were sanded, before a faux stitched border was added with a Copic Multiliner.  The image layer was adhered to the left side, slightly hanging over the edge. The part that was hanging over was cut off.

Four pieces of the Everyday Eclectic paper were stamped with stamps from the Celebration Circle Pennant set. The half circles were cut out and three were strung up as a banner with embroidery thread. The fourth half circle was adhered to the lower right hand side and a button was tied over it. The layers were adhered to the card base, a 4″ x 11″ piece of white cardstock, folded in half. Parts of a Finesse Rhinestone swirl and a few Sleek Strips Silver Rhinestones finish off the card.

To take a peek at today’s fabulous new release creations, please click on the links below…

Remember that the entire new release is available to buy right now from the Whimsy Stamps store along with all your Whimsy favorites.

Thanks so much for stopping by! Have a wonderful day!
Hugs and smiles

Hello and welcome to Day 3 of our October Rubber & Die Release Showcase!

On Wednesday (24 October) Whimsy Stamps released this month’s new rubber designs, Shapeology dies, Whimsy Designer Paper packs and Shape EZ templates. From then until 30 October the Whimsy Stamps DT and Special Guests are showcasing these fabulous new goodies with a daily mini blog hop!

Each mini blog hop has a new release prize hidden somewhere along the way and you have 24hrs to enter each prize draw.

To be entered into today’s mini blog hop prize draw, be sure to leave a comment on ALL of the DT’s posts listed below by 12.00PM EST tomorrow. All winners will be announced on the Whimsy blog on 31 October.

For my card today I used this super cute Meljen’s Designs Holly Christmas Fairy. She was stamped in Tuxedo Black Memento Ink on Neenah Solar White cardstock . It was colored with  Copic Markers (Reds: R32, R35, R37, R39 Greens: YG01, YG03, YG17 Skin: E0000, E00, E01 Hair: Y11, Y13, E31 Wings: BG000, BG10 Background: C00, C1, BV00). The wings were covered with Stardust Stickles and a faux stitched border added with a Copic Multiliner.

The card base is a 4 1/4″ x 11″ piece of Kraft cardstock folded in half. The edges were inked with Moonlight Brilliance ink and the bottom corners of the card were rounded. Three buttons were stitched to the bottom right corner of the image layer before it was adhered to the lower half of the card.

Two pieces of Carta Bella’s Merry & Bright patterned paper were adhered above each other . Black Gingham ribbon was tied around them before they were adhered to the card base. The ribbon bow was topped with a button and two little bells were tied underneath.

Two tickets from the new Holiday Mini Tickets were stamped in Tuxedo Black ink on white cardstock, colored with Copic Markers and cut out. The sentiments were adhered underneath the bow. Kraft cardstock was cut with a Corner die. The edges were sponged with Moonlight white ink and green Carta Bella paper was adhered underneath. Glitter was adhered over the openings. A rhinestones from Sleek Strips Silver Rhinestones was adhered on the top corner of the corner die. Part of a Finesse Rhinestone swirl above the bow finish off the card.

To take a peek at today’s fabulous new release creations, please click on the links below…

Remember that the entire new release is available to buy right now from the Whimsy Stamps store along with all your Whimsy favorites.

Thanks so much for stopping by! Have a wonderful day!
Hugs and smiles

Good morning and welcome to a very special blog hop!  I am excited to announce my participation and publication in the new Copic Coloring Guide, Level 3: People!

Authors Colleen Schaan and Marianne Walker have partnered up again with the team at Annie’s and some of the most talented artists and designers in the industry to bring you a quality publication packed full of techniques, theory, tutorials, and inspiration.  The 64-page book is the next step in the Coloring Guide series, offering information and educational material for crafters of all skill levels.

From the how and why behind picking colors and coloring skin to the tips and techniques for coloring hair to the helpful hints on how to create realistic looking clothing and fabric, this book presents information in an easy-to-follow format.

An included CD contains all of the hand-drawn images used in the tutorial section of the book, along with the assembly instructions for all of the projects, and a number of blank reference charts.

Each participating designer is hopping today to give you a peak at their favorite project from the book – and a chance to WIN your own autographed copy!
I have two cards in the book, one of them showcased here created with a darling Saturated Canary image, the other one with a darling Whimsy image.
To help kick off the celebration of the new book… each designer on the hop is giving away an autographed copy of the book…signed not only by Colleen and Marianne, but by the individual designer too!  Please comment on this post for your chance to win your copy of mine!  Commenting will be closed at midnight on Friday, October 26th. Winners will be announced on the individual designer’s blog.
Can’t wait for your copy?

Copic Coloring Guide Level 3: People is now available at many stamping and scrapbooking stores. Visit your local store today and ask about availability.  It is also sold through the Annie’s catalog, accessible online at Annie’s.

Thanks so much for stopping by! Good luck on winning a copy of that book! Have a wonderful weekend!
Hugs and smiles

Yesterday’s new tutorial on Splitcoaststampers was for the Concertina or Cascading Card. Cherie Franklin is the author, I shot the video.  For my sample my main image is from MFT’s darling Snow Angel stamp set. The image was stamped in  Tuxedo Black Memento Ink on  Neenah Solar White cardstock. It was colored with Copic Markers (Green: YG01, YG03, YG17    Red: R20, R22, R24, R29   Fur: E41, E42, E43    Snow: B0000, B000   Ear/Nose: R20, E40)  and cut out.

It was also stamped in My Mind’s Eye Winter Wonderland paper (red paper) and Carta Bella Merry & Bright patterned paper. The paper pieces were shaded with Copics, cut out, run through my Xyron and adhered to the cardstock image.

Winter Wonderland patterned paper was used to decorate the card sides.  The top corners were rounded and the top of the slanted pieces were topped with Solar White cardstock that was cut with Icicle Border Die-namics die.  The two larger Layered Label dies were used to create layers to place my image on.

More white cardstock was cut with the two smaller dies from Let it Snowflake die-namic dies, stacked and topped with a rhinestone from a Sleek Strips Silver Rhinestones.  Last I stamped a sentiment from Snow Angel on a piece of cardstock with a sentiment strip die.

Here is a video for the visual learner:

[youtube]https://www.youtube.com/watch?v=Whpy-eDRcac[/youtube]

Thanks so much for stopping by! Have a wonderful day!
Hugs and smiles

It’s Friday that means it’s Friends with Flair time at the Unity Blog.  I thought I share a card I made during the last VSN. This one was for Lori’s Glitter Window Challenge. I stamped the cute snow man family image from the Stamp of the week club Just Chillin’ stamp set  in  Tuxedo Black Memento Ink on Neenah Solar White cardstock. It was colored with Copic Markers (YG01, YG03, YG17, R05, R27, R39, BG70, Bg72, BG75, C00, C1, C3, BG0000, BG10) and cut and embossed with one of the Resplendent Rectangles Nestabilities die.

After cutting a frame out of Kraft cardstock with the same and the next size up Resplendent Rectangle dies, I realized that the regular glitter window technique wouldn’t work so well for these shapes. So instead I ran the image layer face down through my Xyron machine and rubbed loose glitter all over.  The frame and the image layer were adhered on another piece of Solar White cardstock and cut down to the size of the Kraft cardstock layer.

The card base was created out of a 9 1/2″ x 6″ piece of white cardstock, folded in half with the edges rounded.  the card front was covered with My Mind’s Eye Winter Wonderland paper patterned paper. White organdy Ribbon was tied around the layers and the bow was topped with a button tied on with embroidery thread.

The image was adhered over the card front with foam adhesive squares. The sentiment was stamped in Tuxedo Black ink on white cardstock, cut out and adhered to the lower right of the image. The lower part of the sentiment panel was colored with Copic Marker BG10 and topped with Stardust Stickles.

White cardstock was cut and embossed with two small Create a Flake 4 Spellbinders dies. They were adhered together with more foam adhesive square. A rhinestone was added to the center of the flake. It was then covered with Glossy Accents and Vintage Glass Glitter Shards were sprinkled over it. The snowflake was adhered to the top left of the image to finish off the card.

Thanks so much for stopping by! Have a wonderful weekend!
Hugs and smiles

My card today is a multi-tasking card. It is a sample in this week’s tutorial for the Twisted Circular Easel card, a fun variation of the Easel card tutorial that was already in our resource section. It is also a sample for the new Spectrum Noir Marker review on SCS and a sample for Lydia’s HYCCT challenge, which was to create a card that showcases your style.

I started by stamping Taylored Expressions Moka Angel image Tuxedo Black Memento Ink on Neenah Solar White cardstock. It was colored with Spectrum Markers (Dress: PP1, PP3, PP5 Skin: FS2, FS3, FS 6 (cheeks), TN2 Wings: BT1, BG2) and cut out.  A piece of white cardstock was cut and embossed with a Vintage Lace Motif die. A piece of My Mind’s Eye Be Happy paper was cut and embossed with a Standard Circle Nestabilities die. The edges were sanded before the circle was stitched to the Vintage Lace circle.  The angel was adhered over the circles with foam adhesive squares. Stardust Stickles was added over the wings and the halo.

My Mind’s Eye Honey patterned paper was cut and embossed with the smallest Grand Circle Nestabilities die. The edges were sanded and stitched. Seam binding was tied around the layer. The bow was topped with a button, tied on with embroidery thread and the layers were adhered to a piece of white cardstock, cut and embossed with the smallest of the Grand Decorative Circle dies.  The image circles were adhered to the card front center with foam adhesive squares.

The inside of the card was also decorated with Honey patterned paper that had been cut and embossed with a Grand Circle Nestabilities die. White Crochet Ribbon was adhered around the horizontal strip before the layers were stitched.  White cardstock was cut and embossed with a tag die from the new Back to the Basic tag dies. A sentiment from Moka Angel was stitched on it with Jet Black Archival ink. Flowers and part of a Finesse Rhinestone Swirl finish off the card.

Here is a video for the visual learner:

[youtube]https://www.youtube.com/watch?v=1RoUVh0l8yM[/youtube]

Thanks so much for stopping by! Have a great day!
Hugs and smiles

© 2012 fresh & fun Suffusion theme by Sayontan Sinha