Welcome to the NinaB Designs* first team blog hop of 2013! We hope you have had a relaxing holiday break and ready to join us for another year of inspirations and prizes!

*NinaB Designs is a product designer for a few paper crafting companies including Spellbinders, Want2Scrap and Penny Black, and The Craft’s Meow.

For this month’s hop, Nina challenged the team to create a project with the LOVE theme, which can be interpreted in many ways: Valentine, Anniversary and Friendship.

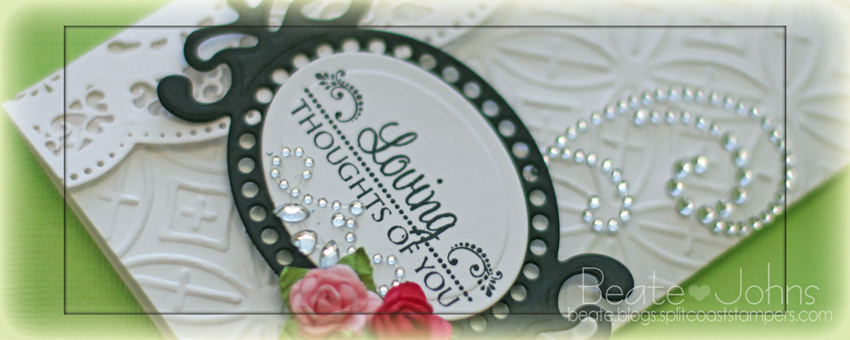
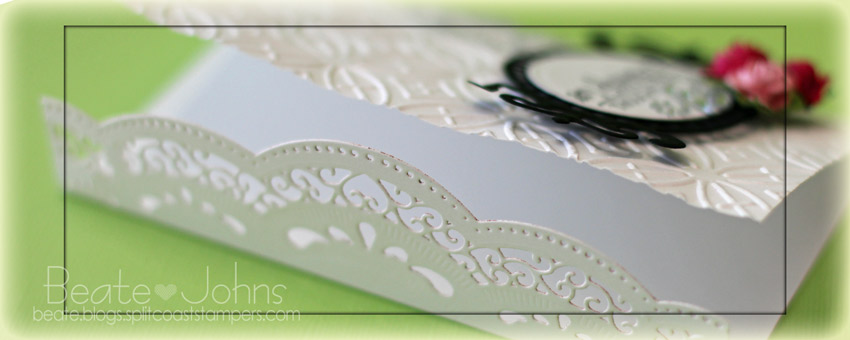
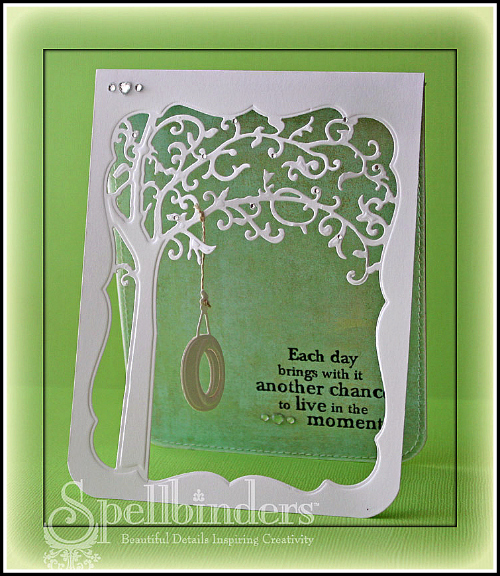
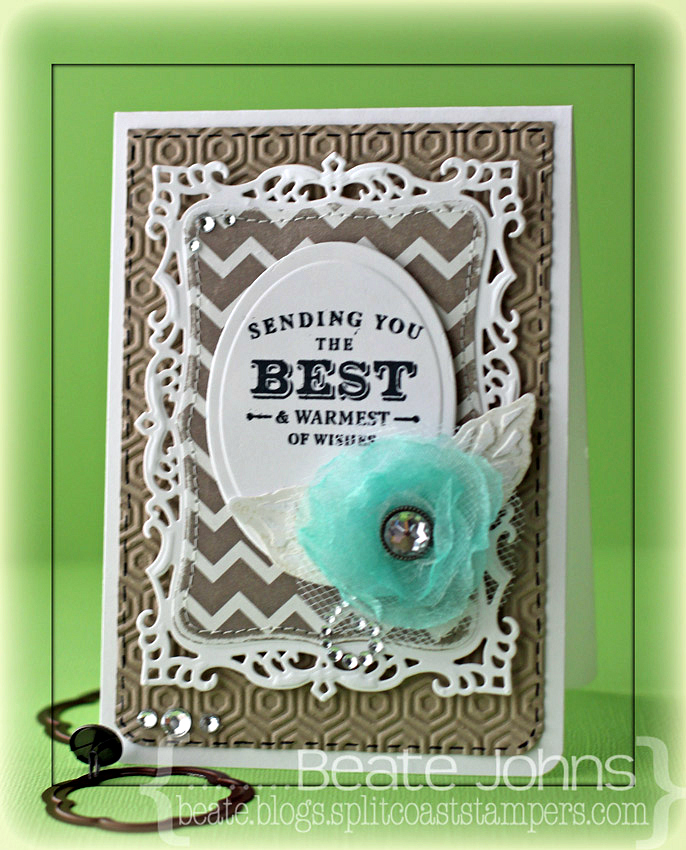
I couldn’t help myself. For my card I used a new M-Bossabilities folder as well as  Scalloped Border dies from the new Spellbinders Winter CHA release. I know, I am a lucky one to have them already. A little birdie told me that Nina designed those border dies.
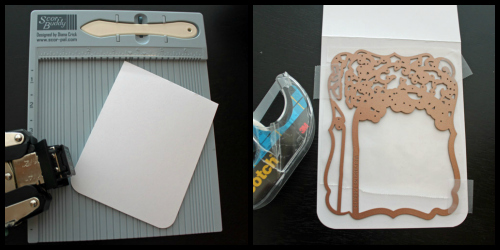
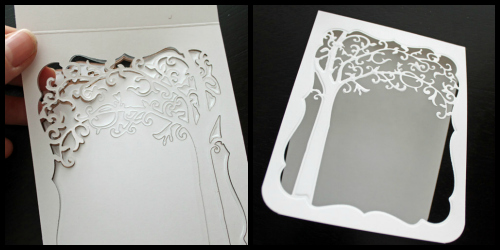
I started by scoring a 5 1/2″ x 8 1/2″ piece of Neenah Solar White cardstock at 3 1/2″ and 7″.  Next I used three dies from the A 2 Scalloped Border One Spellbinders™ Borderabilities® Card Creator dies to cut and emboss the 1 1/2″ edge of the tri-fold.  The other outer panel was embossed with the new Spellbinders™Infinity M-Bossabilities™ folder.
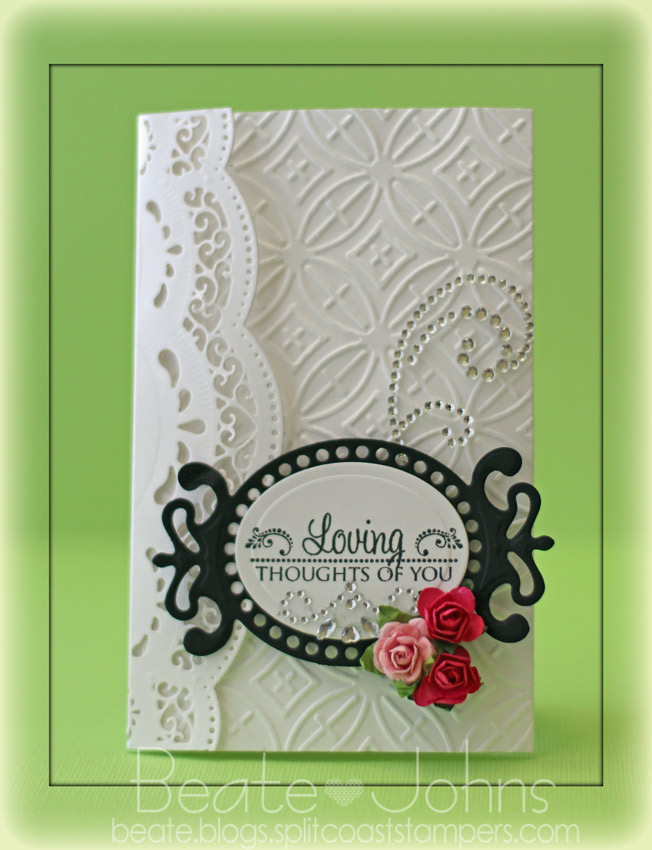
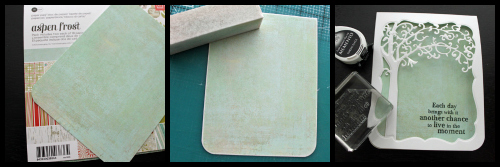
A sentiment from The Craft’s Meow Sent with Love was stamped in Tuxedo Black Memento Ink on a piece of Neenah Solar White cardstock that had been cut and embossed with the 3rd smallest of the Classic Oval SM Nestabilities® dies. It was adhered to black cardstock cut and embossed with one of the Fancy Tags Three dies. A piece of a Beautiful Bloom Bling Border was adhered under the sentiment and flowers were threaded through one of the tag holes and adhered on the back.
The sentiment panel was adhered slightly over the scallop border side to close the card. A piece of a Finesse Rhinestone swirl finish off the card. I picked the black and white (with a splash of pink) color scheme to make the card work for the current Simon Says Stamp Challenge.

The NinaB Designs team is giving away these TWO PRIZE PACKAGES:

Prize Package #1 includes Spellbinders Venetian Accents and Motifs:

Prize #2 includes 2 retired sets from Layers of Colors stamps:

Winners will be picked randomly from 2 of the designers’ blogs:


Everybody is welcome to comment and be eligible to win. The winners will be announced on  January 22 on Nina’s Blog, where you will also find all the relevant info regarding the giveaways. Finally, please consider liking the following Facebook pages that are represented on today’s hop, so you don’t miss the latest news and happenings:

Thank you for joining us today! Have a wonderful day!
Hugs and smiles 

Did you see the new images Tiddly Inks released? They are so cute. For my card I used the new Happy Mail images. They were arranged, printed out on Neenah Solar White cardstock and cut and embossed with the Out of the Box Technique as well as the second smallest of the new 5″ x 7″ Matting Basics A Spellbinders Paper Arts.

The image was colored with Copic Markers (Skin: E50, E21, E33, R20    Hair: YR24, E99, E39, E18   Dress/Bird/Flower: Y13, Y15, Y17, YR15   Mailbox: E31, E34, E29, W3, W5, BV20, BV23, BV25   Flower Center: E99, E09    Grass: YG01, YG03, YG17)  and the edges were sponged first with Summer Sky, then with Bahama Blue Memento Ink. The image was adhered to a piece of black cardstock that had been cut and embossed with the second smallest of the new 5″ x 7″ Detailed Scallops Spellbinders die.

A 2″ x 3 5/16″ piece of My Mind’s Eye Six by Six A Mother’s Love was adhered to a 3 5/16″ x 5 5/16″ piece from the same paper pack. The edges were sanded and stitched before the layers were adhered to the card base, a 3 1/2″ x 11″ piece of Solar White cardstock, folded in half.

The sentiment from Happy Mail was printed out and cut and embossed with a new die from the Charmed I’m Sure Spellbinders Shapeabilities® die. A button was tied to the left hand side of the tag with silver cord before it was adhered to the upper right hand corner of the image layer.

The card works wonderful the current Tiddly Inks Challenge (anything goes.

Thanks so much for stopping by! Have a wonderful day!
Hugs and smiles


Hi everyone! I am very excited to be able to give you a sneak peek of a soon-to-be released  Spellbinders Paper Arts die called Just Swingin’. I love this die set. You can use it several different ways, making it very versatile.


Supply List:


Cross Promotional Partners:

  • Basic Grey: Aspen Frost 6″ x 6″ paper pack
  • Flourishes: Country Road
  • Want2Scrap: Fancy Bling Border

I started by folding a 4 1/4″ x 11″ piece of white cardstock in half and round the bottom corners. Unfold the card base and place wax paper over the front. Adhere the die down with removable tape (or  Post-It notes).

I ran the die/cardstock combo through my Grand Calibur, first with the cutting, then with the embossing sandwich. (Hint: This is an intricate die, you might have to run it through your machine twice to get the detail cut completely.) I carefully pulled the die off the card front.

I cut a piece of Basic Grey Aspen Frost paper a tiny bit smaller then 4 1/4″ x 5 1/2″. The corners we rounded and the edges were sanded, then stitched.  It was adhered into the inside of the card and a sentiment from Flourishes Country Road was stamped with black ink on the bottom right corner.

I cut and embossed the tire swing twice out of white cardstock. On one I cut off the hanger before I adhered it to the back of the other tire. I wanted to have the embossed tire on both sides, since I planned on hanging the tire from the tree with a piece of linen thread. This way, even when the tire swings, it looks great, no matter what side is showing.

To show you a different way to use the dies, I created a shaped card with the outline die that comes with the frame. I love creating shaped cards. Have you tried creating shaped cards with Spellbinders dies yet?


For the official giveaway rules, click HERE.

To enter the Giveaway, enter HERE!   The entry is now closed!

I hope you have time to check out the other Spellbinders blog posts today. I personally can’t wait to see what everyone else has created! Thanks so much for stopping by! Have a wonderful day.

Becky Fleck

Debbie Olson

Hugs and smiles

Questions? [email protected] No entries will be accepted at this email address.

I had a post on the Spellbinders blog yesterday featuring a Happy New Year’s card. I hope you had time to check it out and if not, go and hop on over there and tell me what you think. I am in love with Glimmer paper and stars recently.

Thanks so much for stopping by! Have a wonderful day!
Hugs and smiles

P.S.: Today’s new tutorial on Splitcoaststampers is written by Sabrina Friel for a Flip Down Stack card. I hope you have time to check that out as well.

It’s my turn to share on the Spellbinders blog today. The topic this week is sparkles. Now that was an easy one for me. Rhinestones, Brilliance ink and Glimmer Paper.

I hope you have time to check it out and tell me what you think. Have a wonderful day!
Hugs and smiles

Today’s tutorial on Splitcoaststampers is written by the amazing Eva Doblias. She shows us how easy it is to use Twinkling H2O’s. She couldn’t create a video, so I shot one showing how to use the paints to create a watercolor wash background.

I started by stamping snowflakes from Verve’s Glad Tidings in VersaMark ink on a 3″ x 5″ piece of white cardstock.  They were embossed with white embossing powder before I used blue and purple Twinkling H2O’s for the waterwash. Once the paper dried, I stitched the edges of that layer.

A piece of white cardstock was cut with the Vintage Oval Frame die and the stamp with the same name was stamped over it with Starlite Black Brilliance Ink. A sentiment from Glad Tidings was stamped in the center.

Silver glimmer paper was cut and embossed with the two smallest dies from Spellbinders Create-A-Flake Four, layered on top of each other and connected with a Recollections brad (Michaels). The snowflake was adhered to the right hand side of the sentiment layer. Rhinestones from a Sleek Strips Silver Rhinestone package were added underneath the sentiment. The sentiment layer was adhered to the lower left of the background layer before the background was adhered to the card base. Part of a Finesse Rhinestone Swirl finishes off the card.

Here is a video for the visual learner:

[youtube]https://www.youtube.com/watch?v=oSWBfnl_wSo[/youtube]

Thanks so much for stopping by! Have a wonderful day!
Hugs and smiles

My card today is super easy. I started with a 4″ x 11″ piece of Neenah Solar White cardstock. It was folded in half and the bottom left corner was rounded. One corner of a 2 1/2″ x 5 1/4″ piece of Echo Park’s Holly Jolly Christmas paper was rounded before the edges were sanded. The layer was adhered to the left hand side of the card front.

I have had the Taylored die Merry for a while and had to use it before Christmas is over. I like it a lot. I cut two Merry’s out of Red Devil Fourz Bazzill cardstock and one of silver glimmer paper. They were adhered to the lower part of the card base. Three tiny rhinestones were added on the Y of the bottom Merry.

Next I cut and embossed silver glimmer paper and Red Devil cardstock with the two small dies from the 2012 Snowflake Pendant Shapeabilities® die set. The snowflakes were adhered to the upper right hand side of the card front and topped with rhinestones. A paper piercing edge along the paper strip above the sentiments finish off the card.

I want to wish you a Merry Christmas. I hope you have a wonderful time with friends and family! Have a wonderful day!
Hugs and smiles

I have another post on the Spellbinders blog today. I hope you have time to check out the entire card. It works great for the current Simon Says Stamp challenge, which is to create a Christmas project.

Thanks so much for stopping by!  I don’t know how much I will be posting over the weekend and next week! I wish you all a wonderful Christmas. Hopefully you get to spend it with loved ones!!!
Hugs and smiles

I am back with another cute Tiddly Inks image called Cocoa Wishes. It was printed out on Neenah Solar White cardstock. It was cut 3 1/2″ wide and the image was colored with Copic Markers (Skin: E50, E21, E33, R20   Hair: E13, E15, E19, E18   Jeans: B91, B93, B95, B97   Ear Muffs/shirt/bird: YR09, R24, R29, R39    Cup: E40, E41, E42, E43  ).

Two pieces of  3 1/2″ wide strips of Carta Bella’s Winter Fun patterned paper were adhered above the image and the edges were stitched. The layers were adhered to the card base a 3 1/2″ x 11″ piece of Kraft cardstock, folded in half. The bottom corners were rounded and a piece of red washi tape was adhered on the the paper strips on top.

A sentiment from Snowflake Letters Mini seals was stamped in Tuxedo Black Memento Ink on a piece of white cardstock, cut and embossed with a Standard Circle Nestabilities die. A red button was tied on with a silver cord before the sentiment circle was adhered with foam adhesive squares. A few snowflakes were cut and embossed out of silver glimmer paper with Snowflake Borderabilities dies and adhered to the card to finish it off.

Thanks so much for looking! Have a wonderful day!
Hugs and smiles

Today’s tutorial on Splitcoaststampers is written by the wonderful Susan Roberts. She shows us how to create a flower by cutting and melting ribbon pieces. It’s perfect for winter, when my hands seem to be cold all the time. 🙂

For my sample I used ribbon and tulle bought at Hobby Lobby. Both were cut with the two smallest Blossom Nestabilities® dies, heated and stuck together with a decorative brad.

A sentiment from Simon Says Stamp Apothecary Labels was stamped in Tuxedo Black Memento Ink on Neenah Solar White cardstock that had been cut and embossed with the second largest of the Classic Oval SM Nestabilities® dies.

Two pieces of Fancy Pants Country Boutique Paper were cut and embossed with the single leaf dies from the Bitty Blossoms Shapeabilities® die set. The leaves were sanded before they were adhered under the ribbon flower, who was in turn adhered to the lower half of the sentiment oval.

Another piece as well as more Neenah Solar White cardstock was cut and embossed with the second largest Decorative Label Eight Nestabilities® die. The patterned paper was sanded and cut on the embossed edge before it was stitched to the white die cut. The sentiment panel was adhered to the center of the fancy panel with foam adhesive squares.

The bottom corners of a 3 1/2″ x 5 1/4″ piece of Kraft cardstock were rounded and a faux stitched border was added with a black gel pen. The layer was then embossed with the So Trendy M-Bossabilities ® folder. It was adhered to the card base, a 3 3/4″ x 11″ piece of Solar White cardstock, folded in half with the bottom corners rounded. Rhinestones finish off the card.

Here is a video for the visual learner:

[youtube]https://www.youtube.com/watch?v=ajo7y88Rf3Q[/youtube]

Thanks so much for stopping by! Have a wonderful day!
Hugs and smiles

© 2012 fresh & fun Suffusion theme by Sayontan Sinha