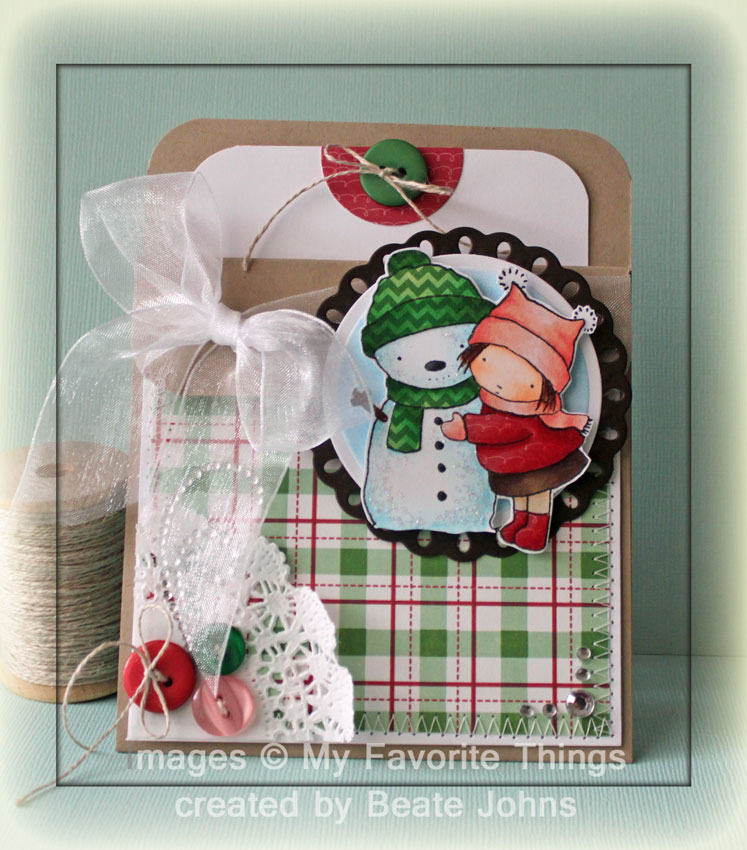
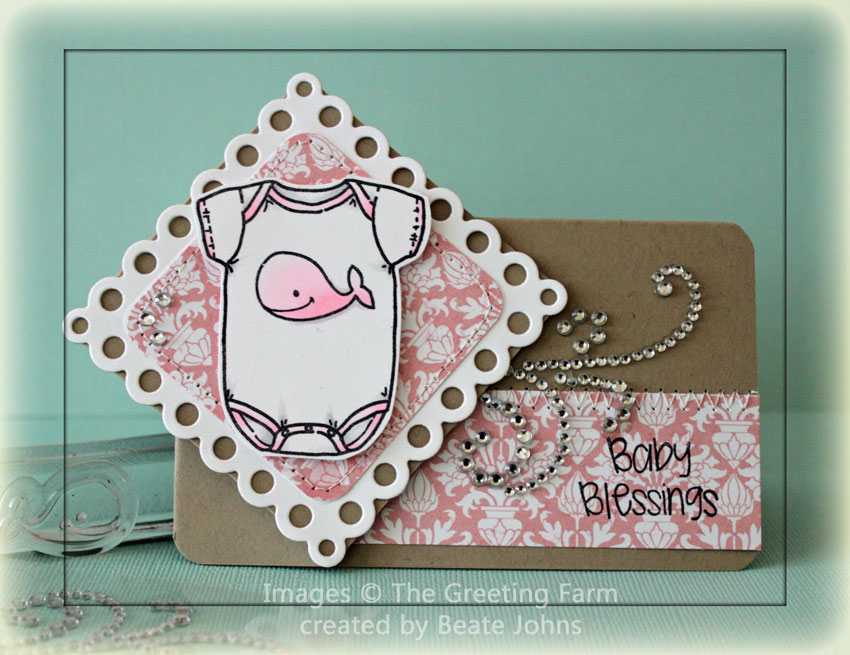
I created this card at the end of November for a color challenge on Splitcoaststampers. The colors were White, Kraft and Pear Green. Having just received an order with Simple Stories Baby Steps Paper, I knew I wanted to use the green crosshatch patterned paper for it.


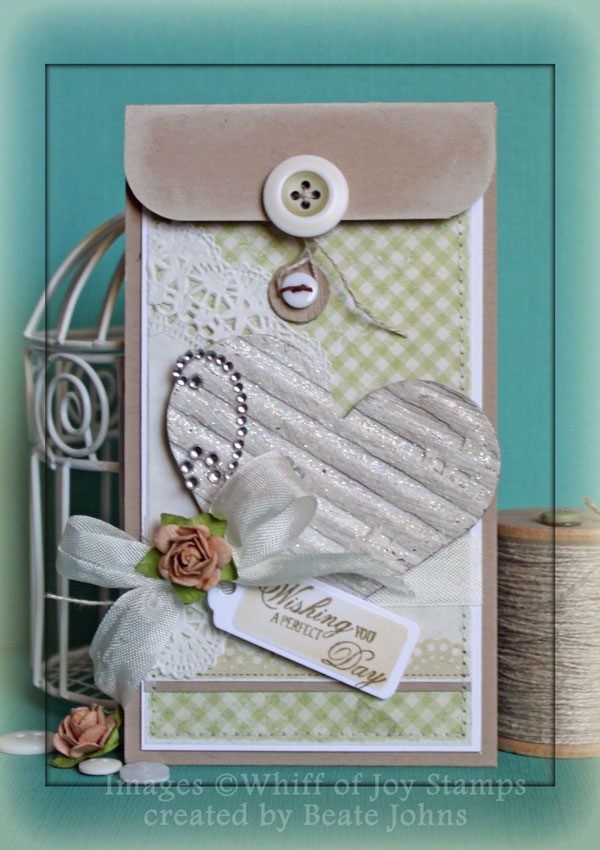
I started with a 3″ x 12″ strip of Kraft cardstock and scored it at 5 1/2″ and 11″. The corners of the 1″ flap were roundedAdirondack Snowcap ink was dragged across the edges of the card front, flap and inside of the card.

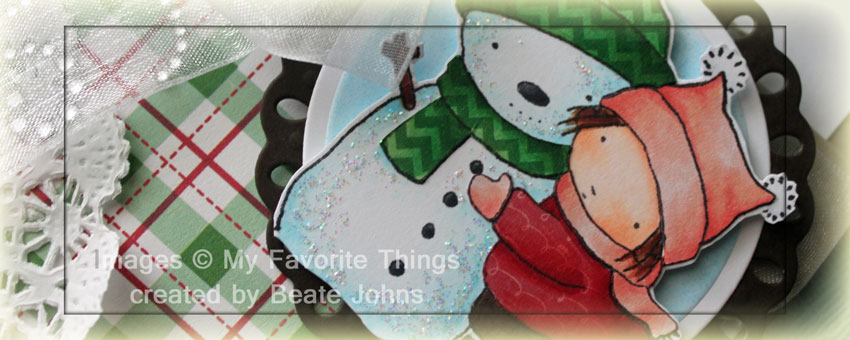
A 2 1/2″ x 5″ piece of that cross hatched paper was adhered to a 1/4″ piece of Neenah Solar White cardstock. A 1 1/4″ x 2 1/2″ piece of the same paper pack was adhered over the green layers and the edges of the big layer were stitched. Part of a Paper Doily was adhered to the upper left hand side. Seam Binding was tied around the horizontal layer and topped with a Recollection Flower.

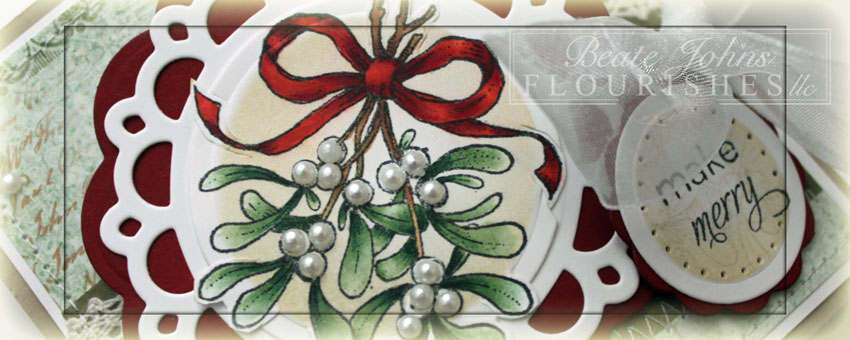
A piece of corrugated cardstock was painted with White Acrylic Paint Dabber , embossed with Iridescent Ice Embossing Powder (Stampin’ Up!) and cut embossed with a Classic Heart Nestabilities die. The heart was adhered next to the bow and topped with part of a Finesse Rhinestone Swirl.

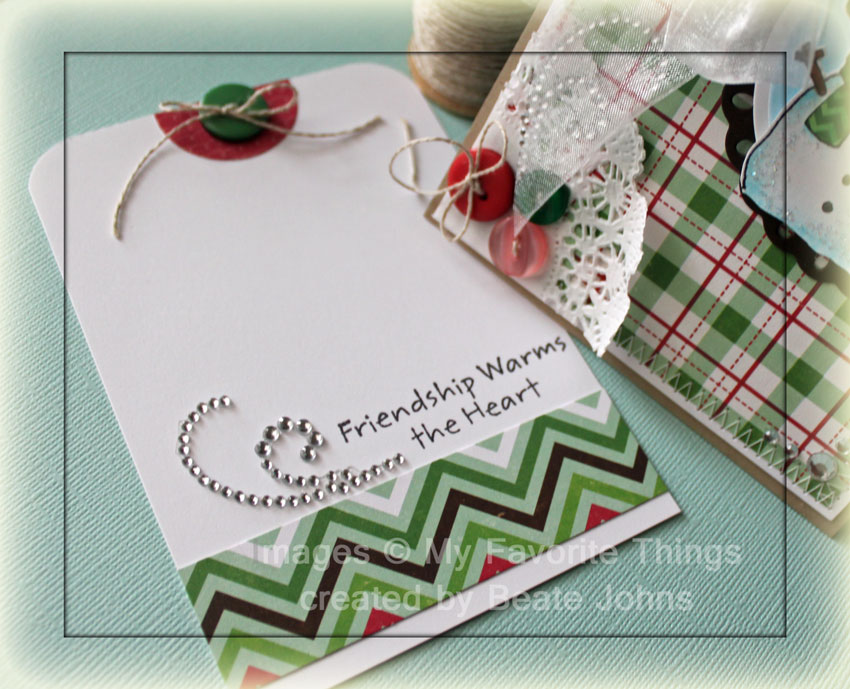
A sentiment from Elizabeth Bells’ Accessories and Sentiment collection was stamped in Rich Cocoa Memento ink on a piece of Neenah Solar White cardstock, cut and embossed with a Tag Trio die (retired). The inside of the tag was sponged with Antique Linen Distress ink. The tag was tied onto the bow with Linen Thread.

Butterscotch Waxed Ribbon was used to tie a tiny button to a 1/2″ Kraft circle. It was adhered underneath the flap. A bigger button was threaded with Linen thread and adhered on to the flap. I left Linen Thread hanging off the big button so I could use that to tie the flap card shut.

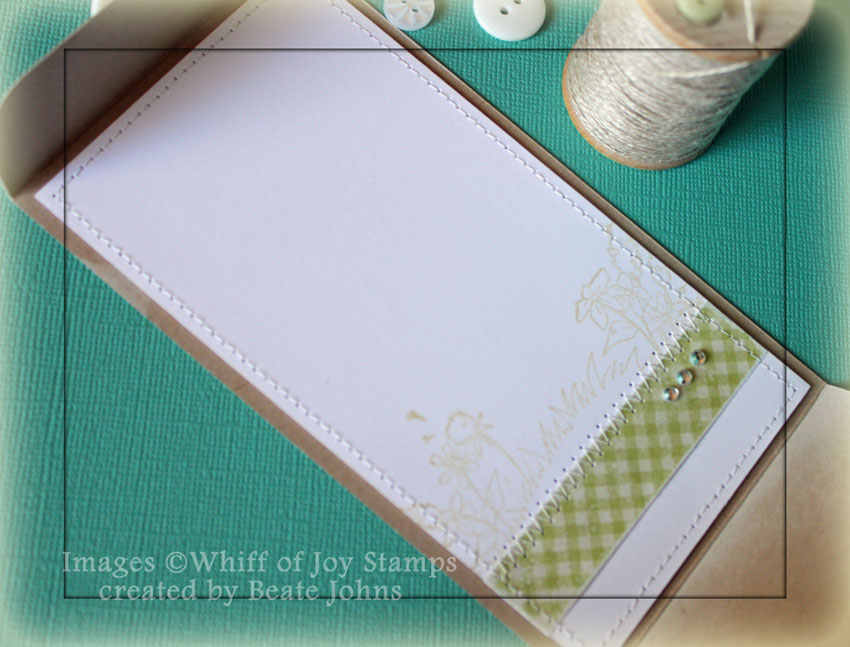
For the inside of the card a 1/2″ x 2 3/4″ strip of patterned paper was stitched to the lower edge of a 2 3/4″ x 4 3/4″ piece of white cardstock. A background stamp from the same set was stamped over the paper strip in Antique Linen. Three baby Bling Rhinestones on the right of the paper strip finish off the inside of the card.

Thanks so much for stopping by! Have a wonderful day.
Hugs and smiles


Today’s tutorial on Splitcoaststampers is created by Monique Trappeniers. She shows us how to create a Six Fold Card. I used the technique to create a sample for today’s Whiff of Joy Challenge, which is to use Charms or Bling. Since I love Bling, I went with Bling.

I started by stamping Henry with Heart in Tuxedo Black Memento Ink on a piece of Neenah Solar White cardstock with Tuxedo Black Memento Ink. The image was cut and embossed with a Standard Circle Nestabilities and colored with Copic Markers (Henry: E30, E31, E33, E00, E93, E95   Heart: YG21, YG23, YG17   Ground: W3, W5, W7   Sky: B0000, B000). The circle was adhered to a piece of brown cardstock, cut and embossed with a Lacy Circle Nestabilities die. The edges of the image circle were paper pierced.


The card base was created out of textured Espresso cardstock and decorated with Echo Park Victoria Garden Patterned Paper. The card base measures 4″ square when folded. I cut a 3 3/4″ square of white cardstock and a 3 1/2″ square of patterned paper. Pieces of a Finesse Rhinestone Swirl were adhered to the top left and bottom right of the card front and brown Organdy ribbon was used to tie the card shut. The image layer was adhered to one part of the card front with dimensionals.

A sentiment from Elisabeth Bell Accessories and Sentiments was stamped in Tuxedo Black Memento ink on a piece of Solar White cardstock, cut and embossed with the smallest Petite Oval Nestabilities die.  The center was colored with Copic Marker B0000 and the sentiment was adhered to the lower left of the image circle.

When you open the diagonal panels, you will find two horizontal strips that were also lined with Victoria Gardens paper. You fold those layers down…

to unveil the inside panel of the card. The front horizontal strip has two little gatefold doors that can be unfolded as well.

Here is a video for the visual learner:

[youtube]https://www.youtube.com/watch?v=r-fPo9_tNXM[/youtube]

Thanks so much for stopping by! Have a wonderful day!
Hugs and smiles

During the Mini VSN a few of weeks ago, the first challenge was to create a card with an image of a warm clothing along with some felt on your card. I had just shot the video tutorial for the Pocket Card ,and had a finished pocket, that just needed an image to be finished off.

I stamped an image from the super cute There She Goes Clear Stamps Wonderful Winter Wishes set in Tuxedo Black on Neenah Solar White cardstock as well as a  patterned piece from Echo Parks Holly Jolly paper pack. The jacket was cut out of the patterned paper and shaded with Copic Markers ( R35, R37, R39). The image on the cardstock was cut and embossed with a Classic Circle Nestabilities die and also colored with Copic Markers (mitten and boots: G000, G00, G02 Skin: E0000, E00, E01, R20 Pants: E40, E41, E42 Snow: BG0000, BG000, B01 Hair: E97, E25 carrot: YR15, YR18). The jacket was adhered to the main image and the background was airbrushed with Copic Marker B02. The cloud that had been masked, was shaded with Copic Markers (W00, W0, W1).


The card base was created out of a 4 1/4″ x 11″ piece of cardstock, scored at 1 1/4″ and 5 1/2″. The four corners were rounded. A 3 3/4″ square of Holly Jolly paper was stitched to a 1/4″ bigger piece of whtie cardstock. A quarter of a paper doily was adhered to the lower left of the the stitched layers and three buttons were tied to it with Linen Thread.

Part of a Finesse Swirl was adhered over the buttons and more Rhinestones were adhered to the lower right corner. The layers were adhered to the card base. Before the flap was taped down, May Arts Organdy Ribbon was tied around it. Pink felt was cut with a small Heart Nestabilities die and stitched to the top of the bow.

The image circle was adhered to a piece of Solar White cardstock, cut and embossed with a Tear Drop Circle Nestabilities die. The layers were adhered to the card base with dimensionals.

The inside tag is a 3 1/2″ x 5″ piece of Solar White cardstock. The top corners were rounded and a 1 1/8″ wide strip of Holly Jolly paper was adhered to the lower half. A sentiment from the Wonderful Winter Wishes set was stamped above the strip with Tuxedo Black ink. Another pink felt heart was topped with a clear button and stitched to the tag with embroidery thread.

The card works great for this weeks DYSU Challenge, so I will be entering it there. It’s an easy challenge that I could enter all my cards into. Use ribbon. It would be harder for me if the challenge was NOT to use ribbon. LOL

Here is a video for the visual learner:

[youtube]https://www.youtube.com/watch?v=PrH-I8Op-O0[/youtube]

Thanks so much for stopping by! Have a wonderful day!
Hugs and smiles


This months Bring Back Beautiful Challenge is to create a special fold card. I had seen a sample of a Diamond Fold card where the card wasn’t used as shown in the tutorial, but inside out. The diamond was inside the card, not on top. I thought that would be a great thing to try out.

For my sample I stamped an image from Meet me Under the Mistletoe in Tuxedo Black Memento Ink on Neenah Solar White cardstock. It was colored with Copic Markers (Leaves G21, G24, G28   Branch: E21, E23, E25   Bow: R08, R24, R29, R39). The image was cut out with a Classic Circle Nestabilities die and the Out of the Box Technique, sponged with Antique Linen Distress ink and layered on a piece of white cardstock cut and embossed with Picot Edge Circle Nestabilities die.

The image was layered on a piece of Cherry Cobbler Cardstock that had been cut and embossed with the Jumbo  Scallop Circle Nestabilities die and the berries of the image were covered with Baby Bling Pearls.

Pieces of Father Christmas Pink Paislee Patterned Paper were adhered to  1 3/4″ x 3 3/4″ pieces of white cardstock. May Arts Crochet Lace was adhered over the horizontal paper piece before a border was stitched around the edges of the patterned paper. May Arts Organdy Ribbon was tied around the card to keep it closed. The image was adhered to the left panel with dimensionals.

A sentiment from Meet Me Under The Mistletoe was stamped in Tuxedo Black on a piece of white cardstock cut and embossed with with a Classic Circle die. It was sponged with Antique Linen Distress ink and the part of the image used for the main panel was stamped over the sentiment with the same color. The edges of the sentiment panel were paper pierced.

Parts of a Finesse Pearl Swirl along with more Baby Bling pearls finish off the card front.

The inside of the card is decorated with more Father Christmas paper stitched to white cardstock pieces. I left the diamond piece blank for a personal message.

Here is the original Diamond Fold tutorial video for the visual learner:

[youtube]https://www.youtube.com/watch?v=QzPyoUja4DI[/youtube]

Thanks so much for stopping by! Have a wonderful day.
Hugs and smiles


Every  week I try to shoot a video for one of the older tutorials. This week I picked the Pocket Card Tutorial. I am loving Echo Parks Holly Jolly Christmas patterned paper so much right now, I had to use it again (and should probably order more).

For my main image of the card I picked the image from MFT’s Merry KISSmas stamp set. It was was stamped in Tuxedo Black Memento Ink on Neenah Solar White cardstock. It was stamped again on pieces of Holly Jolly Christmas paper. Parts were cut out and adhered to the main image. The paper pieces as well as the main image were colored with Copic Markers ( hat/scarf: R00, R30, R32     Shirt/boots: R32, R35, R37     Stockings: E40, E42   Skirt: E43, E44, E47     Skin: E0000, E00, E01    Hair/branch: E23, E25, E29    Snowman: B0000, B000    Hat: G00, G02, G05, G07    Buttons: C5, C7, C9) and cut out.

The image was adhered with dimensionals on a piece of Solar White cardstock, cut and embossed with a Classic Circle Nestabilities die and airbrushed with Copic Marker B02. That circle was adhered to a piece of Canyon Brown cardstock, cut and embossed with a Tear Drop Nestabilities die.

The card base was created out of a 4 1/4″ x 11″ piece of cardstock, scored at 1 1/4″ and 5 1/2″. The four corners were rounded. A 3 3/4″ square of Holly Jolly paper was stitched to a 1/4″ bigger piece of whtie cardstock. A quarter of a paper doily was adhered to the lower left of the the stitched layers and three buttons were tied to it with Linen Thread.

Part of a Finesse Swirl was adhered over the buttons and more Rhinestones were adhered to the lower right corner. The layers were adhered to the card base. Before the flap was taped down, May Arts Organdy Ribbon was tied around it. The image were adhered over the flap with dimensionals.

The inside tag is a 3 1/2″ x 5″ piece of Solar White cardstock. The top corners were rounded and a 1 1/8″ wide strip of Holly Jolly paper was adhered to the lower half. A sentiment from the Merry KISSmas set was stamped above the strip with Tuxedo Black ink and part of Finesse swirl was adhered next to it.

I punched a half circle out of Holly Jolly paper with a 1 1/4″ circle punch, adhered it to center of the top of the tag and tied another button on with Linen thread.

Here is a video for the visual learner:

[youtube]https://www.youtube.com/watch?v=PrH-I8Op-O0[/youtube]

Thanks so much for stopping by! Have a great day.
Hugs and smiles

A couple of month ago Joanne ran a Technique Challenge called Layered cards. It had a great response and we had a lot of requests for a tutorial for that card after that challenge. So today we are posting the Telescoping Card in the resource section.

For my sample I used stamps from The Greeting Farms Clearly Christmas Stamp set. The images were stamped on Neenah Solar White cardstock with Rich Cocoa Memento Ink and colored with Copic Markers (Sleigh: R24, R27, R29, R39, E97, E99, E37   Stars: Y15, Y17, E97). The images were cut with Classic Circle Nestabilities and first sponged with Antique Linen Distress ink
, then a bit with Vintage Photo Distress ink.

I left a large part of the Sleigh circle open to write a note in and stamped snowflake images from Clearly Christmas with Antique Linen over the open areas. The gifts from the sleigh were stamped twice on different paper from Echo Parks Season’s Greetings. The gifts were shaded with Copic Markers (YG21, YG25, YG17, B000, B02), cut out and adhered over the main image. Stardust and Yellow Stickles were added to the sleigh image.

The sleigh circle was first stitched to a slightly bigger Canyon Brown cardstock circle, then to a piece of cardstock, cut and embossed with a Beaded Circle Nestabilities die.

The tree image was first stitched to a Kraft cardstock circle, then on a piece of Cherry Cobble cardstock (Stampin’ Up!) cut and embossed with a Jumbo Circle Nestabilities die and lastly on an Echo Park Season’s Greeting Paper circle.

For the top layer the sentiment circle was first layer on Kraft cardstock circle, then on a patterned paper circle and lastly on a piece of Neenah Solar White cardstock cut and embossed with a smaller Beaded Circle Die. Stardust Stickles was added over the snowflake and Baby Bling Rhinestones were added on each bead but one, that holds the brad connecting it to the medium size circle layers.

Here is a video for the visual learner:

[youtube]https://www.youtube.com/watch?v=ik-t2AXlZSo[/youtube]

Thanks so much for stopping by! Have a wonderful day!
Hugs and smiles

Today’s tutorial is for a fun fold I called Side Spring card. Instructions were posted back in 2005 in a forum post on SCS and a recent post from Dawn reminded me of it.

For my card I started out with a 5 1/2″ x 8 1/2″ piece of Kraft cardstock. The patterned paper is from the Echo Park Victoria Garden Paper pack. The strip on the left hand side measures 1 1/4″ x 4 1/2″. A sentiment from The Greeting Farm’s new Clear Set Build-a-Onesie Boy was stamped with Tuxedo Black Memento Ink directly on to the paper strip. Part of a Finesse Silver Rhinestone Swirl was adhered over to sentiment.

For the main image I stamped the onesie image on a piece of Neenah Solar White cardstock, colored it with Copic Markers (RV0000, RV10, N0, N1) and cut it out. A piece of white cardstock was cut and embossed with one of the Eyelet Square Nestabilities dies. A 2 3/8″ square of Victoria Garden paper was stitched to it after the corners were rounded. The image was adhered to the square with dimensionals. Three Silver Baby Bling Rhinestones on the left corner finish off the card front.

For the inside a 5/8″ x 4 5/16″ long patterned paper strip was adhered to a 2 9/16″ x 4 5/16″ piece of white cardstock. A small image from the same set was stamped to the right hand side of the strip with Tuxedo Black Memento ink.

Here is a video for the visual learner:

[youtube]https://www.youtube.com/watch?v=7nMekwqD3XE[/youtube]

Have a wonderful day! Thanks so much for stopping by!
Hugs and smiles

Today’s challenge hostess is Betty. She challenged us to create a girly card decorated with Pearls, Ribbon and Glitz. Unfortunately it is also our last challenge with Betty. She is stepping down to spend more time with her family.

For my card I started out with the new gorgeous Feminine Charm set. I stamped the dress form in Tuxedo Black Memento ink on Neenah Solar White cardstock and colored it with Copic Markers (Dress form body: E50, E51, E53, W3   Stand: W1, W3, W5, W7, W9   Letter: E40, E41, E43   Flower and Heart: R22, R27, R29   Flower: Y13, Y18, R20, R22   Leaves: G21, G24, G28  Gold accessories: Y21, Y28).

The image was cut out and White Opal Liquid Pearls were added over the pearl necklace and gold Spica pen was added over the gold accessories.

Four different patterned paper square from the MME Lost & Found Urban paper pack were adhered to a piece of cardstock, then cut and embossed with one of the Grand Circle Nestabilities dies. The layers were stitched to a piece of black cardstock that was hand cut to a slightly larger layer.

A piece of white cardstock was cut and embossed with one of the Fancy Tag 2 dies. The center was sponged with Tea Dye Distress ink. One of the images from Fancyful Flourishes was partly stamped over the tag with Tea Dye ink (stamped off twice). A sentiment from Feminine Charm was stamped in the center with Tuxedo Black ink.  Three small flower were twisted together and adhered to the lower left of the sentiment panel.

Part of Finesse Pearl swirl was adhered to the upper right of the patterned paper layers before the sentiment panel was adhered with dimensionals. The dress form was adhered over the sentiment.

The card base was cut and embossed with a Grand Scallop Circle Nestabilities die out of Cherry Cobbler Cardstock. A single layer was cut and embossed out of the same cardstock with the same die and the pieces were used to create an Easel Card. The card front layers were adhered to the single piece before that was adhered to the card base.

For the inside of the card a piece of white cardstock was cut and embossed with the same circle die used for the card front layers. A small strip from the Urban paper pack was cut with that die as well. The strip was adhered to the white layer and ivory Crochet Lace was adhered to the strip.

The layers were stitched to a slightly bigger, hand cut black cardstock circle. The crochet lace was topped with a yellow lace. The rest of the Finesse Pearl swirl was adhered over the button.

Please check out my fellow Timeless Tuesday Challenge Team members:

Betty Wright
Cindy Haffner
Heather Jensen
Makiko Jones
Silke Ledlow
Tammy Hershberger

I hope you have time to participate in the challenge! Have a wonderful day!
Hugs and smiles

I got the idea for this weeks tutorial from Ellen Hutson. She posted a similar one several years ago. I thought it was a great card idea and wanted to share it with all of you and have it in the SCS resource section. You use 4 circle die cuts to create a Petal Card.

For my sample I cut and embossed the four circles out of black cardstock with the largest of the Beaded Circle Nestabilities dies. 2 circles were cut and embossed with a smaller Classic Circle Nestabilities die out of Glowing Authentique Patterned Paper. The patterned paper circles were cut in half and sanded before one half was stitched to each of the four Beaded circles. The circles were scored in half and adhered with glue dots.

A piece of Crochet Lace was stitched to a 2″ x 10″ strip of Authentique Paper before it was adhered around the card as a belly band. Gold Organdy Ribbon was tied around the band. A Muse Token was tied around the bow with Linen Thread and topped with a button.

An image from Crafty Secrets Halloween Creative Scraps was cut with a Classic Oval Nestabilities die. The edge of the image was sanded before it was first adhered to a slightly bigger black cardstock oval, then to a Scallop Oval layer cut and embossed out of Classic Cream Neenah cardstock. A sentiment ticket from the  same Creative Scraps was cut out and attached to the image layer with a Mini Paper Clips. A small button was stitched underneath the sentiment.

For the inside of the card I cut and embossed another piece of Classic Cream cardstock with a Classic Circle Nestabilities die. A strip of Authentique paper was stitched to the layer after the edges had been sponged with Antique Linen Distress ink.

Here is a video for the visual learner:

Thanks so much for stopping by! Have a wonderful day!
Hugs and smiles

Isn’t this the cutest image? It is from a There She Goes Clear Stamp set called Back in 10. I absolutely adore those bears. I stamped them on Neenah Solar White cardstock in Tuxedo Black Memento Ink and colored it with Copic Markers (Big Bear: E97, E99, E19, Ears and Nose: E02, E04, Little Bear: E42, E43, E44, Hammock: R24, R29, R39, Trees: E35, E37, E39, Leaves: YG01, YG03, Sign: E51, E53, E55, Grass: YG23, YG25, YG17, Sky: BG0000, BG10, BG11).

The image was cut with Square Nestabilities and layered first on a slightly bigger square cut and embossed out of Cherry Cobbler cardstock, then on a Neenah Canyon Brown cardstock piece cut and embossed with Scallop Square Nestabilities.

The card base is 4 1/2″ x 9″ piece of Core’dinations cardstock scored at 2 1/4″ and 4 1/2″.

Two 1 7/8″ x 4 1/8″ pieces of October Afternoon Campfire pieces were sewn to 3/16″ bigger pieces of Canyon brown cardstock and adhered to the side panels. The image was adhered to the card base with dimensionals on the left panel.

A bow was tied out of Crinkled Ribbon with the Bow-Easy and topped with a October Afternoon Campfire button. The ribbon was adhered to the lower left corner of the image panel.

The sentiment is also from the set Back in 1o. It was stamped in Tuxedo Black Memento Ink on Neenah Solar White cardstock and cut and embossed with the smallest Petite Oval Nestabilities dies and colored with Copic Markers BG0000, BG10.  Two stitches were added with brown embroidery floss before the oval was adhered to the upper right hand side of the image panel.

For the inside of the card a 4″ square of white cardstock was adhered to a 1/4″ bigger piece of Canyon Brown cardstock. A frame was cut with Label 15 and Circle Nestabilities out of Campfire October Afternoon paper and adhered to the cardstock layers. The inner edge of the circle was paper pierced and another sentiment from Back 1o was stamped on the left hand side of the circle.

Thanks so much for stopping by! Have a wonderful day! Hugs and smiles

© 2012 fresh & fun Suffusion theme by Sayontan Sinha