I will try to start posting a scrapbook  page every Sunday. Right now I still have display stamper images to show off, but hopefully this resolution (is that the right word for it?) will help me motivated to scrapbook more.

build-a-flower-sweet-smile.jpg


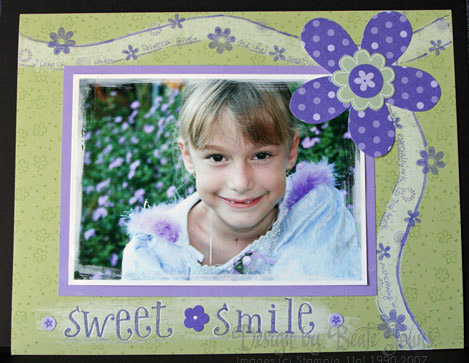
This is an 8 1/2″ x 11″ scrapbook page for the Build a Flower tin! It was hard for me to work with the stickers….especially the green and purple ones.

The wavy stripes on the page are painted on with craft refill. I painted the white stripe with the wide watercolor brush and white craft reinker fluid. Once it was dry I added a small stripe of lovely lilac  on the outside of the white stripe.  I added circles and flowers from Seeing Spots in Lovely Lilac Craft ink over both stripes. I journaled with a Lovely Lilac Journaling marker (I just saw that those were retired. Am I slow or what?) on the bottom of the white stripe.

I also added a few brushstrokes of white underneath the photo to make the title Sweet Smile (stamped with the retired Whimsical Alphabet in Lovely Lilac craft ink).

Of all my samples I stamped for this years convention, my scrapbook pages were by far my favorite. I don’t scrapbook very often, and most times for entries for Stampin’ Up! contests or display samples, but I usually really like how my pages turn out. I always tell myself that I have to scrapbook more just for my family and myself and then get caught up in creating cards instead.

fun-and-fast-forever-love.jpg

I made this 12″ x 12″ page for the stamp set Fun & Fast Notes.

I had cut all the sentiments off the images and mounted them on the side of the wood block.

Here I only used the sentiment “Together Forever” from the Wedding cake image as a framing layer all around the picture. 

Display stamper don’t get the retirement list before hand, so this sample has some retired accessories and stamps on it. We no longer carry any organdy ribbon, nor do we have the Wonderful Words II set anymore.

The chipboard heart is from our On Board Accents collection. I covered it with cardstock or designer paper (can’t remember, how sad is that) and stamped Forever several times over it. I rolled the edges in black craft ink.

The flowers were punched out of cardstock and Brilliant Blue Prints designer paper (that was the paper I was sent to work with. Obviously they don’t know that I almost break out in a rash when I see Brilliant Blue, let alone having to work with it!!!) with the Spring Flower Punch. The center of the bigger flowers is a 1/4″ black cardstock circle, the center for the smaller one is a brad from the vintage brads.

I was lucky enough to get chosen to be a display stamper for convention. When I opened my goody box I was a bit shocked. One of my “sets” that I was supposed to make samples for was the Build a Flower Tin. It took me a while to make peace with that. Those flowers come in some unusual colors: Wild Wasabi (can you hear me saying green Flowers? Sticker Flowers???? I like vintage! Wahhhhh), Lovely Lilac (anyone reading this blog knows I am not a fan of any kind of PURPLE!), Rose Red and Bashful blue. I did like those last two colors.

Well….once I got over pitying myself and started creating, the projects came together pretty quickly. Here is a scrapbook page I had a blast making!

build-a-flower-tin-silly-me.jpg

Rebecca took silly pictures of me when we went back home to San Antonio last March. I thought those had to be scrapbooked. I just wish I had made a duplicate to keep.

I made another Jacob’s Ladder for one of my downline. She is expecting a baby girl in July. They aren’t 100% sure what they will name her, so I didn’t add a name to the front.

oh-my-word-jacobs-ladder-c.jpg

I love making those little books. They are so much fun to make. For this one I stamped the baby carriage from last year’s hostess set Oh My Word in pretty in pink on Shimmery white cardstock.  The next layer is Rose red, the following Pretty in Pink stamped with the Aida Background. Before adding the last layer of Rose Red cardstock I tied white organdy ribbon around the layered image.

All coasters were covered with the pink multi colored polka dot paper from Petals & Paisley Designer paper. I glued them on with Stampin’ Up!’s glue stick and sanded the edges with a sanding block.

I added a faux stitching around the last layer of the Rose red to make it look softer. I stamped precious Moments from Expressive Flexible Phrases on shimmery white cardstock in Rose red and punched it out with the  1 1/4″ circle punch. I stamped the heart from A-Z accents over it in Pretty in Pink. Then I added a dotted border on the outside of the white cardstock and taped it on a 1 3/8″ Rose Red Circle.

oh-my-word-baby-girl-jacob.jpg

I added a 3 1/2″ Rose Red layer on all covered coasters and used white organdy ribbon to make the Jacob ladder. Now Maria will just have to add photos of her soon to be born baby girl and it will be done!

I took this shot when Rebecca read an Alligator warning sign for the first time. These signs are posted in all State Parks here.  I love how you can see her apprehension. I love the lighting in this photograph.

rebecca-and-the-sign.jpg

Click on more if you are interested in seeing a quick tutorial for this fun project. Think Mother’s Day present, think Teacher gift! This is great for any occasion. I can’t wait to make my next one.

The images in the tutorial are thumb nails. Click on them to see a bigger picture.

  Continue reading »

This week on SCS I found a link to a video tutorial for a Jacob’s Ladder. I had to try it out today! I was itching to do it yesterday, but by the time we came back from the beach the good light was gone. This is such a cool project.

jacob-ladder-step-9001.jpg

There is nothing stamped on this one. I used 4×4 lightweight coasters, Stampin’ Up! ribbon, Fancy Pants and My Mind’s Eye Rubbons as well as My Mind’s Eye Papers. I used Adirondack Acrylic Dabber paint on the outside of the coasters. I took pictures for a quick tutorial. I am simply tickled pink. I never had a Jacob’s Ladder and didn’t know what it was until I saw the tutorial! I know my kids will LOVE this!


jacob-ladder-finished-side-a001.jpg

For those of you who are like me, and don’t know how a Jacob’s ladder works:

You hold the album up so all the coasters hang down. Turn the top coaster upside down and all the coasters will flip over! Did I mention I think this is super cool! I am still giddy like a kid!


jacob-ladder-finished-side-b.jpg

Some of you had a few questions about my little book yesterday. The book comes together fast and is easy. So I made another one and wrote a tutorial for it.

 reba-book-finished-front001.jpg

This time I used Fancy Pants stamps and paper. If you are interested viewing the tutorial, click on more. Some of the images are blurry. I have to apologize for that. My new stamp room is dark even during the day. I need to run out and buy some daylight bulbs.


Continue reading »

creative-imaginations-purse-close.jpg

….was decorating a Sonia handle purse with Paper, stickers and printed acetate from Narratives Oceanside collection. Purse and paper can be found in the Creative Imaginations shop. You can also find Bare Element merchandise at Eclectic Paperie.

I thought this paper was perfect for the pictures I took this March when we went to the beach.

I traced the sides of the purse onto the scrapbook paper and cut it out. Then I added Aegan Blue DewDrop ink on the edges of the purse and let it dry.

I used mod podge to adhere the paper to the purse. Then I added sticker and StarDust stickles (front sand dollar) and added another mod podge layer. The clear round stickers are from A Muse. You can find them in Ellen Hutson’s store.

ci-purse-top-inside.jpg

I only covered the inside lid with matching paper. I left the rest of the inside blank.

Check out the special gallery Creative Imaginations started for the SCS design team. You will find some incredible work there!

If you are interested in viewing my matching scrapbook pages, click on more.

Continue reading »

© 2012 fresh & fun Suffusion theme by Sayontan Sinha