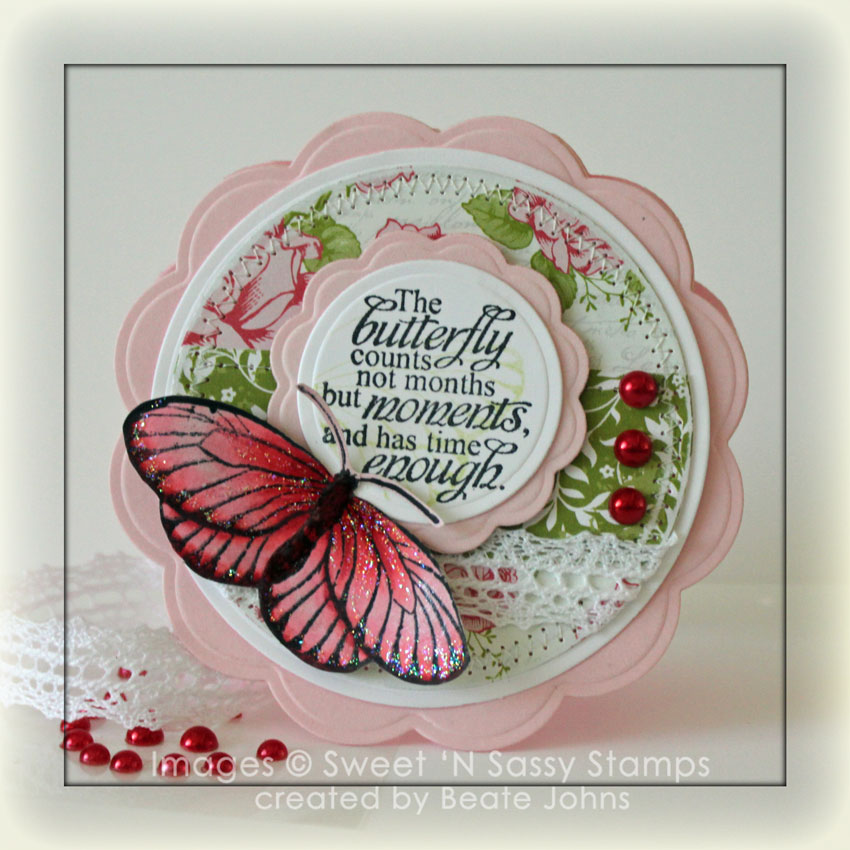
Here is another card I created for the Sweet ‘n Sassy Blog as well as for a HYCCT Challenge. Wendy challenged us to use Butterflies on our project. It was the perfect time to use Everyday Miracles.

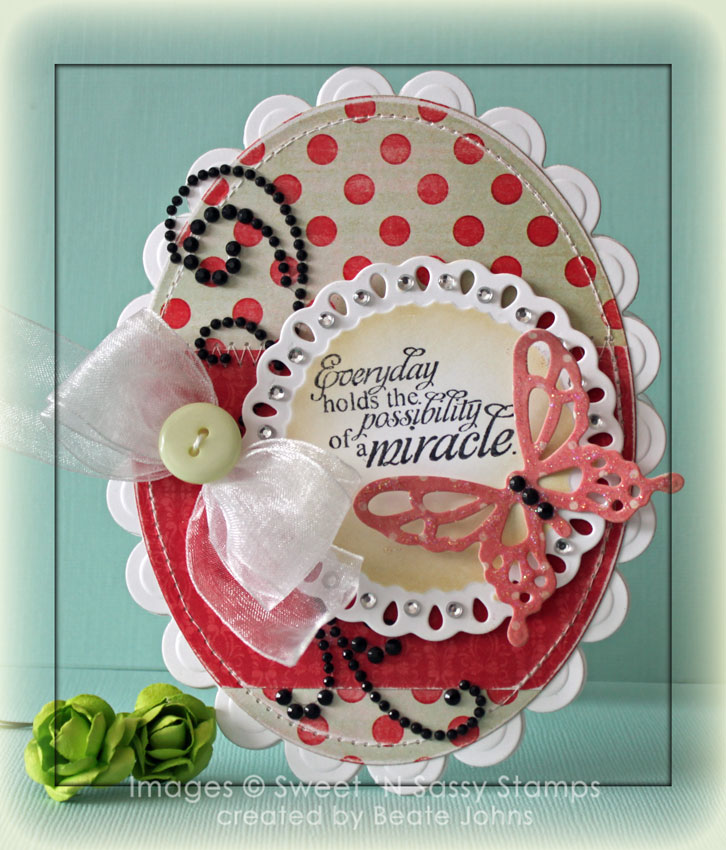
A sentiment from the set was stamped in Tuxedo Black Memento Ink on a piece of Neenah Solar White cardstock that had been cut and embossed with a Tear Drop Circle Nestabilities die. The inside was sponged first with Antique Linen, then the edges with Vintage Photo Distress ink. Baby Bling Rhinestones were added to the rim of the circle.

MME  Lost & Found Market Street paper was layered, then cut with Grand Oval Nestabilities dies. The edges were sanded before the layers were adhered to the card base, Neenah Solar White cardstock cut and embossed with a Grand Scallop Oval Nestabilities die. A black Finesse Rhinestone swirl was cut apart and adhered to the card base before the sentiment panel was adhered to the card base with dimensionals.

White Organdy Ribbon was tied into a bow with help of the Bow-Easy. It was topped with a green button and adhered next to the sentiment circle. A butterfly was cut out of Market paper with the new Donna Salazar Wonderful Wings dies. The butterfly was adhered to the circle and topped with Stardust Stickles. Three black Baby Bling Rhinestones finish of the butterfly and card.

Thanks so much for stopping by! Have a wonderful day!
Hugs and smiles

For this post I thought I share a card I created to update an older tutorial on Splitcoaststampers. The Foxy Oxi Technique. I created it back in 2004 when OxiClean was a pretty new product. I was wondering if it would act just like Bleach. Well, it does and it doesn’t. Depending on what ink and paper you use, the results vary.

For my sample I used a shipping tag and Distress inks. Distress inks don’t bleach out all the way, the get darker spots. When I created the tutorial, I used Stampin’ Up! Classic inks and Whisper White cardstock. That combination bleached out into white spots.

I sponged my shipping tag with Peeled Paint, Broken China and Wild Honey Distress inks before I sprinkled OxiClean over it and sprayed it with water. After the tag dried, I cut it with a Petite Oval Nestabilities die and stamped the main image from the Wildflowers set in Jet Black Archival ink over it.

The oval was first layered on a slightly bigger white oval, then on a piece of black cardstock that had been cut and embossed with a Label 18 Nestabilities die.

The pieces of My Mind’s Eye Lost & Found Sunshine paper were stitched to a 4″ x 5 1/4″ piece of black cardstock. The bottom corners were rounded. A 4″ strip of white cardstock was cut and embossed with a Lacy Doily Accent die. It was adhered over the horizontal patterned paper strip.

A doily was cut apart, sponged with Antique Linen and adhered under the Label 18 layer. White Organdy ribbon was run under the main image and tied around the layers. It was topped with a button that was tied on with Linen thread.

The sentiment is also from the Wildflowers set. It was stamped on a piece of white cardstock that had been cut and embossed with one of the Fancy Tag labels and sponged with Wild Honey Distress ink.

To finish the card off a Pearl swirl was cut apart. The bigger part was adhered to the top right, the smaller one to the lower left of the card front. The layers were adhered to a 4 1/4″ x 11″ piece of Kraft cardstock, folded in half.

Here is a video I created for this technique for the visual learner:

[youtube]https://www.youtube.com/watch?v=H4gFNafQ1hY [/youtube]

Thanks so much for stopping by! Have a wonderful day!
Hugs and smiles

Today’s card is another sample I created for the Hope You can Cling to Challenges on Splitcoaststampers and as one of my Sweet ‘N Sassy Guest Designer posts. The challenge at SCS was to incorporate pink in a masculine card.

The sentiment from Season of Change was stamped in the center of a 3 1/4″ x 4 3/4″ piece of Neenah Solar White cardstock with embossing ink. The sentiment was embossed with clear embossing powder before the entire piece was sponged with Tattered Rose, Wild Honey and Peeled Paint Distress ink. Leaves from Season of Change were stamped over it in the same colors.

The edges of the panel were distressed and stitched to a 1/4″ bigger piece of Canyon Brown cardstock. Three brads were added to the top left of the card.

The card base is a 4 1/4″ x 11″ piece of Kraft cardstock folded in half. The card front was embossed with the Cuttlebug Brocade Embossing Folder and the edges were sponged with Vintage Photo distress ink. The layers were adhered to the card base with dimensionals.

Leaves were cut out of white cardstock with leaf dies matching the set. Leaves were stamped over the die cuts and the edges were sponged before both leaves were tied together with a button and Linen thread. The leaves were adhered to the lower right of the sentiment panel.

I used this sample to update Splitcoaststampers Embossing Resist Tutorial and shoot a video for that technique:

[youtube]https://www.youtube.com/watch?v=qBAHRrJSuRM[/youtube]

Thanks so much for stopping by! Have a wonderful day.

Isn’t this image darling? I used Stella from The Greeting Farm for Jimmi’s Hope You Can Cling To Challenge. She gave us this sketch to  use.

I new I wanted to use Stella and new dies and build my card around that.  I started by stamping the image in Tuxedo Black Memento Ink on Neenah Solar White cardstock. It was colored with Copic Markers ( Skin: E0000, E00, E01, BV00   Hair: YR24, E39, E29   Dress: G0000, G00, C2   Heart and shoes: RV00, RV10, RV13).

A piece of MME Lost & Found Two Blush Paper was cut and embossed on Classic Circle Nestabilities dies. It was stitched to black cardstock piece that had been cut and embossed with the next size circle die. A piece of white cardstock was cut and embossed with the largest of the Tear Drop Circle Dies. Pink Baby Bling Rhinestones were added between each tear drop. Stella was cut out and adhered to the center of the circles with dimensionals.

A 4 3/4″ square of Blush paper was stitched to a 3/16″ bigger piece of black cardstock. A 4 1/8″ mint green square of Blush cardstock was cut in half diagonally. It was stitched to a slightly bigger white cardstock triangle. A black cardstock was cut and embossed with the Lace Doily Accents Border die. The strip was adhered under the triangle layers before those were adhered to the lower left of the card front.

Before the image was adhered to the layers with dimensionals, pink silk ribbon was run through one of the tear drops and tied around the layers. The bow was topped with a button that was tied on with embroidery floss. A black Rhinestone Flourish was cut apart and adhered to the lower left and upper right of the layers.

The card base was cut and embossed with one of the Grand Scallop Square Nestabilities die out of Whitewash Core’dination cardstock. A sentiment from Sweet ‘n Sassy Stamps Simple Pleasures was stamped in Tuxedo Black Memento Ink on a white cardstock piece, cut and embossed with Classic Circle dies. It was layered on a slightly bigger black cardstock circle, adhered to the lower right of the main image. Pink Baby Bling was added underneath.

The inside of the card was kept pretty simple. Extra pieces of Blush paper were adhered to a 4 1/2″ square of white cardstock before they were stitched to a 1/4″ bigger piece of black cardstock. Another part of the black Rhinestone swirl was adhered to the lower right of the layers.

Thanks so much for stopping by! Have a wonderful day!
Hugs and smiles

I created this card for a Hope You Can Cling To Challenge on Splitcoaststampers. I was the hostess and my challenge was to create a circle card. It was also the first card I shared at the Sweet ‘n Sassy Stamps blog. I am excited to be the Guest Designer there this month.

The card base was cut with the largest of the Large Scallop Circle Nestabilities dies out of Pink Pirouette cardstock. Patterned paper from the Echo Park Victoria Garden pack was cut with a Classic Circle Nestabilities die. Before it was stitched to a slightly bigger white cardstock circle, May Arts Crochet Lace was taped under the horizontal layer.

The sentiment is from Everyday Miracles. It was stamped in Tuxedo Black Memento Ink on Neenah Solar White cardstock. The sentiment was cut and embossed with a Classic Circle Nestabilities die. One of the butterflies from the same set was partially stamped on the sentiment circle in second generation Shabby Shutter Distress ink. The sentiment was adhered to a slightly bigger pink layer cut with one of the Large Scallop Circle Nestabilities dies.

The butterfly that was used in the sentiment panel was stamped again on a piece of Victoria Garden Echo Park paper with Tuxedo Black Memento Ink. The butterfly was cut out and colored with Copic Markers (RV10, R43, R46 and E27). It was adhered to the lower left of the sentiment panel. Stardust Stickles was added to the darker parts of the wings and Glossy Accents to the body.

Red Kaisercraft Pearls finish off the card! Thanks so much for stopping by! Have a wonderful day!
Hugs and smiles

Lydia Fiedler wrote the tutorial today on SCS. She shows us how to use Crayons and Embossing folders for a new resist technique. As a variation, she shows the same technique with solid stamps. I created my sample with the technique Variation.

For my sample I used Sweet ‘n Sassy Wildflower stamp set. I used the big flower image for the technique and Neenah Solar White cardstock. After rubbing white crayon over the cardstock, Shabby Shutter Distress ink was sponged over it. The cardstock was cut and embossed with the second largest Lacy Square Nestabilities die.

The sentiment is also from the stamp set. It was stamped on the lower right side of the image with Peeled Paint ink. A slit was cut to the left of the sentiment. White organdy ribbon was pulled through the slit and slide into a bow. The bow was topped with a button.

The card base is a 4″ x 10 1/2″ piece of Neenah Solar White cardstock. The bottom was cut and embossed with a Edgeabilities die from the Classic Scallop and Classic Postage sets.

Thanks so much for stopping by! Have a wonderful day!
Hugs and smiles


After cyber stamping the last couple of weeks with Korin she was sweet enough to ask if I would like to join her sketch challenge team for the month of April. I LOVE challenges, so of course I said yes. 🙂

I flipped the sketch from last Saturday 180 degrees I used Benjamin Bunny. I LOVE the belly on this bunny. He is so cute! He was printed out on Solar White cardstock and colored with Copic Markers (Bunny: E40, E41, E42, E43,  Ears, nose and sole of feet: YR00, E93, E95, E97    Flower: Y13, Y15, Y17, E97, E00, E29, YG21, YG23, YG25      Flower Pot: YR12, YR14, E25, E29   Grass: YG61, YG63, YG67    Sky: BG0000, BG10, BG11). The image was cut out with a Petite Oval Nestabilities die and the Out of the Box technique.

The same Oval Nestabilities die was used along with  one of my new Label 18 Nestabilities dies (yes….still giddy that I got some of the new dies in. The others are backordered, but ordered) to cut and emboss a frame out of Canyon Brown cardstock. Both dies were left on and the cardstock was sponged with Walnut Stain Distress ink to make the embossed part just a tad darker then the edges of the frame. I placed a slightly bigger piece then the cut out oval behind the frame and adhered the image oval in the center of the frame. (In retrospect, I should have just used one size bigger oval for the image, but…it was too late for that already.)

One 2″ x 4 1/2″ piece of MME Fine and Dandy True Blue paper and one 2″ x 4 1/2″ piece of MME Stella and Rose Gertie paper were stitched to a 2 1/8″ x 4 9/16″ piece of White cardstock. Brown May Arts Organdy Ribbon was tied around one layer.

A 4 3/4″  5″  piece of Gertie paper was stitched to a 3/16″ bigger piece of white cardstock. Both layers strips were adhered to that. A green button was added to the top right of the frame of the image before the image layer was adhered with dimensionals. Two additional buttons were stitched next to the green one with Honeydew Twine.

Just because I already had the buttons out I added another over the ribbon. Before I tied it on, I stamped the sentiment from Everyday Sentiment from Kraftin’ Kimmmie stamps in Tuxedo Black Memento ink on a piece of Solar White cardstock, cut and embossed with the smallest of the Tag Trio dies. The sentiment tag was tied with the button to the ribbon with more Honeydew Twine (love that color and Lemon drop).

The layers were adhered to the card base a 5 1/2″ x 10 1/2″ piece of Canyon Brown cardstock folded in half. To finish it off I cut apart a Recollections Rhinestone swirl and adhered it to the upper left and lower right side of the image.

Thanks so much for stopping by! I hope you have time to try the sketch if you haven’t done so yet.

Have a great day!
Hugs and smiles

I created this card for the Technique Lover Challenge on SCS as well as the 100th Sweet Stop Sketch. I picked Peek-a-Boo Cocoa as my image, printed it out on Neenah Solar White cardstock, cut it with a Classic Square Nestabilities die and colored it with Copic Markers (Sky: B21, B23,   Mouse: N0, N1, N3, E93, E95    Flowers: Y17, YR15, YR18, E97, E09, E18    Rock: W3, W5, W7    Grass: YG01, YG03, YG25)….I know. I am so predictable. Neenah Paper, check, Nestabilities, Check, Copic Markers double check! 🙂

The image was adhered to a piece of black cardstock, cut and embossed with Classic Scallop Square Nestabilities and the edges of the image were paper pierced. Three buttons were stitched to the lower right edge with Lemon drop Twine. I think that color is my favorite. It’s so pretty!

A 2 3/4″ x 3 5/8″ piece of Pebbles patterned paper was stitched to a piece of white cardstock, cut and embossed with a Classic Scallop Rectangle die. The image panel was adhered to the patterned paper panel.

A 2 1/2″ x 4 1/2″ strip of dictionary was adhered to a strip of black cardstock that had one edge cut and embossed with a long Scallop Rectangle Nestabilities die. The layers were adhered to a 4 1/2″ square of Pebbles Happy Go Lucky Patterned Paper. The layers were stitched to a 3/16″ bigger piece of black cardstock.

Lemon Drop Twine was wrapped around the dictionary strip and a sentiment tag was added. The tag had been cut and embossed out of Solar White cardstock with the smallest of the Tag Trio die. The sentiment is from Kraftin’ Kimmie’s Everyday sentiment and was stamped on the tag with Tuxedo Black Memento Ink.

A Recollection Rhinestone swirl was adhered to the upper right corner before the image layer was adhered to the card base with dimensionals.

Thanks so much for stopping by! Have a wonderful day!
Hugs and smiles

© 2012 fresh & fun Suffusion theme by Sayontan Sinha