Are you on Pinterest? Do you pin things and tell yourself you will create something like that at one point later on? A blogging friend of mine, Kendra Wietstock, is posting a Pinterest inspired project from the first of December until the 21st on her blog. I thought I join her today.

Ever since I saw a Christmas tree made out of string on Pinterest, I knew I wanted to try it. But when buying string for it, I changed my mind a bit and bought fuzzy white yarn instead. I had seen a Christmas tree decor at Target that I liked and thought I could re-create it with the string tree technique. Plus white and silver would work great with the current Moxie Fab World challenge.

Well…it worked kind of. I wrapped a styrofoam cone with wax paper. Then started glueing the string to the cone.

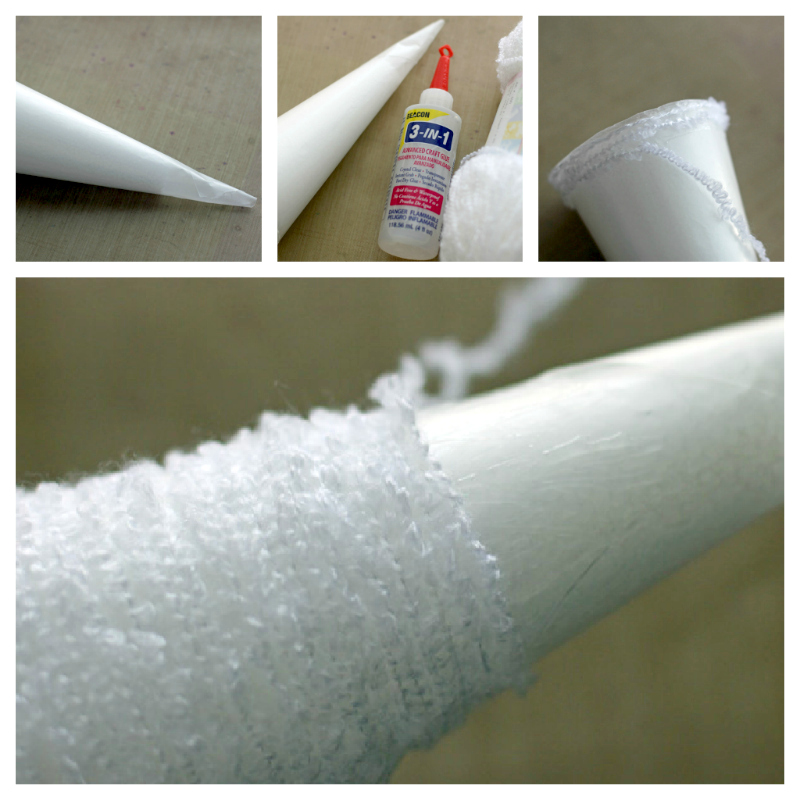
Once I wrapped the entire cone and the glue was dry, I took the styrofoam cone out and tried to separate the my string tree from the was paper. Note to self: This doesn’t work the with fuzzy yarn! LOL So I stuck the styrofoam cone back in and started on the decoration.

I cut and embossed hearts and stars out of shiny silver paper (bought at a scrapbook store back in Ohio) with the small dies from Sweet Folk Art. They were strung up on silver cord and adhered to the tree. The tree was topped with a star created out of the same paper cut with the bigger star die. Red and Silver rhinestones finish off the tree.

I am happy with how it turned out, even if it’s a bit different then the pinterest idea I started out with.  Thanks so much for stopping by! Have a wonderful Sunday!
Hugs and smiles


I have another video post to share with you on the Spellbinders Paper Arts blog. The coming week is all about Nestabilities®. Nestabilities started my love for Spellbinders products. Once the original shapes came out I was hooked. In the video I talk a bit about some of my favorite techniques you can do with Spellbinders dies and show how to create this telescoping image.

I hope you have time to stop by, check it out and tell me what you think. I would love to hear from you!  Have a wonderful weekend!
Hugs and smiles

Patti, you asked for it. Here is a video for the visual learner on how to just emboss your Spellbinders die shape into your cardstock:

[youtube]https://www.youtube.com/watch?v=RRUoXVNuhF0[/youtube]

Have a wonderful Friday! Hugs and smiles


Yesterday I had some free time to play along some of my favorite challenges. I created this card for the current Way to Use it challenge on Splitcoaststampers (favorites), the current CASE Study and Simon Says Stamp challenge (snowflakes).

The current CASE study showcases a gorgeous card from Windy Robinson. Her card had some great dry embossing with Nestabilities dies. Her card had flowers in the center, but I thought snowflakes would be more appropriate for December. Plus I LOVE snowflakes. So I cut snowflakes out of Neenah Solar White cardstock, Frosted Teal and Patina Bazzill cardstock with dies from the 2012 Snowflake Pendant Shapeabilities® die set.

A 3 1/2″ x 11″ piece of Neenah Solar White cardstock was folded in half and the bottom corners were rounded.  Two of the Wonky Rectangles Nestabilities® were embossed in the center of the card. A sentiment from Merry Everything was stamped in the center of the embossed rectangles with Midnight Black VersaMagic Ink.

Red silk ribbon was tied around the lower part of the card base. Thin silver wire was wrapped around a stylus and added to the small white snowflakes. The bigger blue snowflake and a while one were adhered to the left hand side of the sentiment. A second white snowflake was adhered over the ribbon bow.  Rhinestones from Want2Scrap finish off the card.

Thanks so much for stopping by! Have a wonderful Friday!
Hugs and smiles

This week on the Spellbinders blog it was all about Gift ideas. I had some 7Gypsies 6″ x 6″ Shadowboxes for quite a while and thought it would be great to alter one. I hope you have time to check out my post with step by step instructions HERE. I used a picture of my kids from 10 years ago. They were so cute when they were little.  Altering items is definitely out of my comfort zone. Let me know what you think.

Thanks so much for stopping by! Have a wonderful day!
Hugs and smiles

Today’s tutorial on Splitcoaststampers is written by Judy Maddigan and super fun. My little Santa cracked me up wobbling back and forth. I hope you try it out.

I made two samples. One really simple one with pieces cut out of Carta Bella Merry & Bright paper cut with Simon Says Stamp exclusive Christmas Trees dies. The tree was decorated with Silver Stickles and Red Baby Bling Rhinestones.  A tiny star was cut out of Desert Marigold Fourz Bazzill paper with another die from the Holiday Trees set.

The santa (from Simon Says Stamp Gnome Sweet Gnome ) was a bit more tricky, since the stamp comes only with his face, not the back.  I stamped it twice in Tuxedo Black Memento Ink on Neenah Solar White cardstockand cut them out. I flipped one over and traced the lines from the front to the back, leaving off his face and his thumbs.

The images were then colored with Copic Markers (Red: YR09, R24, R29, R39    Mittens: YG01, YG03, YG17    Beard/Hair: N0, N1, N3   Hat trim: W00, W1   Skin: E50, E21, E34, R20). Red paperclips that had been unbend and reshaped were adhered to the inside of the back with Scor-Tape. The front was run through my Xyron and adhered over the back, hiding the paper clip ends. The Santa as well as the tree were adhered to a covered Hershey’s Nugget with Glossy Accents.

Here is a video what these little rockers do: They crack me up, especially that little Santa Gnome.

[youtube]https://www.youtube.com/watch?v=-dLGB22EbVY[/youtube]

And here is a video on how to create the rocker for the visual learner:

[youtube]https://www.youtube.com/watch?v=7CR8qa_D_c8[/youtube]

Thanks so much for stopping by! Have a wonderful day!
Hugs and smiles

Thank you to everyone who commented on my blog recently. That brought a big smile to my face. I think that’s how I will give away my blog candy from now on to make sure one of my readers and blog visitor will receive that candy. Random.org picked #76 (after picking two numbers that had less then two comments + candy comment). That’s Evelyn in Oregon who wrote:

What a haul! I’ve followed your work on SCS and wherever I can find you. Unfortunately, I seem to be one who admires from afar rather than creating as I want to.

Evelyn, email me with your mailing address and I will send the goodies out to you!
Have a great day! Hugs and smiles

While creating yesterday’s card, I cut a strip of the MME Lime Twist Life is a Party Paper with the second die from MFT’s Retro Square Die-namics dies. It was too pretty to throw away, so I created another card with it. The card base is a 3 1/2″ x 11″ piece of  Neenah Solar White cardstock, folded in half. The upper 3/4 (and a bit of the back) was embossed with the Simplicity M-Bossabilities folder and that Life is a Party paper strip was adhered where the embossing ended.

A heart was cut out of Patina Fourz Bazzill cardstock with the smallest heart from Hearts a Plenty Die-namics die. It was topped with a pink button, tied on with silver cord and adhered with foam adhesive squares to the left hand side of the retro strip. A tiny arrow from MFT’s Flags & Tags Die-namics set was cut out of black cardstock and adhered to the right of the heart, pointing to the sentiment.

The sentiment was stamped with Melanie’s new Lots of Letters set in Tuxedo Black Memento Ink. The bottom corners of the card were rounded. Black and silver Rhinestones from Want2Scrap finish off the card. This card is another entry for the Keen on Neon Moxie Fab World Challenge.

Thanks so much for stopping by! Have a wonderful day.
Hugs and smiles

We have a new Member Company at Splitcoaststampers.  You know I love them, I use their stamps and dies all the time. Drum roll please………….the new member company is: Simon Says Stamp. Here are some cards I made with Simon Says Stamp products.

Thanks so much for stopping by today! Have a wonderful day!
Hugs and smiles

I am excited to be joining in the Gina K. Designs Design Team December Inspiration Blog Hop! Gina and the Design Team will inspire you with many beautiful ideas, and as you hop through their blogs, make sure to leave a comment on each of them because a few random comments will be chosen and those stampers will each win a grab bag of Gina K. Designs products! To see the full list of winners, check the Big News forum at Stamp TV a couple of days after the hops.

The new Melanie Muenchinger set called Lots of Letters  is just perfect for my new love of Clean and simple cards. It  is available in both clear photopolymer and red rubber.

This is the first letter and number set from Gina K. Designs and is packed with frames and elements that will help your stamped cards, pages or personalized designs shine!   Gina K. also carries matching Silhouette Studio cut files for only 99 cents each which make creating beautiful and professional cut designs with these stamps a breeze. The square and circles images are also perfect for your dies and punches, fitting perfectly in a ¾” or larger die or punch.

I created this card not just for Melanie’s blog hop, but also as an entry for the Keen on Neon Moxie Fab World Challenge.  I started with a 3″ x 5″ piece of white cardstock. The bottom right corner was rounded before I stamped the square stamp with the one rounded edge  four times in the right corner  (once in Mango Madness VersaMagic ink, once in Key Lime VersaMagic ink, once in Sea Breeze VersaMagic and once in Rose Bud Memento Ink). Hi was stamped in the orange square with Tuxedo Black Memento Ink.


More white cardstock was cut and embossed with MFT’s Retro Squares Die-namic die and adhered over a thin strip of MME Life of the Party patterned paper (old pack…I wish I had more. Love the funky colors). The white cardstock piece was adhered to the right hand side of the  card base, a 3 1/2″ x 11″ piece of Patina Fourz Bazzill cardstock, folded in half. The retro square strip was adhered to the left hand side, leaving only about 1/4″ of the Patina base showing.

A heart was cut out of orange Core’dinations cardstock with the smallest heart from Hearts a Plenty Die-namics die. It was topped with a button that was tied on with silver cord. The heart was adhered slightly above the center of the retro squares strip. Black rhinestones were added to the square strip and silver chevron rhinestones to the colorful stamped squares to finish off the card.

Please see Melanie’s blog for the full link list of blog hop participants! Also, if you come back tomorrow, you will see another card created with the Lots of Letter sets and with leftovers from what I used (or tried to use) on this car).  And this afternoon, I am posting some super exciting Splitcoaststampers news here! I am tickled pink about this!

Thanks so much for stopping by! Have a wonderful day!
Hugs and smiles

© 2012 fresh & fun Suffusion theme by Sayontan Sinha