I created this card for a Way to Use it Challenge (no fall colors) and a CASE study challenge.  I just LOVED the card we had to case and it made me create not just one but several cards. For this one I paired 3/4″ x 3 1/4″ wide strips of different colored blue Bazzill cardstock were adhered to a slightly bigger white base. I used the new Simon Says Stamp Curvy Snowflake die to cut a negative image in the center.  The edges were stitched and the snowflake die cut was adhered over the negative cut.

The layers were adhered to the card base, a 3 3/4″ x 10″ piece of Limeade Bazzill cardstock, folded in half. The bottom corners were rounded.

A piece of Solar White cardstock was cut and with Holiday Folded Banner die. The sentiment and frame is from the same named Simon Says Stamps exclusive stamp set and was stamped on the banner with Jet Black Archival ink. The banner was adhered to the lower right edge of the snowflake panel. Rhinestones on the snowflake and next to the banner finish off the card.

Thanks so much for looking! Have a wonderful day!
Hugs and smiles

P.S.: Today’s Holiday Blitz tutorial on Splitcoaststampers was created by Theresa Momber. She shows you how to turn a circle die cut into a darling basket.


I created this card a while ago for one of the Hope You Can Cling To challenges on Splitcoaststampers. It’s perfect for our new Crafty Friends Challenge, to use a sentiment as the focal point of the card.

Are you playing along with us? If not, you’re missing out on the chance to lift the spirits of women battling breast cancer at MD Anderson, and also on more than $6500 in prizes from your favorite crafty companies. So what are you waiting for? Get to stamping!

For my card I started by stamping the a frame from Lovely Labels 1 in Sea Breeze VersaMagic Ink on Neenah Solar White cardstock. It was cut out with a Label 18 Nestabilities die. A sentiment from Winter Wonderland was stamped in Jet Black Archival ink in the center of the label.

The bottom corners of a 3 3/4″ x 5 1/4″ piece of white cardstock were rounded before it was embossed with the Holiday Magic M-Bossabilities folder and it’s edges were stitched. The layer was adhered to the card base, a 4″ x 11″ piece of Seasalt Canvas Bazzill cardstock, folded in half. The sentiment label was adhered slightly hanging over the right hand side with foam adhesive squares.

Snowflakes were cut with Create-a-Flake 4 dies out of white cardstock and adhered to the upper left and lower right of the sentiment label. A Flourish out of white cardstock, cut with a the Ornate Artisan Tags and Accents die, was adhered to the right of the double stacked snowflake and rhinestones were added to the center of each snowflake. Part of a Finesse Rhinestone swirl finish off the card.

Check out my fellow Crafty Friends for more Sentimental inspiration:


It’s my turn to share on the Spellbinders blog again. This time I used a Medallion Die D-Lites die. I created the cards for the current CAS-ual Fridays challenge (use Kraft) and the CAS(E) this sketch challenge.

I hope you have time to check out the post! Thanks so much for stopping by! Have a wonderful day!
Hugs and smiles

Yesterday’s new tutorial on Splitcoaststampers was for the Concertina or Cascading Card. Cherie Franklin is the author, I shot the video.  For my sample my main image is from MFT’s darling Snow Angel stamp set. The image was stamped in  Tuxedo Black Memento Ink on  Neenah Solar White cardstock. It was colored with Copic Markers (Green: YG01, YG03, YG17    Red: R20, R22, R24, R29   Fur: E41, E42, E43    Snow: B0000, B000   Ear/Nose: R20, E40)  and cut out.

It was also stamped in My Mind’s Eye Winter Wonderland paper (red paper) and Carta Bella Merry & Bright patterned paper. The paper pieces were shaded with Copics, cut out, run through my Xyron and adhered to the cardstock image.

Winter Wonderland patterned paper was used to decorate the card sides.  The top corners were rounded and the top of the slanted pieces were topped with Solar White cardstock that was cut with Icicle Border Die-namics die.  The two larger Layered Label dies were used to create layers to place my image on.

More white cardstock was cut with the two smaller dies from Let it Snowflake die-namic dies, stacked and topped with a rhinestone from a Sleek Strips Silver Rhinestones.  Last I stamped a sentiment from Snow Angel on a piece of cardstock with a sentiment strip die.

Here is a video for the visual learner:

[youtube]https://www.youtube.com/watch?v=Whpy-eDRcac[/youtube]

Thanks so much for stopping by! Have a wonderful day!
Hugs and smiles

It’s Friday that means it’s Friends with Flair time at the Unity Blog.  I thought I share a card I made during the last VSN. This one was for Lori’s Glitter Window Challenge. I stamped the cute snow man family image from the Stamp of the week club Just Chillin’ stamp set  in  Tuxedo Black Memento Ink on Neenah Solar White cardstock. It was colored with Copic Markers (YG01, YG03, YG17, R05, R27, R39, BG70, Bg72, BG75, C00, C1, C3, BG0000, BG10) and cut and embossed with one of the Resplendent Rectangles Nestabilities die.

After cutting a frame out of Kraft cardstock with the same and the next size up Resplendent Rectangle dies, I realized that the regular glitter window technique wouldn’t work so well for these shapes. So instead I ran the image layer face down through my Xyron machine and rubbed loose glitter all over.  The frame and the image layer were adhered on another piece of Solar White cardstock and cut down to the size of the Kraft cardstock layer.

The card base was created out of a 9 1/2″ x 6″ piece of white cardstock, folded in half with the edges rounded.  the card front was covered with My Mind’s Eye Winter Wonderland paper patterned paper. White organdy Ribbon was tied around the layers and the bow was topped with a button tied on with embroidery thread.

The image was adhered over the card front with foam adhesive squares. The sentiment was stamped in Tuxedo Black ink on white cardstock, cut out and adhered to the lower right of the image. The lower part of the sentiment panel was colored with Copic Marker BG10 and topped with Stardust Stickles.

White cardstock was cut and embossed with two small Create a Flake 4 Spellbinders dies. They were adhered together with more foam adhesive square. A rhinestone was added to the center of the flake. It was then covered with Glossy Accents and Vintage Glass Glitter Shards were sprinkled over it. The snowflake was adhered to the top left of the image to finish off the card.

Thanks so much for stopping by! Have a wonderful weekend!
Hugs and smiles

Hello and welcome to Day 2 of our September Rubber & Die Release Showcase!

On Wednesday (19 September) Whimsy Stamps released this month’s new rubber designs, Shapeology dies, Whimsy Designer Paper packs and Shape EZ templates. From then until 25 September the Whimsy Stamps DT and Special Guests are showcasing these fabulous new goodies with a daily mini blog hop and I am part of today’s hop!

Each mini blog hop has a new release prize hidden somewhere along the way and you have 24hrs to enter each prize draw.

To be entered into today’s mini blog hop prize draw, be sure to leave a comment on ALL of the DT’s posts listed below by 12.00PM EST tomorrow. All winners will be announced on the Whimsy blog on 26 September.

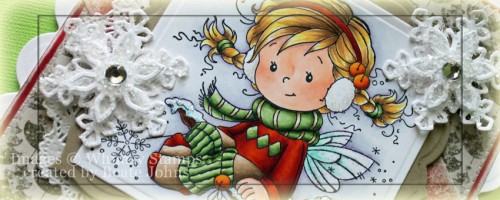
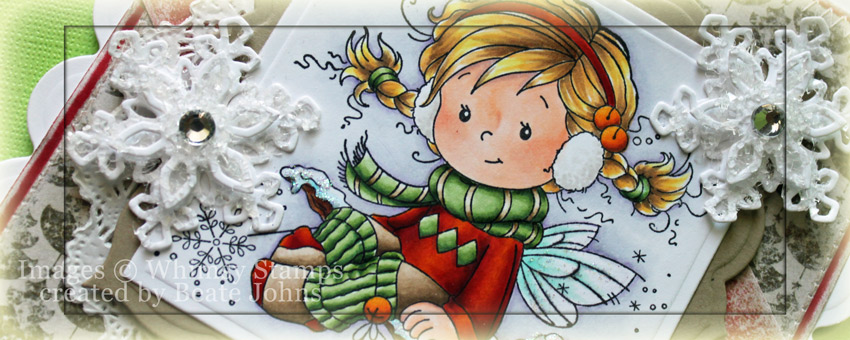
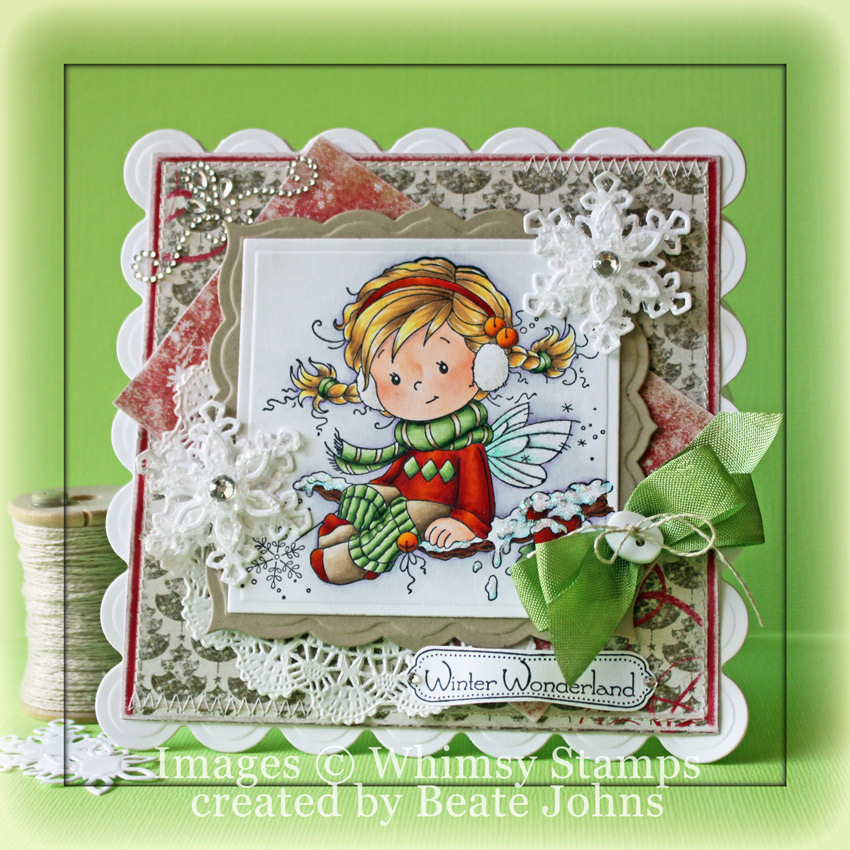
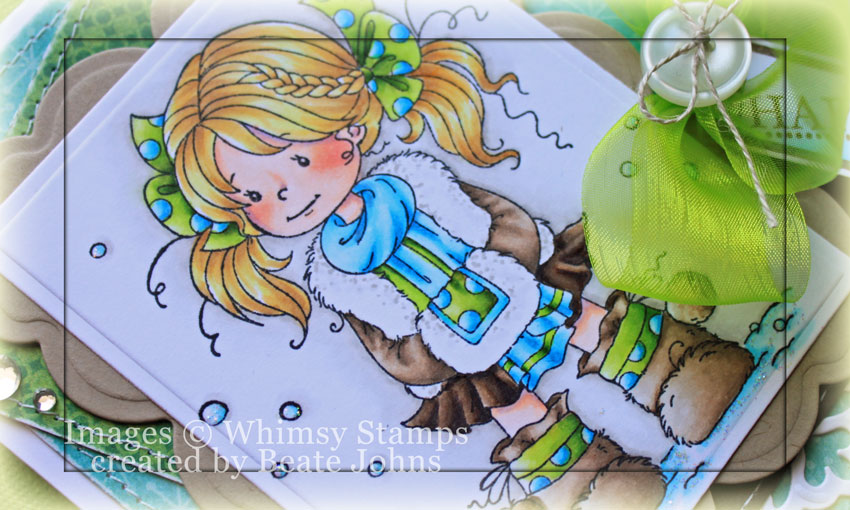
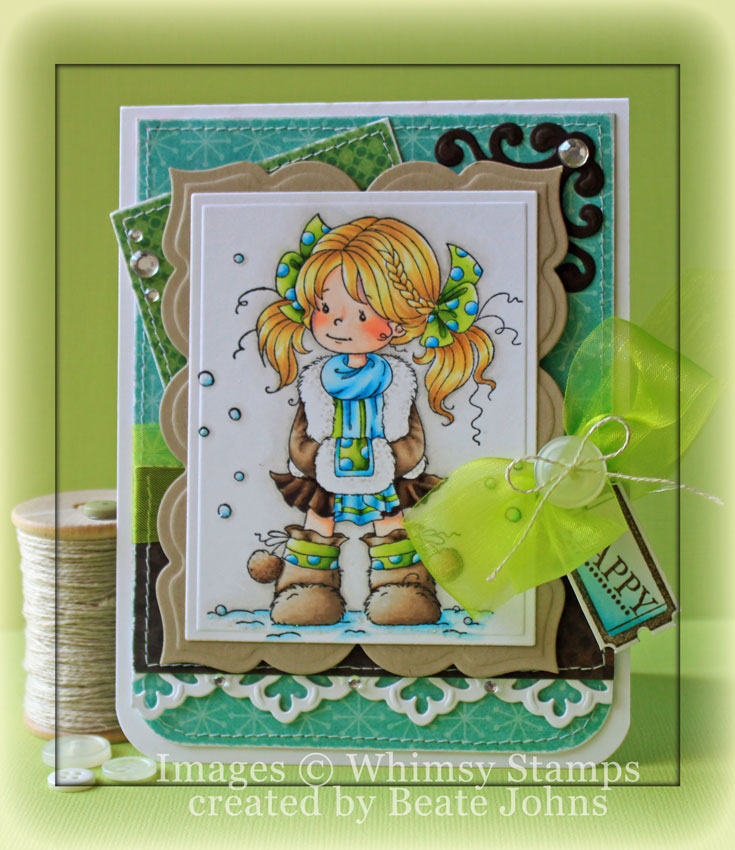
For my sample today I used the darling new Wee Image called Holly. I stamped it in  Tuxedo Black Memento Ink on Neenah Solar White cardstock . It was colored with  Copic Markers (Skin: E000, E00, E01, BV00 Hair: Y11, YR21, E43 Scarf/Stockings G40, G43, G46 Shirt/socks/berries: YR15, R05, R08, R27 Pants/socks: E41, E42, E43, E44   Leaves: G21, G24, G28   Branch: E23, E27, E29, E97    Wings: Bg10, BG11   Bells: Y35, Y38, E97    Snow: B000, B000    Ear muffs: W0, W1    Background: C0, C1, BV00) and it was cut and embossed with the largest of the Classic Square SM dies. The square was adhered to kraft cardstock, cut and embossed with the largest Label Twenty-Six die.

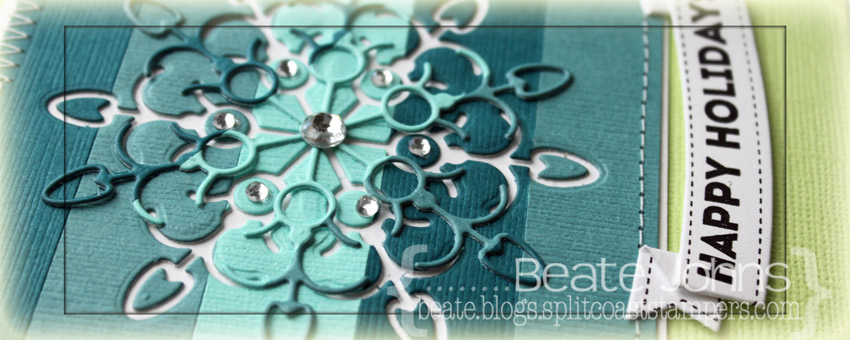
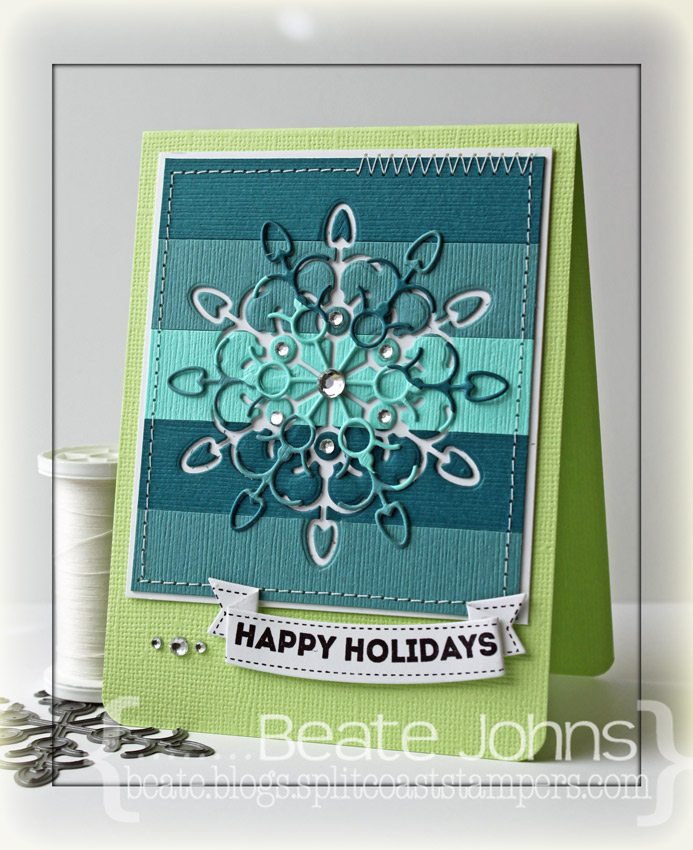
Vintage Christmas Paper was cut and embossed with the second smallest Grand Square Nestabilities die. The edges were sanded and stitched before it was adhered to white cardstock, cut and embossed with a Grand Scallop Square Nestabilities die. A 2 1/2″ x 4 5/8″ piece of Vintage Christmas paper was sanded and adhered diagonally over the card front. A paper doily was adhered to the lower left corner and the image layers were adhered to the center of the layers with foam adhesive squares.  Glitter was glued over the snow with Glossy Accents, and sparkle was added to the wings with  Frost Smooch Glitz.

Snowflakes were cut and embossed out of white cardstock, stacked with foam adhesive squares and topped with Vintage Glass Glitter Shards. They were added to the edges of the image. Green seam binding was tied into a double bow and topped with a button to be placed to the lower right side of the image.

A sentiment from the new Holiday Notables 2 was stamped in Tuxedo Black on white cardstock. It was cut out and adhered to the lower right of the card front. A piece of Fancy That! Border Bling on the top left finished off the card front. It was then adhered to the card base, white cardstock, folded in half and cut and embossed with the same Grand Scallop Square Nestabilities die.

To take a peek at today’s fabulous new release creations, please click on the links below…


Remember that the entire new release is available to buy right now from the Whimsy Stamps store along with all your Whimsy favorites.

Thanks for stopping by and don’t forget to pop back to the Whimsy blog tomorrow for more new release creations! Have a wonderful day!
Hugs and smiles

Hello and welcome to Day 3 of our January Rubber Die Release Showcase!

On Wednesday (18 January) Whimsy Stamps released this month’s rubber designs and new shapeology dies. From then until 25 January the Whimsy Stamps DT and Special Guests are showcasing these fabulous new stamps and dies with a daily mini blog hop.

Each mini blog hop has a new release prize hidden somewhere along the way and you have 24hrs to enter each prize draw.

To be entered into today’s mini blog hop prize draw, be sure to leave a comment on ALL of the DT’s posts listed below by 12.00PM EST tomorrow. All winners will be announced on the Whimsy Inspirations blog after 12.00PM EST on 25 January.

For my sample today I stamped the darling Wee stamp image Heidi in Tuxedo Black Memento Ink on Neenah Solar White cardstock. The image cut and embossed with the largest Classic Rectangle Nestabilities die and colored with Copic Markers (Skin: E0000, E00, E01, R20, BV00   Hair: Y11, Y21, E31   Scarf/dots: B0000, B000, B00, B01, B02   Shirt/Bands: E40, YG01, YG03, YG17   Jacket: E43, E44, E47, E49).  I chose the colors so it would work for this weeks Whimsy Challenge, which is the color combo brown/blue. I colored her cheeks really red because that’s how mine always look when I am cold outside on a winter day.

The image was adhered to a piece of Kraft Cardstock, cut and embossed with the largest Label 23 Nestabilities die and Stardust Stickles was added over the snow and snowflakes.

A 4″ long strip of white cardstock was cut and embossed with a Parisian Accent die and adhered under 1 3/4″ x 4″ piece of My Mind’s Eye MME 12 Days of Christmas patterned paper, which had the edges sanded.  The strip was adhered to a 4″ x 5 1/4″ piece of the same paper pack. The corners of that piece had been rounded and the edges were sanded and stitched.

Green organdy ribbon was tied around the layers and the bow was topped with a button, tied on with  Linen Thread. With the same Linen Thread a sentiment was attached. The sentiment is from the new Whimsy set called Celebration Mini Tickets. It was stamped in Tuxedo Black Memento Ink on Neenah Solar ink. It was cut out and colored with Copic Markers (B000, B00, B01).

A 2 1/2″ x 3″ piece of 12 Days of Christmas paper was sanded and adhered to the upper left hand side of the layers. The image was adhered to the center of the card with dimensionals. A piece of Canyon Brown cardstock was cut and embossed with the corner die of Parisian Accent die. That corner was adhered to the upper right hand corner. Rhinestones from the 72 Count Rhinestone pack finish off my card front.

To take a peek at today’s fabulous new release creations, please click on the links below…

Ann Vento

Deb Routledge

Dena Concienne

Erin Bailey

Iris Wiechmann

Jacque Beddingfield

Tammy Louise Cunliffe

Remember that the entire new release is available to buy right now from the Whimsy Stamps store along with all your Whimsy favourites.

Thanks for stopping by and don’t forget to check the Whimsy Inspirations blog tomorrow for more new release creations!
Have a great day!

Today’s tutorial on Splitcoast is written by Patty Bombyk. She shows us how to create a unique card fold she calls Double Dutch fold. It’s like a mix of a vertial card and a gatefold.

(Since I thought this tutorial would run last week, I made it a Christmas card. So bear with me and allow me to show you another Holiday card.) For my video tutorial sample I used the adorable Uru and Bird image from Whiff of Joy. The image was stamped with in  Tuxedo Black Memento Ink on Neenah Solar White cardstock, cut out with a Classic Square Nestabilities die and colored with Copic Markers (Hat, Shirt and Bird: R12, R14, R27, R29, E09   Star and dots on Shirt: Y15, Y17, E97   Shoes and Shirt: E55, E57, E59   Leggings and Ribbon: YG13, YG17, YG67, C0, C2   Bird House: E21, E23, E25, E27   Background: BG0000, BG000, BG01). The square was stitched to a slightly smaller square cut and embossed out of  Canyon Brown cardstock before the layers were adhered to a piece of Kraft cardstock, cut and embossed with a Label 15 Nestabilities die.

My card base was created out of Kraft cardstock. The bottom two corners were rounded. MME 12 Days of Christmas patterned paper was used to decorate the panels. A bow out of gold organdy Ribbon was topped with a red button, tied on with iridescent curling Ribbon and adhered to the lower right corner of the image. The image was adhered to the top part of the card with dimensionals.

A sentiment from Whiff of Joy’s Seasonal Greetings. was stamped in Tuxedo Black in on Solar White cardstock and cut and embossed with the smallest Petite Oval Nestabilities die. The embossed center was colored with Copic Marker BG0000, BG000. The sentiment was adhered to the lower right corner of the card front. Rhinestones from the 72 Count Rhinestone pack finish off my card front.

The inside of the card is kept simple as always. A slightly smaller piece of white cardstock, stitched with matching paper from the front and voila….done.

Here is a video for the visual learner:

[youtube]https://www.youtube.com/watch?v=6gUK5AsUO6s[/youtube]

Thanks so much for stopping by! Have a wonderful day!
Hugs and smiles

I created this card a while back for a Featured Stamper Challenge at Splitcoaststampers. The featured stamper that day was Tenia Sanders-Nelson. She has an amazing gallery of CAS cards. While those are not easy to make for me, I gave it a whirl. I picked Tenia’s Trick or Treat card and used Winter images from Lawn Fawn’s Cute Critters in the Snow.

I cut and embossed three circles out of Neenah Solar cardstock with Classic Circle Nestabilities dies. The small penguin image was stamped in each center with Tuxedo Black Memento Ink and colored with Copic Markers (Y15, Y17, YR15, C0, C1, C3, C5, C7, BG10, BG11). Glitter was added underneath each Penguin.

The card base is a 6″ x 6″ piece of Kraft cardstock folded in half. The card front was embossed with a Snowflake Embossing folder from Sizzix. A 3/4″ x 5 3/4″ piece of Echo Park Walk in the Park was stitched to a 1 1/2″ x 5 3/4″ piece of Echo Park Holly Jolly Christmas cardstock, after the bottom corners were rounded. Before the layers were adhered to the card base, May Arts Organdy Ribbon was tied around the paper strips. The ribbon was topped with a Basic Grey Button tied on with May Arts Silver Curling Ribbon.

The images were adhered over the ribbon with dimensionals. Silver Rhinestones and part of a Finesse Rhinestone Swirls finish off the card front.

Thanks so much for stopping by! Have a wonderful day!
Hugs and smiles

Merry Christmas! I hope you have a wonderful time with your family today! My wish for you is health and happiness for the entire next year!

Here is another card that you can find in the new Whimsy Magazine. I love the new Wee Images from Whimsy Stamps. They are just soooo cute and so much fun to color. For this card I used the image called Christmas Bunny. It was stamped in Tuxedo Black Memento Ink on Neenah Solar White cardstock and colored with Copic Markers (Bunny: E30, E31, E33, R30, R20, R22   Gifts: Y15, Y17, E97, R05, R08, R29, R39, YG21, YG23, YG17   Glove: BG10, BG11, BG13   Sled: E23, E25, E27). The image was cut and embossed with the largest Classic Circle Nestabilities die.

It was masked, cloud masks were added and the background was airbrushed with B02. To make the clouds look more dimensional, the bottom edges were colored with Copic Marker W00, W0 and W1. The image was stitched to a piece of Crayon Brown Cardstock that had been hand cut into a slightly bigger layer. Stardust Stickles was added the the snow on the ground and some of the snowflake circles in the image.


Strips of Echo Parks Holly Jolly Christmas paper were adhered to a 4″ square of the same paper pack. The paper was stitched to a 1/4″ bigger square of Canyon Brown cardstock.  More paper strips from that paper pack were adhered to a 5″ square which was in turn stitched to a 5 1/4″ square of Canyon Brown cardstock. White Organdy Ribbon was tied around the vertical strips before the paper layers were adhered to the card base, yellow Core’dination cardstock, cut and embossed with a Grand Scallop Square Nestabilities die.

A sentiment from the new Winter Notables stamp set was stamped in Tuxedo Black Memento ink on Neenah Solar White cardstock. The center oval was cut out and colored with Copic Marker B0000 and B000. It was adhered to the upper right of the image. Baby Bling Rhinestones were adhered underneath the sentiment and part of a Rhinestone swirl was adhered to the upper right and lower left of  layers.

Thanks so much for stopping by! Have a wonderful day.
Hugs and smiles


© 2012 fresh & fun Suffusion theme by Sayontan Sinha